Follow our easy, complete, step-by-step, photo illustrated recipe to learn how to make this moist and delicious Duke’s Mayonnaise Cake with Chocolate Frosting. Printable recipe included.

Duke’s Mayonnaise is used instead of oil and eggs to make this deliciously moist chocolate cake. We’ve even included a chocolate frosting recipe to go along with the cake. It’s a chocolate lovers dream cake.

I feel it’s only natural to think that adding mayonnaise to a cake is a bit, shall we say, “different.”
But, have no fear, I promise you’re going to love it if you will just try it. I certainly did, and I’m a big mayonnaise fan as you may already know. Plus, I’m truly a Duke’s Mayonnaise fan as any Southerner should be. It’s a staple in our kitchens here in the South.
If you could see my kitchen at this very moment, you’d find one opened jar of Duke’s in the refrigerator, and two unopened jars in the cabinets. It’s not possible to have too much on hand at any one time. Smile.
Mayonnaise is made mostly of eggs and oil, so even though we haven’t thought about it, it comes pretty natural to replace the eggs and oil from a cake batter recipe with just mayonnaise. It accomplishes the same thing. Duke’s, in my Southern opinion, is the perfect choice for this.
Duke’s recently published a new cookbook of their own with lots of other uses for their great product that I’ve slowly been trying here in the Taste of Southern kitchen. Things like adding a bit of mayo to my scrambled eggs, or spreading mayo on the outside of a grilled cheese sandwich before grilling it instead of butter. So far, I’ve been well pleased with all of them.
We just learn something new everyday as the old saying goes.
Duke’s recipe calls for water in the cake batter, but I’ve stepped that up by using buttermilk instead. Regular milk will also work, but the buttermilk just adds a greater depth of flavor. You decide.
I do hope you’ll try this cake. It’s really easy to prepare and turns out very moist and delicious. The frosting is sweet, so the cake is rich, and it doesn’t take a large slice to satisfy your cravings for chocolate. In other words, it will go a long way in serving your family and friends.
We’ll walk you through making the cake, the frosting, and assembling your cake in the steps below.
Ready to give it a try? Alright then, let’s head on out to the kitchen and… Let’s Get Cooking!

Mayonnaise Cake – You’ll need these ingredients to make the cake.
Frosting ingredients and instructions are listed further down.
Remember, we’re using mayonnaise instead of eggs and oil to make this one. Smile

Start by placing a bit more than 3 cups of All-Purpose Flour into your sifter. Sift the flour into a large mixing bowl.
Sifting helps aerate the flour. And, if you were back in the 40’s and 50’s, it would help you find any meal bugs that might be enjoying living in your flour. True story. We don’t worry about little bugs so much these days, but it still happens. Just saying.

Use a spoon to scoop flour from your bowl into your measuring cup. Take a butter knife and level off the top of the flour in the measuring cup. This is one level cup of flour.
Add 3 level cups of the sifted flour back into your sifter. I normally place my sifter on a plate because some of the flour will fall through the sifter as you pour the flour in. Just helps keep your work surface clean.

Add 6 level Tablespoons of Unsweetened Powdered Cocoa to the sifter.

Add 1/2 teaspoon of Baking POWDER.

Add 1/4 teaspoon of Salt.

Add 1 Tablespoon of Baking SODA.

Sift these ingredients back into the first bowl you used for the flour.

Add 1-1/2 cups Sugar to the flour ingredients.

Whisk all of the dry ingredients together until fully combined. Set aside for the moment.

Place 1-1/2 cups Duke’s Mayonnaise in a large mixing bowl.
My niece gave me a nice set of metal bowls with lids for Christmas. I like them, but the mirror like finish on the inside makes the photos of what’s in the bowl look a bit funny. Smile.

Add 1-1/2 cups of Buttermilk.
The recipe on the Duke’s Mayonnaise website calls for water in their recipe. You can easily replace it with milk or buttermilk for added flavor to your cake layers. Milk works great, but buttermilk seems to kick it up yet another notch. Just use what you have on hand.

Add 2 teaspoons of Happy Home Vanilla Flavoring.
I like the Happy Home brand of flavorings as much as I like my Duke’s Mayonnaise. I guess it’s just a Southern thing. Mama always used Happy Home Flavorings after we moved to the big city. Back in the country, we had a Watkins man that came around once a week, so that’s what she used back then.

Use a mixer on a lower speed to mix it all together until creamy smooth.

Gradually add the dry ingredients to the wet ingredients. Mix just until incorporated.
Okay, so I forgot to take a photo of that part. Please forgive me. I added about 1/3 of the dry ingredients to the mayo and milk mixture at a time, then mixed it together just until it was all combined. Repeat this step until it’s all mixed together.

Don’t overmix it. Just mix it until the dry ingredients are combined with the wet. Scrape down the bowl as needed. If you’re using buttermilk and it’s a bit dry, add just a bit more of the buttermilk. It seems to use a bit more buttermilk than just regular milk or even water.

Prepare two 8inch cake pans.
I lightly sprayed the bottom and inside walls of my pans with a baking spray. You could use butter and flour if you prefer. Then, I added a parchment paper circle to the bottom of each pan and sprayed the paper lightly as well.
Next, divide the batter between the two pans as evenly as you can.
Tap the pans lightly on your counter top to remove any air bubbles.

Pre-heat the oven to 350F degrees.
Place the pans on the middle rack of your hot oven and let them bake for 30 minutes or until they are done. Test them with a toothpick to be sure the centers are fully baked. The edges will also start to pull away from the pan when the layers are done.

When the layers are done, remove them from the oven and place them on wire racks to cool for 10-15 minutes.
I was pleased at how evenly these baked up to the tops of the pans. If you look closely at the bottom right corner, you can see where the thumb of my oven mitt pressed into the cake as I was taking it out of the oven. My layers usually aren’t up so close to the top of the pan. Smile.

After they cool for about 15 minutes in the pan, you need to remove them from the pans completely.
I placed another sheet of the parchment paper on top of the layer still in the pan, placed another wire rack on top of that, then squeezed the bottom and top wire racks together enough to where I could flip the entire thing over.
Then, I gently lifted the pan off the layers. As you can see, the top piece of parchment is now on the bottom. This should help keep the top of the cake layer from sticking to the wire rack.
The cakes came right out, and the parchment that had been inside the pan was still inside the pans. Parchment just makes cake baking so much easier. Trust me on this one.
The layers need to cool completely before you frost them. Let’s make some frosting, shall we?

Mayonnaise Cake Frosting Recipe – You’ll need these ingredients.
You’ll need to use softened butter, so leave it out on the counter awhile before you actually start making the frosting.

Place 1 cup of Unsweetened Powdered Cocoa in a large mixing bowl.
I didn’t sift mine, but I think you should. It certainly can’t hurt and it would eliminate most of the little lumps like you see above.

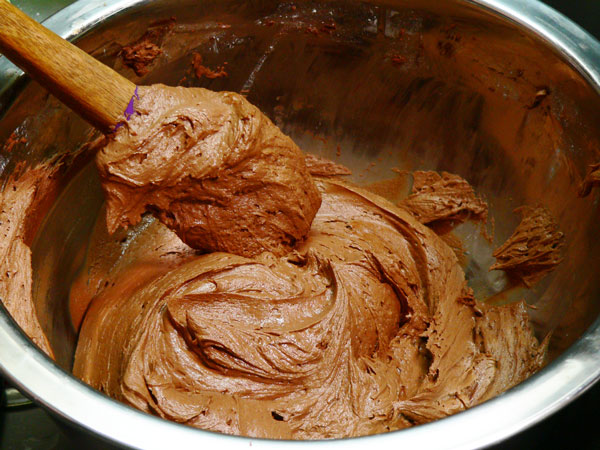
Add 1 cup of softened Butter to the Cocoa.

Use the whisk attachment on your stand mixer if you’re using one. I do have one, practically a brand new one, but I decided to do this the hard way I guess. As an old man that now does most of his cooking sitting down, it was just easier for me to do. Getting old is fun. Smile.
Of course, the cocoa is going to try to fly everywhere at first, so start out on the slowest speed until the butter starts working into the cocoa. This could take several minutes because you want to work it together until it’s creamy smooth. Don’t skimp on this part.

Add 1 teaspoon of Vanilla Flavoring.

Add 1 cup of Confectioner’s Sugar and 1 Tablespoon of Milk.
You will be adding a total of 6 cups of Confectioners Sugar and 6 Tablespoons of Milk, maybe a liitle more. Add 1 cup of the sugar and 1 Tablespoon of the milk at a time and mix it together just until it reaches a smooth and spreadable consistency at the end.
I ended up just adding the entire 2 pound bag of Confectioners Sugar. I did have to add some more milk to get it to this point. Making adjustments as you go is just part of the process.
I think I should have added some more milk to make it even creamier, but this is where I stopped.
The more you bake, and the more you experiment with frostings, the better you’ll get. I’ve never been much of a baker, but always wanted to learn how to decorate cakes. I just do the best that I can. Sometimes it works, sometimes it doesn’t, but they usually still taste good. Smile.

Assemble your cake.
I’m using a turntable for my cake. Makes it easier to spread and work with the frosting.
I’ve placed a cardboard circle on top of the turntable. Then, I place a dab of frosting on the cardboard and place the first layer on top of that. The frosting helps to hold the layer to the board and keep it from sliding around.
I’ve also placed strips of parchment paper under the edge of the layer. As I add frosting, the paper will catch it. When I’m finished, I just ease the parchment out and end up with pretty clean edges of the cake at the bottom.

I placed some of the frosting in a piping bag and spread a thick layer of frosting around the outer edge of the layer. Doesn’t have to be perfect, just creating a barrier for the other icing.

Then, add some more frosting to the inside of the first ring. Again, you’re not worried about how it looks. Obviously… right? Smile.

Use a spatula to spread and smooth the frosting, keeping it as even across the top as you can. You want it even so it covers the entire surface of the layer.

Carefully place the second layer on top of the frosting. Place this layer bottom side up. The bottom is always smooth and this gives you a smooth surface for your frosting on the top of your cake.
I put the first layer top side up by the way.

Use a spatula to add frosting to the outside of the cake layers. We’re just trying to get frosting on and to stick to the outside at this point. Add it all around the outside, top to bottom.

Plop a layer of frosting on top of the cake. You could use the piping bag and do the top the same way we did the bottom, but I think I got a bit lazy at this point and just winged it. Gotta have fun in the process you know.

Spread the frosting out evenly across the top and around the sides. Just do your thing and decorate it any old way you like it.
My frosting was a bit dry which made it a bit harder to spread. I worked with it until I got it looking this good and called it a night. Smile.
Use your talent and decorate it any way YOU prefer. I know you’ll do much better than me and I’m certainly okay with that.
I’m always afraid I’ll get it too thin and it will be runny I think. I had hoped to do a little piping around the edges, but my frosting wasn’t suited for that. I’m not giving up on it though and I hope you will not either. Like I stated earlier, it will still taste good.
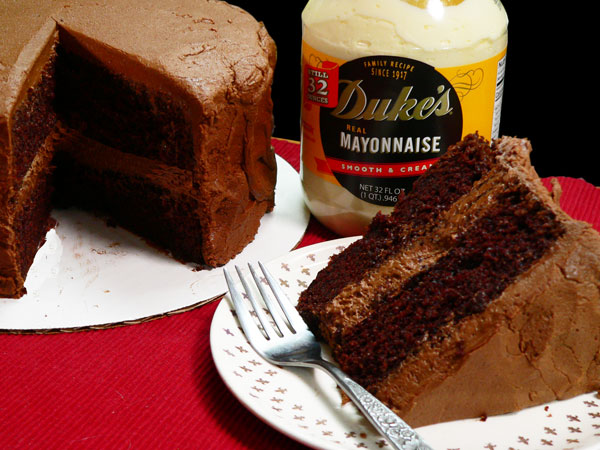
Enjoy!


