Japanese Fruitcake
Follow our complete, step-by-step, photo illustrated instructions to make this Southern favorite known as a Japanese Fruitcake. This old fashioned Christmas cake contains raisins in a spice flavored cake with a coconut and orange filling. Printable recipe included.
…
Japanese Fruitcake recipe
…
The weeks before Thanksgiving, up through Christmas were my Mama’s “time to shine.” She loved to cook, and she loved to share what she cooked, and baked, with family and with friends.
Dishes and baked goods we never saw at any other time of the year found themselves in Mama’s kitchen and on her tables throughout the holidays. I’m sure she was tired, after all she worked a full time job during the day, but always seemed to enjoy being in the kitchen afterwards.
I’m blessed to be able to remember Daddy, sitting at the kitchen table cracking open fresh coconuts, and removing the brown skins from the white flesh of the coconut so Mama could grate it down for her cakes and pies.
We spent most of our time in the kitchen and dining room area. They had heat. The fireplace in the living room didn’t generally have a fire in it except on weekends when company was expected. A small electric heater was in the bathroom in later years, but the bedrooms never did have heat. Just saying.
The kitchen cabinet, the one with the glass doors, would all at one time hold one of Mama’s Coconut Cakes, a Japanese Fruit Cake, maybe an Orange Slice Cake, and a couple of pies. And, let’s not forget the Icebox Fruitcake that was in the refrigerator.
It was definitely getting really close to Christmas Day when that happened.
Mama made Christmas special, in more ways than one. Wait, why are my eyes watering now?
I’m not sure, and haven’t been able to find, any real definition of why this is called a Japanese Fruitcake, it just is. Mama always seemed to bake one each Christmas as I recall.
This is another recipe from our family reunion cookbook that the family created years back. Members of the family submitted some of their favorite recipes, and the cookbook was created and sold for several years at our family reunions. Called the “Stewart Family Favorites,” this recipe for the Japanese Fruit Cake was submitted by Aunt Iva.
Often referred to as “Aunt Iver” (EYE-ver) our Southern speak changed her name a bit.
This version of the cake was submitted by her as one of her favorites. You’ll find various versions of this cake if you search around a bit. I think it was more dependent on what each family liked and/or could afford when they made one.
The layers have a spice cake flavor. It’s only fruit inside the layers are raisins. It doesn’t have an actual frosting, using a “filling” instead. The filling is made with oranges and coconut, and has a bright tropical type of flavor. Maybe the tropical flavors were suppose to make the long, hard and cold winters back then easier to cope with.
I do hope you’ll try our recipe, and I look forward to reading your comments and memories about the cake if you’d like to share them.
Ready to give our Japanese Fruitcake a try? Alright then, let’s head to the kitchen, and… Let’s Get Cooking!
…
Japanese Fruit Cake, you’ll need these ingredients to make the cake layers.
…
Japanese Fruitcake filling: You’ll need these ingredients to make the filling for the cake.
You can substitute whole milk for the canned milk if you prefer.
…
We’ll begin by sifting enough flour to make the layers for the cake.
You’ll need 4 level cups of sifted flour. Always sift the flour first, then measure.
…
Crack the eggs.
I always suggest that you crack the eggs in a small separate bowl. That way, if any eggshell falls in, you’ll be able to see it and easily remove it.
…
Grab a large mixing bowl and add the two sticks of softened butter. The butter needs to be at room temperature to begin making the batter for the cake.
…
Add the sugar.
…
Using a mixer on a lower speed, cream the butter and sugar together until smooth.
I set a timer to do this by. It just doesn’t happen in a couple of minutes. I set my timer for eight minutes and just hang on until the butter and sugar begin to look more like a frosting. It takes a little time and effort, but it makes a difference.
…
Add the eggs one at a time.
…
Mix the eggs into the batter just until they are combined. Do not over mix.
Repeat this process until you have added all four eggs, scraping down the sides of the bowl as needed.
…
Prepare the raisins.
Place the raisins in a mixing bowl, then add a couple of Tablespoons of flour to the raisins. Stir this together until the raisins are coated with flour. Set this aside for now.
…
Remember to always measure out flour in level cupfuls.
We’ll add the flour in small portions at a time, alternating adding the flour and the milk until we have mixed it all into the batter.
…
Mix the flour until combined. Do not over mix.
…
Add about one third cup of the milk at a time.
…
Mix the milk into the batter until it’s combined. Do not over mix.
Repeat this process until you have added all the milk and all the flour. You’ll do this in segments as follows, always starting with flour and ending with flour.
- One cup flour
- 1/3 cup milk
- One cup flour
- 1/3 cup milk
- One cup flour
- 1/3 cup milk
- One cup flour
Just mix each addition until its combined, scraping down the sides of the bowl as needed.
…
Add the cocoa.
…
Add the ground allspice.
…
Add the cinnamon.
…
Add the vanilla extract.
…
Mix the spices and vanilla into the batter just until combined.
…
Add the raisins.
…
Grab a large spoon and gently fold the raisins into the batter.
…
Prepare your baking pans.
I used a spray type oil that contains flour to lightly spray the bottoms of my 8 inch pans. Then, I added the parchment paper circles that I had cut out and lightly sprayed the tops of the paper.
You could also just lightly grease and flour the pans if you prefer.
…
Divide the batter as evenly as possible between the pans.
Use the back of your spoon to gently spread the batter evenly out in the pans. If you’re using parchment paper in the bottoms of your pans, you have to be extra careful when trying to spread the batter. It just wants to slide the paper instead of moving the batter. Take it slowly and you can spread it out.
Once filled, I lift each pan up off the counter about 6 or 8 inches high, then just drop it down onto the counter. This helps release any air bubbles that might be in the batter. Besides, it’s fun. Smile
…
Place the pans on the middle rack in your oven that has been preheated to 350F degrees.
I placed all three pans in my oven at one time, placing one pan in the middle and at the back of the oven, with the other two towards the front.
After about 20 minutes, I rotated the pans, pulling the one in back to the front and pushing the ones in front to the back, switching them around from one side to the other at the same time so they would bake more evenly.
…
Test your cake layers to be sure they are done by inserting a wooden toothpick into the center of the layer. If it pulls out fairly clean, without big crumbs hanging on, the layer is done. Remove it from the oven and place it on a wire rack to cool.
If the toothpick pulls out with crumbs attached, then let the layer bake for a few minutes longer until it will pass the toothpick test.
…
Prepare the filling;
When you’re ready to assemble your cake, start by preparing the filling. Scrape the zest off of one of the oranges, with a microplane if you have one. You could also use a paring knife to cut very thin layers of the outer skin off the orange, then chop the skin up very fine.
Don’t cut down into the white -pith- layer of the orange. It’s very bitter and you don’t want to use that part.
…
Take a sharp knife and slice away the pith part of the orange. Just discard this white part.
…
Cut the oranges into segments, making sure you save all the juice. Basically I just squeezed the pulp part of the orange out from between the tougher part that holds the segments together. I didn’t want that tough part in the finished pulp and juice.
I did this to BOTH oranges, but again, I only used the zest from one.
…
Place the milk in a medium sized sauce pot, over medium heat on your stove top.
Please note that I did not use the Evaporated Milk as pictured in the ingredients photo for making the filling. I used whole milk instead. I did use the Evaporated Milk in the layers though. Just saying.
…
Add the sugar.
…
Add the orange juice, zest, and pieces of orange to the milk and sugar.
…
Add the thawed coconut.
I used almost two bags of coconut, reserving just about 1/4 cup to garnish off the top layer.
…
You’ll need to keep stirring this as it comes up to a light boil.
Let it boil at a low simmer, stirring often, for SEVEN MINUTES.
Be sure to scrape all the way down to the bottom, so it doesn’t burn or stick.
…
Mix and add the cornstarch.
Mix the cornstarch along with about 1/4 cup COLD water, until the cornstarch has dissolved into the water. Add this “slurry” to the coconut mixture, stirring constantly.
The filling should thicken a little, but it will not get real thick.
Let it simmer for about four minutes longer, then remove it from the stove top. You also need to go ahead and empty this mixture into another bowl so it can cool quicker.
…
Remove the layers from their pans by first running a thin bladed knife around the inside of the pan to loosen the layer.
Place the wire rack on top of the layer in the pan. Holding the pan and rack together, flip it all over. The layer should easily fall from the inside of the pan.
…
If your layers have a large dome in the center, as often happens, you might want to use a large bread knife to level the tops of the layers. Just slide the blade through the layer, removing the high domed center of the layer.
I only did this with one layer, the other two turned out fairly flat on top.
…
I’m going to place this cake on a cake board. I’ve placed the board on a cake turntable to help in adding the filling. You could just place it directly on a cake plate if you prefer. Your choice.
I always add just a spoonful or two of frosting to the center of the board or plate before adding the fist layer. This helps keep the layer centered and from sliding around while you’re working with it.
…
Position the first layer on the board.
…
I forgot to poke some holes in the layer before adding the filling, but did it after the filling was on the layer. Use a wooden skewer to poke holes into the layer so the filling can sink down into the layer.
The filling is a bit runny, so just spread it to the outer edge of the layer.
…
Center the second layer on top of the first. Poke holes in the second layer.
…
Spread the filling over the top of the second layer. As you can see, it easily runs off the sides. Not to worry, we’ll clean it up once we finish.
…
Add the third cake layer. Center it up to the bottom two, then cover it with the filling. Let a little run down the sides, then wipe your plate or board clean.
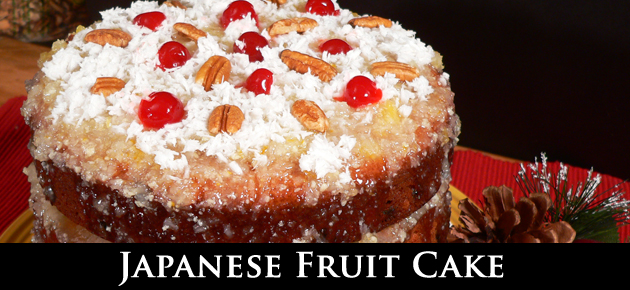
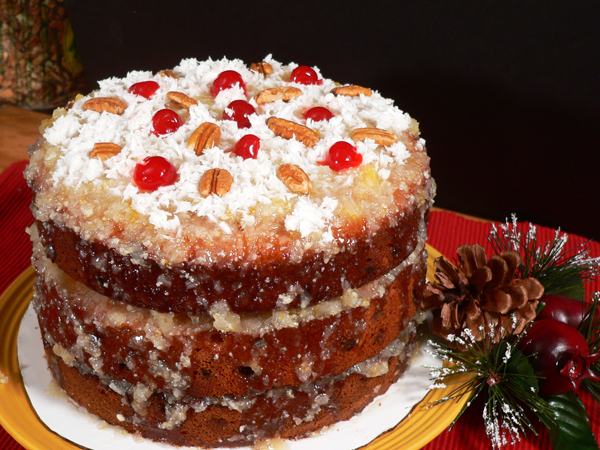
I added the little bit of coconut that I had reserved to the top, then added some Marashino Cherries and pecan pieces to the top to try and decorate it a bit.
I certainly don’t claim to be a cake decorator type of person, I guess that’s fairly obvious. Still, the cake certainly has that homemade look, don’t you think? Smile.
Let the cake sit for a few hours prior to slicing and serving… if you can wait that long.
Enjoy!
PS: Here are some other recipes here on Taste of Southern you might find of interest.
Mama’s Fresh Coconut Cake Recipe
…

Japanese Fruitcake
- Prep Time: 45 minutes
- Cook Time: 30 minutes
- Total Time: 1 hour 15 minutes
- Yield: 8-10 slices 1x
- Category: Desserts
- Method: Bake
- Cuisine: American
Description
Follow our complete, step-by-step, photo illustrated instructions to make this Southern favorite known as a Japanese Fruitcake. This old fashioned Christmas cake contains raisins in a spice flavored cake with a coconut and orange filling.
Ingredients
For the layers.
- 2 cups Sugar
- ½ lb Butter, at room temperature
- 4 Eggs, at room temperature
- 4 cups Self Rising Flour, sifted
- 1 cup Evaporated Milk
- 1 lb. Seedless Raisins
- 2 Tablespoons Cocoa
- 1 teaspoon Vanilla Extract
- ½ teaspoon Ground Allspice
- ½ teaspoon Ground Cinnamon
For the filling:
- 1 cup whole milk
- 2 cup Granulated Sugar
- 2 medium Oranges, zest from one, juice and segments from both.
- 2 cups Coconut, grated
- 2 Tablespoons Cornstarch
- ¼ cup cold water
Instructions
- Place the sugar in a large mixing bowl.
- Add the butter.
- Cream butter and sugar together until smooth, about 8 minutes with an electric mixer.
- Add eggs, one at a time, mixing together just until combined.
- Sift the flour. Measure out 4 level cups of sifted flour.
- Add about 2 tablespoons of the flour to the raisins, toss until coated. Set aside.
- Alternate adding flour and milk.
- Start with flour and end with flour, mixing after each addition just until incorporated into batter.
- Add the cocoa.
- Add the allspice.
- Add the cinnamon.
- Add the vanilla extract.
- Mix again, until spices and flavoring are just incorporated. Scrape down sides of bowl as needed.
- Fold the raisins into the batter.
- Grease and flour three 8 inch baking pans.
- Divide the batter evenly between the three pans. Tap lightly on counter to release air bubbles.
- Bake at 350F degrees until done. Test with a toothpick for doneness.
- Remove pans when done, place on wire rack to cool.
Prepare the filling
- Place milk in a medium sized sauce pot. Bring to a light boil.
- Add the sugar.
- Add the chopped oranges.
- Add the grated coconut.
- Let return to a light boil, cook for 7 minutes, stirring often so it doesn’t burn or stick.
- Mix the cornstarch in ¼ cup COLD water. Stir well to dissolve.
- Add the cornstarch mixture to the sauce pot. Stir to combine.
- Simmer for about 4 minutes, stirring often.
- Remove from heat and let cool. Stir several times as it cools.
Assemble the cake
- Place filling between the layers, on top, and on sides.
- Garnish with pecan halves and maraschino cherry halves if desired.
Keywords: Japanese Fruitcake, fruit cake, Christmas cakes, made from scratch, southern recipes
…
Your Comments: Have you ever heard of, or tried Japanese Fruitcake? What did you think about it? What memories do you have of this cake?
I’d love to hear your thoughts on our recipe. It will only take a minute or two for you to leave your comments in the section below.
Just remember, all comments are moderated. That just means that I personally read each and everyone before they are approved for viewing on our family friendly website. Thank you in advance for sharing.
…
Sign Up For Our Free Newsletter: While you’re here, be sure to sign up for our totally FREE NEWSLETTER. I’ll send you an Email every once in awhile to remind you when I post a new recipe, or when anything else of importance is going on around Taste of Southern. It’s totally free, and super easy to sign up. And, should you ever decide that you are no longer interested, it’s even quicker to unsubscribe. How cool is that? I’ll be looking forward to seeing you add your name to our list. The signup box is below and you’ll also find one in the top right hand corner of each page. I hope you’ll do it today.
Be Blessed!!!
Steve
..
Category: Desserts
My mom use to make these cakes and sell some. Hers did not have any milk except buttermilk in the layers. Her coconut orange filling was delicious with just orange juice, sugar, corn starch and coconut. I could eat it with a spoon. She used shortening in her layers and it called for 6 eggs. It made 4 spice layers. So so good!!!
I have made that fruit cake. You can find it on the internet. It is from the 1960’s by Borden who owned NonSuch mincemeat and condensed milk. I don’t know of any recipe that does NOT use Eagle Brand Milk. I add extra cherries and pecans to the recipe.
When I was a kid, my aunt used to ship us a Japanese fruit cake. She passed the recipe down to me, and I only made it once. I just love Japanese fruit cake…most people have never heard of before. Whenever they hear fruitcake, they think of the traditional fruitcake which I never liked. From what I understand, Japanese fruitcake originated in Georgia, and is one of Jimmy Carter’s favorite cakes. My recipe is different from this recipe. My recipe has two white layers and two spice layers…no chocolate in ingredients.
This cake brings so many memories of my precious mother. She only had the middle layer as spice. The other two were white. Also, she added crushed pineapple to the filling. Our dining room stayed cool and was a perfect place to keep all of the yummy baking that Mother did. It was my favorite dessert of the Christmas season. Thank you for bringing this wonderful memory of my childhood!❤
★★★★★
Help!!! My layers sunk! I followed your instructions exactly. I have never had this happen with any other cake. What did I do wrong?
Hi Jennifer, I’m truly sorry to hear you had problems with our cake. I’ve never experienced any problems making it, but that’s not to say I’ve not had problems with some other things I’ve tried to make. Sadly, we all do. It’s just part of the never ending learning experience. Its possible your layers didn’t bake long enough. Ovens vary a lot. Have you checked your oven temperature with an oven thermometer recently to be sure it’s holding the temp you want? It’s also possible you might have overworked the batter, or that your oven temperature was too high which could cause the layers to fall. Just guessing of course. I hope you’ll not give up on it and try it again sometime. Thank you for sharing your results and for your visit today. I hope you’ll stop by again… real soon. Be Blessed!!! -Steve
Why do you put cocoa in this cake?
Hi Teresa, With all due respect, I did it because it was called for in the recipe I was using. Smile. But, it gives the cake flavor and color as well. Not sure how it would taste without it but suppose you could omit it if desired. Thank you for the question. I wasn’t trying to be smart about my answer, just being truthful. I do appreciate your visit today and I hope you’ll visit with us often. Be Blessed!!! -Steve
My Dad and Mom made this cake at Christmas time. My very favorite cake of all time. Seeing this recipe brings back some really good memories.
Hi Judy, Thank you for sharing your comments with us. I’m glad we could bring back some memories for you with the recipe. I do hope you might try it sometime and let me know how it turns out in comparison for you. I appreciate your visit and do hope you’ll visit with us often. Be Blessed!!! -Steve
My mama like others used to make this cake. Mama has been gone for 19 years now and I’ve not had a japanese cake since. Family is going to be surprised when I use this recipe to make one. Using the recipe to make this cake is going to put me in a place that I will appreciate through tears. Thank you!
Hi Beverly, I do hope the recipe turns out close to what your Mama made. I’ll feel bad if it doesn’t. Enjoy the recipe. I do appreciate your visit and your comments and I hope you’ll stop by again… real soon. Be Blessed!!! -Steve
5/4/19 Thanks for this recipe, love how you show step by step making the recipe….it is so helpful…..can’t wait to make this cake….it sounds so yummy…..
Keep up the good work on these recipes…..I wish more places would do their recipes like you do…..
Wish we could send these to friends too,,,,could you put a Facebook , and email on here so we can send your recipes to friends ? I would love it…..and sure others would too….
Hi Kentuckylady717, I know you’ll enjoy the cake and trust you’ll share your results when you do. It’s my pleasure to share the recipes, and thank you for your kind comments and compliments. I’ve never done the Facebook thing so I’m sorry I don’t offer that option for you. But, I do hope you’ll direct your family and friends to our website. I’d greatly appreciate it. I appreciate your visits and do hope you’ll visit with us often. Be Blessed!!! -Steve
Went ahead and rated it….would love to make this, but 2 doesn’t like coconut !!! What do you suggest….guess I could just frost 2 layers with this frosting and then take the other layer and put another frosting on it right ? Hard to cook or bake for someone who doesn’t like something….I like cooking for people who are not picky…..
I wonder if you can put the coconut in a blender and blend it really fine….as I think what they don’t like about it is the texture of the coconut…..and I do agree with some coconut I have seen, the more you chew it the bigger it gets…..some just do not chew up well…..but if it was super fine the taste would still be there, just not the texture right??
Any other suggestions, would love to hear them from anyone…..
★★★★★
Do you have a recipe for fruitcake using Nonsuch mincemeat without using sweetened condensed milk ? To my shame the recipe died with my mom . It had the candied fruit and nuts and Nonsuch but that’s all I recall
Hi Karen, I’m sorry but I don’t have a recipe like you’re looking for. I’ve never tried the mincemeat although I did buy a jar at auction once. Brought it home and let it go bad before I ever tried it. Sorry. I hope you find what you’re looking for though. I’m sorry I couldn’t be of help. I greatly appreciate your visit and hope you’ll visit with us often. Be Blessed!!! -Steve
Karen Gayles 5/4/19 (Leaving a reply for Karen Gayles)….the Nonsuch Mincemeat can be found at most all the grocery stores….do you have a Kroger or Wal Mart or a Meijer in your area? It would be in the baking aisle…..if you don’t see it ask someone who works there and they can let you know where it is or if they have it…..
I’ve been shopping here at my store for yrs. and still can’t find some things I’m looking for, so I just find a person stocking a shelf or other and ask then, they are very helpful in finding it for you…..Good luck…..hope you find it….. 5/4/19
I have made that fruit cake. You can find it on the internet. It is from the 1960’s by Borden who owned NonSuch mincemeat and condensed milk. I don’t know of any recipe that does NOT use Eagle Brand Milk. I add extra cherries and pecans to the recipe.
Just like my sweet Nanny used to make! I haven’t thought of this in 40 years! Made it this morning and the memories came flooding back!
★★★★★
Hi Lynn, I’m glad we could bring back some of those good memories of Nanny for you. I hope you enjoy the Japanese Fruitcake. It was always one of my favorites at Christmas. I appreciate your visit and do hope you’ll visit with us often. Be Blessed!!! -Steve
My grandmother made this every christmas,after she passed,my mom has made these.soo good..Thank you
Hi Debbie, Happy to hear that your mom has been carrying on the family tradition with the Japanese Fruitcake. Have YOU made one yet? Smile. Got to keep it going you know. Thank you for sharing your memories of this cake with us. I do appreciate your visits and trust you will stop by again… real soon. Be Blessed!!! -Steve
My mom made this when I was young. Thanks for the recipe, along with the picture. Going to try it for Christmas this year
★★★★★
Hi Karen, It’s my pleasure to share the recipe. I hope it turns out well for you. Thank you for trying it. I’m thankful for your visits and do hope you’ll visit with us often. Be Blessed!!! -Steve
My grandmother used to make a cake like this and put it in a box with apple and orange peelings around it. I want to make one but I can’t remember if she did the filling before or after she let the cake set a week or longer. Which do you think would be the best way to do it?
Hi Leamon, You’ve certainly shared something new with me on this one. I’ve never heard of placing apple and orange peelings in a box with the cake. I guess it’s suppose to add some flavor, but what happens when the peelings go bad? Maybe she did another type of fruitcake that had some alcohol involved. Is that a possibility? If you plan to make this Japanese Fruitcake and let it set for awhile, you’d probably be best off waiting until you’re ready to serve it to add the filling. You could make the layers ahead of time, wrap them well in clear plastic wrap and freeze them until a day or so before serving. Remove from the freezer, let them come up to room temperature, then add the filling. If you find out more about those peelings in the box, please let me know. Maybe some of our readers might be familiar with it as well. Thank you for the question, I’m sorry I couldn’t be of more help. I appreciate your visit and do hope you’ll stop by again… real soon. Be Blessed!!! -Steve
Are you sure you aren’t my cousin? sounds like we grew up in the same house. My grand mother always made this cake but it had what she called 2 black layers ( made with cocoa , cinnamon, all spice and cloves). And 2 light layers. She was an amazing cook…. and cooked in a wood stove for which I always gathered wood. She would always make my favorite egg custard as pay for helping .I also got to churn butter every Saturday . I am the proud owner of my mothers hand written copy of my grandmothers recipe.
Hi Peggi, I’m sure you treasure that handwritten copy. Those are my favorites when I can find them. I’ve heard of making the dark layers and the light layers, but don’t recall that Mama ever made hers that way. It was good though. Smile. I appreciate you sharing your comments with us, and I do hope you’ll stop by again… real soon. Be Blessed!!! -Steve
This was my Daddy’s favorite Christmas cake. My Aunt Pauline made it for him every year until she passed away. When I was married and more experienced in baking I made it as a surprise for him one Christmas. He ate it excitedly and said it was as good as Aunt Pauline made. That was the best complement ever!
Hi Judy, Thank you for sharing your memories with us regarding the Japanese Fruitcake. I’m glad you were able to finally make one for your dad and truly sorry to hear he is no longer with you and the family. I bet you made a really good one. Thank you for your visit and taking the time to comment. I do hope you’ll visit with us often. Be Blessed!!! -Steve