Follow our easy, step-by-step, instructions to learn how to make this Classic German Chocolate Cake recipe. We’ve even stepped it up with the addition of a Chocolate Buttercream Frosting, but you can leave that off if you desire.
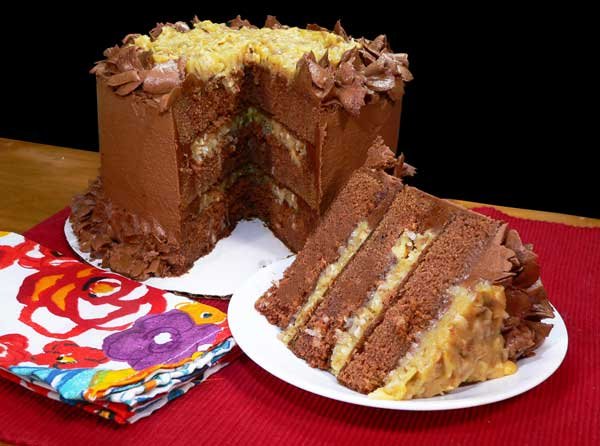
Our German Chocolate Cake recipe with a Coconut-Pecan filling. You can make it without the addition of our Chocolate Buttercream Frosting, but it’s so much better with both.
It isn’t easy, but it IS elegant.
That’s what one of the advertising pieces from back in the late 50’s said about making the Classic German Chocolate Cake from scratch. It IS a little bit “involved,” but it sure is worth the effort once you get it completed.
We’ve taken the classic version of this cake and stepped it up a notch with the addition of our Chocolate Buttercream Frosting. It’s just the way I know this cake best. You can make yours without it if you prefer. Smile.
We’ve got a small chain of grocery stores here in North Carolina that makes this cake with the buttercream frosting, and I’ve come to prefer it that way as opposed to just adding the filling between the layers and on the top. The store sells a whole cake for 12.99 as of this writing. I don’t know how they do it.
The cake isn’t actually difficult. It’s just got a few extra steps you’ll need to take to complete the layers and the filling. Little things like chopping up a sweet chocolate bar, whipping egg whites, and toasting pecans. But, if you have a chocolate lover that you’d like to impress – THIS is your cake.
I’ve never claimed to be much of a cake decorator. I don’t bake a lot of cakes, but I do love cake. I have just yet been able to figure out the proper consistency for making frosting that you can pipe and decorate with. Then, my hands aren’t very steady. Then, my hands are so warm the frosting warms up in the piping bag and doesn’t do what I want it to do. Then, I just don’t have the talent for it. Do you get the idea?
So, set aside a little extra time and make one deliciously moist and awesome German Chocolate Cake. We’ve got all the photos and steps below to help you along the way.
Ready to give it a try? Alright then, let’s head on out to the kitchen, and… Let’s Get Cooking!
German Chocolate Cake – You’ll need these ingredients to make the layers. I’ve got the ingredients for the coconut-pecan filling further down in the recipe. And, if you want to add our chocolate frosting, which is an optional addition, you can click this link to see how to make our – Chocolate Buttercream Frosting.
Butter and eggs should be at room temperature before you begin.
Let’s begin by first sifting the cake flour. The flour gets packed down during packaging and shipping, and it needs to be aerated before you measure it out. Just sift a little more than you think you need into a large bowl.
Once the flour is sifted, measure it carefully. Spoon the sifted flour into your measuring cup, then level across the top with a knife. This will give you one level cup of flour for baking. Smile.
Measure out all the needed flour into another mixing bowl. Then, add the BAKING SODA. Please note this is baking SODA and not baking powder. There is a difference.
Add the salt.
Use a whisk or a fork to mix all the dry ingredients together. Set aside for now.
Place the room temperature butter and the sugar into the bowl of your mixer.
I’d like to add that this is the very first time I’m using my new KitchenAid mixer. I’d wanted one for a long time, and finally bought one in the Fall of 2019. Never used it until I made this cake. Thank you for listening.
Cream the butter and sugar together on Medium speed until the mixture is creamy and smooth. This will take several minutes.
Did I mention my new mixer is RED?
Chop the chocolate bar into small pieces.
You really want to be using a Baker’s German’s Sweet Chocolate Bar in this recipe. The cake is named after English-American chocolate maker Samuel German. German created the formula for the dark baking chocolate used in the recipe back in 1852. It’s a sweet chocolate and is the original chocolate used to make the cake.
The cake itself, was created in 1957 by a lady from Dallas, Texas. The rest as they say – is history.
It really should be called German’s Chocolate Cake and not just German Chocolate Cake. Many folks these days use a dark chocolate bar instead of the sweet German’s chocolate bar. But, the choice is always yours. I’m just the fellow sharing the information. Smile.
Place the chopped up chocolate in a half cup of boiling hot water. Give it a good stir until the chocolate has all melted. Set this aside and let it cool while we separate the eggs.
Separate the egg yolks. I always suggest that you break the egg into a small bowl first. That way, should the yolk break, you’re not going to get any of the yolk into your egg whites. I use this handy little gadget that I’ve had for years to separate the yolks from the whites. It works most of the time, but I did break one while taking these photos.
Place the yolks in one bowl and the whites in another. We’ll use the whites later in the process.
Scrape down the bowl as needed once the butter and sugar have been creamed together.
Start the mixer up again, and add the egg yolks one at a time, mixing each one in after you add it.
Scrape down the sides and bottom of the bowl again, then add the vanilla flavoring.
With the mixer running, gradually pour in the chocolate syrup mixture.
Once the chocolate is mixed in, we’ll start gradually adding the flour.
We’re going to alternate between adding flour and buttermilk in this order.
Add about one third of the flour.
Add half of the buttermilk.
Add another third of the flour.
Add the other half of the buttermilk.
Add the final amount of flour.
Simple enough. Let’s do it.
With part of the flour mixed in, I’m adding half of the buttermilk, It will only take a few seconds to work the flour or buttermilk in after each addition. You don’t want to over work the batter, just mix it enough to mix in each ingredient. Scrape down the sides of the bowl, the bottom of the bowl, and the beaters as needed.
With the flour and the buttermilk mixed in, let’s prepare the baking pans.
I used a baking spray that contains flour. I lightly sprayed the bottom of the pan, then I added a parchment paper circle cut to fit the inside of the pan. Press this down so it sticks, then spray the parchment paper and around the sides of the pan until they are lightly coated.
The parchment paper really is a good investment. You can purchase ready cut circles or just buy a roll and cut your own circles to fit. It makes removing the layers intact so much more dependable and easier.
You’ll need a totally clean mixing bowl to whip up the egg whites in. I transferred the batter to another bowl, washed and dried my mixing bowl then put on the wire whisk. I beat the egg whites on Medium speed after adding them all to the bowl.
It will take a couple of minutes to whip the egg whites up to where they will form stiff peaks. It always amazes me that egg whites alone will do this. Smile.
Place about one fourth of the whipped egg whites into your bowl with the batter.
Use a spatula and stir the whipped egg whites into the batter until fully combined.
You’ll need to be more gentle with this step. Add the remaining whipped egg whites to the bowl of batter.
Gently FOLD the whipped egg whites into the batter. Scoop down from the bottom of the bowl and fold the batter over on top of the egg whites. Repeat this process just until you’ve incorporated the whites into the batter. You don’t want to deflate the egg whites, so you need to do this gently.
Divide the batter between your three prepared pans.
I do this with a large spoon, placing batter in each pan as I go. Just do your best to get an equal amount in the pans.
I recently started using these cloth baking strips around my pans. They keep the layers from forming a dome in the middle as the layers bake. It’s a little extra effort, but the layers turn out fairly flat on top and you don’t have to worry about cutting off the dome. Of course, that means you don’t get to eat the cake scraps either, but be patient, you’ll get to enjoy the cake itself shortly.
These were made by Wilton brands and I ordered them online. You’ll find them in lots of stores that sell baking supplies. You soak them in water, squeeze them out a bit, then place them around the outside of each cake pan before placing them in the oven.
I liked them a lot. That is, until I was trying to snug one down and caught my thumb nail on part of the strip and split it about a quarter of an inch right down the middle. Ouch. It did hurt, but I lived through it. Not to worry, I’m okay.
Bake the layers in an oven that has been pre-heated to 350F degrees. The layers need to bake for about 30 to 35 minutes or until they pass the toothpick test for doneness.
You can insert a wooden toothpick into the center of the cake. If it pulls out clean and free of crumbs, the layer is done. If it is wet looking with crumbs, you need to bake it a minute or two longer.
Another good indication is if the layers have pulled away from the side of the pan and the center of the cake springs back when lightly pressed.
Place the cake pans on a wire rack or folded towel and let cool about 8 to 10 minutes.
After the cakes have slightly cooled, flip them over and out of the baking pan onto a wire rack. Gently pull off the parchment paper.
Let the layers cool completely on the wire racks while we make the filling for the cake.
Coconut Pecan Frosting – You’ll need these ingredients.
This is the frosting, or filling, for our German Chocolate Cake.
Please note that this will make enough frosting to place between the layers and on top of the cake, but doesn’t make enough to frost the outside of the cake. If that’s what you want to do, you should make a double batch of this.
I prefer to toast my pecans first. Lightly grease the bottom of a small sheet pan and spread the pecans out in one single layer.
Place the pecans in an oven that has been pre-heated to 350F degrees. Let them stay for only about 5 to 8 minutes until slightly toasted. Do not burn them.
Chop the pecans when cooled. Set aside for now.
Place the sugar in a medium sauce pot.
Add the evaporated milk.
Add the LIGHTLY BEATEN eggs. Ooops, I missed that part, but I got it before they started cooking. Sorry, my bad. Smile. Now, tilt your head and tell me if that looks like a smiley face in the pot? Is it just me?
Add the butter.
Add the vanilla.
Place the pot over Medium heat. Stir it constantly as it heats up and until it thickens. This will take about 10 minutes. It may begin to rise in the pan as it heats up, but it will stir down so keep stirring.
Once it begins to thicken, remove the pot from the heat.
Add the chopped pecans.
Add the coconut.
Stir everything together until fully combined. You’ll need to let the mixture cool some before placing it on your cake. Stir it occasionally as it cools and gets down to a good spreadable temperature.
If you’re not going to add our Chocolate Buttercream Frosting, you can spread this Coconut-Pecan frosting between the layers and on top of your cake and call it a day. Smile. It will be good either way you decide to finish the cake.
Assemble your cake: I’m going all out and using both the Coconut-Pecan for filling, and our Chocolate Buttercream Frosting. I’ve got my turntable to hold my cake, with a piece of drawer liner cut to go across the top. This holds my cake board in place while I turn the cake to decorate it.
Place the cake board or plate on the turntable, then spread a small amount of frosting over the top. This will hold the cake layer in place on the cake board.
Place the first layer on the cake board and gently press it down so it holds on the board.
Use a piping bag filled with the Chocolate Buttercream frosting and a large round tip, and pipe a circle of frosting around the outer edge of the layer. This should be about 3/4ths of an inch in height. This will create a wall or barrier to help hold in the filling.
Spread a layer of the filling inside the barrier wall. Level it out.
Add the second layer of cake on to the top of the first layer. Repeat the process with the barrier and the filling.
Add the third cake layer. I like to place this one bottom up so I have a flat surface on the top of the cake to work with.
Spread a thin layer of the buttercream frosting across the top and around the outside of the layers. Smooth it out fairly smooth but you don’t have to get carried away with it.
This thin layer is called a crumb coat. It helps hold any loose crumbs that might be on your cake that could get into the frosting. That way, when we apply the second layer of frosting, the crumbs are glued to the cake and don’t end up in the visible layer of frosting. Make sense?
Once you’ve applied this thin crumb coat, place the cake in your refrigerator for 30-45 minutes to let the frosting firm up.
Apply the final layer of frosting to the top and sides of the cake.
Smooth out the frosting on the outside of the cake. I use a flat cake decorating tool designed just for this purpose. We don’t have to worry much about the top because we’re going to cover that with filling and more frosting.
Use the frosting to pipe some flowers, or in my case some “floppy flowers” around the top layer of the cake. I still haven’t figured out the right consistency of the frosting to be able to make any decorative flowers or anything else. And, my hands keep the frosting pretty warm while I’m trying to work with it. I’m sure you can do much better.
Spread a layer of the filling in the center of your flowers and finish decorating your cake as desired.
As we said at the beginning, “It isn’t easy, but it IS elegant.”
Here’s another look.
Enjoy!