Follow step-by-step, photo illustrated instructions for making our favorite Southern Sweet Potato Pie from scratch. We’ll show you everything, from how to make the pie crust, to how to bake the Sweet Potatoes, to how to put it all together. Much easier to make than you might expect, and certain to bring lots of happy smiles and hugs of gratitude from anyone lucky enough to get a slice. Printable recipe included.

Southern Sweet Potato Pie Recipe, made from scratch.
My Aunt Bessie, was one of my mothers sisters. Her family lived in another town from us and I didn’t really get to spend a lot of time with them while I was growing up. She had several sons and daughters that were older than I was. One son was near my age however, and about the only memories I have of playing with him was when we had birthday dinners for Grandpa, or maybe at one of the yearly family reunions. Still, being cousins, we acted like we had just seen each other the day before despite that it had probably been a year ago.
This recipe is one that Aunt Bessie contributed to the Family Cookbook that was printed back in 1999 for one of our family reunions. I love church cookbooks and old family type cookbooks that were usually made as some type of fundraiser. I’m always on the lookout for them when I get the chance to visit some Flea Markets, Yard Sales, or the local auctions.
They usually have some interesting recipes, but they always seem to lack very much detail as to how to actually prepare the recipe. That’s when you wish you could call Aunt Bessie up and ask her a question or two. Don’t you wish Heaven had telephones?
I will almost always go to the Family Cookbook first when looking a particular recipe. There aren’t all that many of them, but I always enjoy flipping through the pages and seeing what name goes along with what recipe.
You can certainly find a large variety of recipes for making Sweet Potato Pie. What makes this one any different you might wonder. I like the fact that it’s just pretty straightforward and simple. It doesn’t use eggs, it doesn’t use brown sugar, and it can be made just as easily using a ready made pie crust, or one you’ve made from scratch.
“The Sisters,” learned how to use those ready made crusts in their later years just like everyone else. Still, I think there’s just something truly special about being able to say you made a pie entirely from scratch. We’re using Baked Sweet Potatoes and we’ve made the crust from a recipe we have already posted here on Taste of Southern called the Basic Pie Crust Recipe.
Prepare the dough for the crusts ahead of time, freeze it, and you’ll be ready to make pies about any time you get in the mood. I really think you’ll like the simplicity of this one, and that you’ll enjoy the mild taste that’s not overpowered with lots of spices. I do hope you’ll give it a try and I’ll look forward to reading your Comments in the section below. Ready to give Aunt Bessie’s Sweet Potato Recipe a try? Alright then, Let’s Get Cooking!

Sweet Potato Pie Recipe: You’ll need these ingredients.
You’ll find the full step-by-step, photo illustrated recipe for our Basic Pie Crust Recipe here.
You’ll find the full step-by-step, photo illustrated recipe for Baked Sweet Potatoes here.
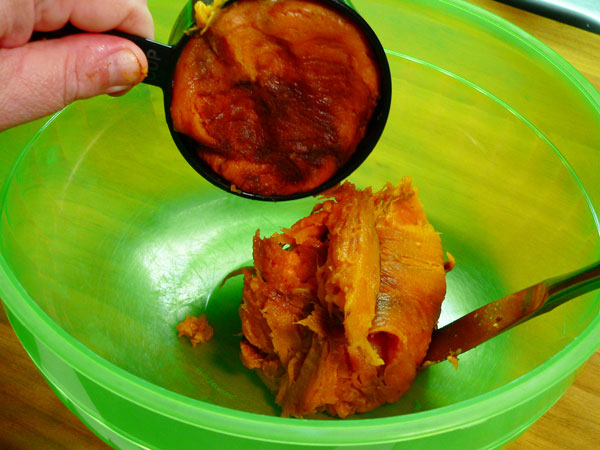
In a large mixing bowl, add the 2 cups of Sweet Potatoes. It only took 2 baked Sweet Potatoes for this recipe. I just peeled the potatoes, then pressed it into my measuring cup to get the proper amount. Two potatoes worked out perfectly.

Grab your potato masher, or something similar, and mash the potatoes. Don’t have a potato masher? Just mash them with a couple of forks, working out any lumps. We’ll work them up some more later when we use the hand mixer.

Add the Granulated Sugar.

Add the Evaporated Milk. I’ve pretty much gone to using Evaporated Milk in all my baking. I just never seem to have the regular stuff around when I need it. Either I don’t have enough, or I’ve let what I did have go bad. I strongly suggest that you keep several cans of Evaporated Milk in your pantry at all times.

Add the Happy Home Pure Vanilla Flavoring Extract. I also suggest that you keep a bottle of this stuff handy at all times. One day, I hope to write up one of my early memories of using Happy Home flavorings. Growing up, the church sold lots of Happy Home products as fundraisers. The Southern Flavoring Company still makes it available for such purposes. Mama always had the Lemon Flavoring and the Vanilla Extract on hand.
They aren’t paying me to endorse their products, but in all fairness, they did send me several sample bottles to test and use. I’ve even been invited to tour the plant next time I’m in the area. So, don’t forget, Evaporated Milk and Happy Home Vanilla Extract. You’ll need it to make some really great snow cream one day. It pays to be prepared.

Add the Nutmeg.

Add the Ground Cinnamon.

Add the melted Butter.

Using a hand mixer on low speed, beat the ingredients together.

Crank the speed up just a bit and whip the potato mixture until it’s sort of fluffy.

Go ahead and turn the oven on to 400º, and let it be warming up.
You could certainly use a ready made pie crust to make this pie. Or, even some of that ready made crust dough that’s so readily available these days. But, for true made-from-scratch pie, why not make up some of your own pie crust dough and keep it on hand. I will make up about 3 or 4 of these at a time and freeze them for later.
You’ll find our step-by-step, photo illustrated instructions for making a Basic Pie Crust right here on Taste of Southern. The recipe makes enough dough for one crust but can easily be doubled. Once you’ve worked it together, wrap it in plastic wrap and place it in the freezer until you need it. That way, you can always say, “YES, I made it all myself.” It’s a good feeling. You can do it.

Roll out the dough a bit larger than your baking dish. You’ll want some dough hanging over the edge and of course, you’ll need enough so it can drape down inside the pie plate itself.
BE SURE to spread a layer of butter around the inside of your pie plate before adding the dough. I didn’t get a picture of that step but wanted to be sure to remind you to do it.

I like to roll out the dough, then slip my scraper up under it to be sure it’s not sticking to the board anywhere. Then, I gently roll it around the rolling pin itself so I can easily transfer it over to the pie plate.

Just unroll the dough across the top of your pie plate and let the dough settle down into the dish on it’s own as much as possible. You don’t want to stretch the dough as you work it into the edges of the plate. It will pull back as it starts baking, so work it gently.

Let it settle down into the dish and then gently press it in around the bottom edges. You should have some dough overlapping the top edge and it should be centered into the plate before you start doing this.

Use a sharp knife, or kitchen shears, and trim off any large amounts of dough that overhang around the edge. You’d like for it to be as even as possible, all the way around, with about 1/2 to 1 inch of overhang.

I take the excess and fold it back in towards the center of the plate. This forms a bit of a lip all around the edge. Any tears can be patched with pieces of excess dough that you just trimmed away.

As your pie-making skills improve, you can get into all that fancy edge decorating stuff. But, for starters, let’s just do like mama always did. She took a fork and lightly pressed it into the top edge of the dough all around the rim. You might need to dip the fork into flour if the dough is still a bit tacky-sticky. To me, this is how a pie is SUPPOSE to look. I’m still a big part old fashioned that way.
Once the pie crust is ready, you might want to stick it back into the refrigerator for about 10-15 minutes to let the dough chill and rest some more. Don’t worry about covering it, it’ll be perfectly fine.

Spoon the pie filling into the crust. This filling is a bit thick as you can see. I could have added a bit more milk to thin it down some, but opted to not do it, and just stick to Aunt Bessie’s recipe.

Using a spoon, work from the center out and gently spread the filling out to the edges of the dough.

Here we are, almost ready for the oven.

I strongly suggest you place the pie on a baking sheet. That way, if by any chance it begins to bubble over, it drops into the pan and not on the bottom of the oven floor. It’s much easier to clean up any mess this way. Just saying.

PAY CLOSE ATTENTION: You should place the pie on the bottom rack in your oven to bake it. We’re going to START baking at 400º, and let it bake for TEN MINUTES. After that, we’ll REDUCE the heat down to 350º, and let it bake on out until done. Set a timer so you don’t forget it.

Watch the edges of the crust as the pie bakes. You’ve turned the heat down to 350º hopefully and you don’t want the pie edges to burn. After about 15 minutes, if needed, cut some strips of aluminum foil about 2 inches wide, and gently wrap them around the edges of the crust, and then let it bake on out until done. This should prevent the edges from burning.

You DID remember to turn the heat down… right?

Test the pie by inserting a toothpick into the center as it’s about finished baking. If you pull the toothpick out and it’s moist, or has crumbs clinging to it, bake the pie a little longer. On the other hand, if the toothpick pulls out clean, the pie is ready and should be removed from the oven.
Place the baked pie on a wire rack, or folded towel and let it cool. It will slice much easier if you can let it sit for a couple of hours to firm up. If you want to serve the slices warm, slice the pie and place each slice on a dish. Then, pop each dish into the microwave for a few seconds to warm it back up. Top it off with a dollop of whipped cream and… ENJOY!