Follow our step-by-step, photo illustrated instructions for making these delicious Sweet Potato Biscuits from scratch. Just a hint of sweetness makes this the perfect biscuit for breakfast, lunch or dinner. Never made biscuits from scratch? We’ll show you how easy it is to make these without even rolling out any dough.

Sweet Potato Biscuits Recipe: Made from scratch.
Sweet Potato Biscuits were a real treat when I was growing up. I guess mama just had a need to do something a little different every once in awhile and would make up a big old pan of these biscuits for all the family to enjoy. No special holiday or occasion was needed, they were served at various times of the day and, various days of the week. Country ham just took on a whole new meaning when served inside one of these big fluffy treats.
Every time I bake sweet potatoes, the aromas that fill the kitchen just rush me back to my youth. Back then, mama would get out a large sheet pan and fill it full of freshly dug sweet potatoes. It didn’t take long to bake them in the oven and once they started to get done, the kitchen would be filled with that sweet, sweet smell. It’s much the same as a fresh baked apple pie when it’s ready to come out the oven door. The sweet potatoes will start oozing sugars and drip down the side of the potato. Then, it begins to burn a bit to the bottom of the pan but you know that all kinds of great things are going to be prepared in the days ahead.
Baked sweet potatoes are used in Sweet Potato Pies, Candied Yams, Souffles, Casseroles and, yes….to make Sweet Potato Biscuits. There are just so many great recipes that call for baked sweet potatoes. But, we’re here to talk about Sweet Potato Biscuits. Don’t make biscuits from scratch? Why not? It’s really not as hard as you might think. Mostly, it just takes a bit of practice and after a time or two…you’ll wonder why you have always put off giving them a try. I’m pretty confident that you can actually make them the FIRST time you try with our instructions.
I’ve tried all types of recipes for making biscuits. Some turn out good…others…well….not so good. Even for someone that’s made more than a few pans of biscuits. I just always seem to fall back to making them the way mama originally taught me how to do. I don’t have one single memory of mama ever rolling out dough to make biscuits. She always pinched off a bit of dough with her fingers, rolled it around between the palms of her hand, patted it out a bit and then placed it in the pan. Some folks call them “cat head” biscuits. I just call them…GOOD. And, back during our restaurant days, we made a ton of them….using the method mama taught us.
I have yet to do an actual recipe for mama’s biscuits. Still, this one will give you the basics and it’s a great recipe to add to your biscuit making abilities. So, grab some sweet potatoes, fill the kitchen with the aroma’s I grew up with….and Let’s Get Cooking!

Sweet Potato Biscuits: You’ll need these ingredients.

We’ll begin by adding flour to our sifter. I’ve always sifted my flour first….mama said it was the right thing to do. If you don’t have a sifter, you can use a whisk to aerate your flour a bit. Just whisk it around a few good times and bring some air into it.

Sift the flour into a good sized mixing bowl.

You can also add the dry ingredients that follow on top of the flour before you sift it. I do it sometimes but…well…maybe I got in a bit of a hurry and forgot to do it this time. Besides, I wanted to show you an “alternative” way of mixing them into the flour. Yeah…that’s it. An alternative way of mixing it all together. OK…let’s proceed. Add the Sugar to the flour.

Add the Cinnamon. I’m only adding about 1/4th of a teaspoon. I suggest you go a bit on the light side the first time you make them. Then, depending on how well you like the taste, you can add more the next time you try them. Yep, I’m pretty certain that you will make them more than once. They’re just that good.

Now, for that alternative way of doing things. Here goes. Grab a whisk or fork and give all the dry ingredients a good stir. Make sure you mix them all together well. Of course, had we added them to the sifter before we actually sifted the flour, the sifter would have taken care of mixing everything together. Remember, this is just the “alternate” way of doing things. But, now you have two different ways of making it happen. You can thank me later.
Use the fork and make a little well in the middle of the flour. Just push most of the flour to the outside edges of the bowl to create a well in the middle.

Add the lard or shortening to the center part of the well.
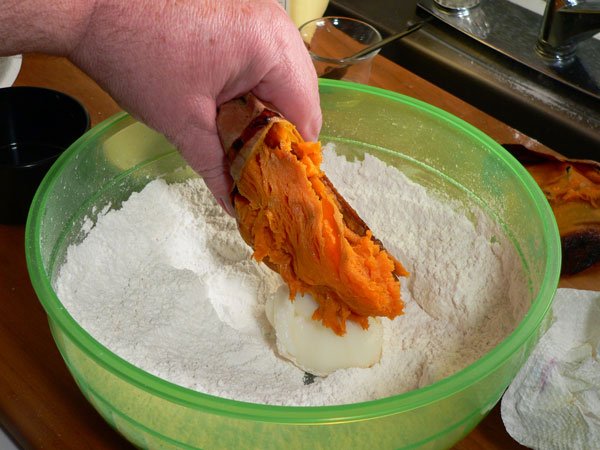
Add the Sweet Potato right on top of the lard. I’m just squeezing the potato right out of its skin. You don’t want to add a bunch of the potato. The more wet ingredients that you have, the more flour you’ll need to reach the right consistency for dough. The lard, sweet potatoes and milk make up the “wet” ingredients in this recipe.

Add the buttermilk. The well we created just helps keep all of the wet ingredients centered in the bowl. We need to mix those up before we start working the flour into the mixture. I think this is a bit of a crucial part of biscuit making, at least for this recipe.

OK…this is going to get a bit more difficult to photograph. The process is very simple but, I must admit, having this on video as opposed to photographs, could make the next few steps a bit easier to follow. But….have no fear. We’ll work our way through it…besides….this is the fun part.
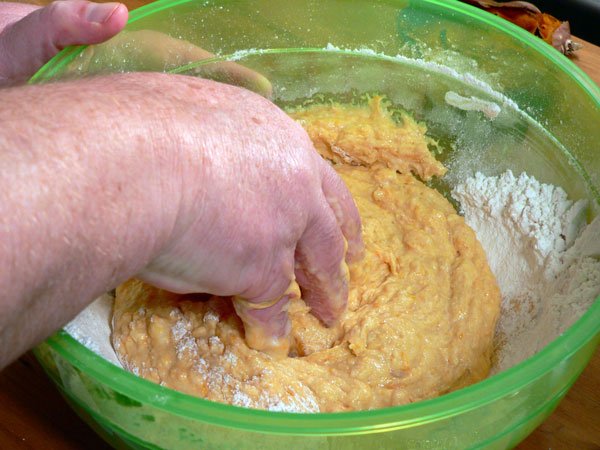
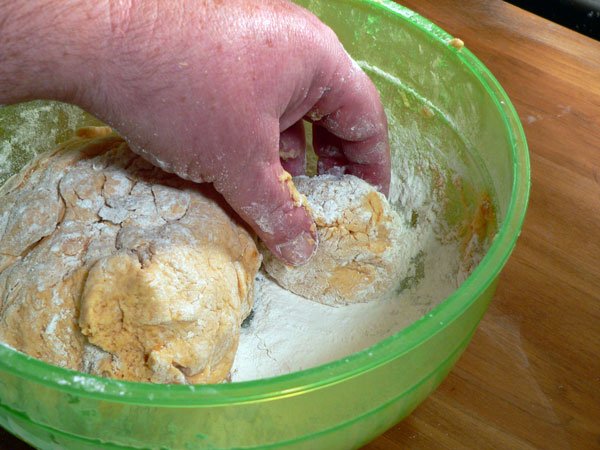
Stick your fingers right down in the middle of all of those wet ingredients. Gently grab a handful of the “stuff” and squeeze it between your fingers. Squeeze your fingers into your palm and let it squish out both sides of your hand. Have fun with it. Add some love into what you’re doing. Do this several times until it all seems to be mixed together. You’ll have a few small clumps of lard but that’s OK…we don’t mind those a bit. Just try to keep it all within the center of that well we created. Go ahead….squish…squish….and squish it a few times more. Now we’re having some fun right?

You should have something that looks like this when you’re finished. We’ve worked the sweet potato into the lard and got the buttermilk all worked into it as well. Note that I’ve managed to keep it within that well in the middle and, that I’ve got flour built up around the edges of the bowl. It’s not really critical that you do this but, it helps…trust me.
VERY IMPORTANT: The best advice I can give you for making biscuits is to use a very light hand and light touch while mixing up and handling the dough itself. Don’t try to apply pressure and squeeze it together. Just work it lightly and let the dough ball form itself as you go. You’ll see below what I mean.
Follow this portion closely. Again, it’s a little difficult to describe the process but I think you can follow along very easily. Put your fingers down in the middle of the wet ingredients, all the way to the bottom of the bowl. Then, start moving your hand in small circles, around and around in the middle. As you move around in circles, the outside edges of the wet ingredients will begin to pull the flour along the walls INTO the mixture. In just a few turns, you’ll be dragging the dough around in the bowl. Do this in a quick motion but don’t try to work too much of the flour into the wet ingredients at one time. Let it happen naturally as you continue to make those small circles.
Your fingers have pretty much become a dough hook at this point, like you’d find in an electric mixer. As you continue to make those circles, gently ease the flour around and let it grab a bit more flour. Keep your fingers touching the bottom of the bowl, scraping if needed, as you go. You can remove your hand to rest it if need be, then get right back in there an finish mixing. A lot of recipes talk about not over working the dough. Yes, you can do that with this recipe but, I’ve found it’s a lot more forgiving than some other recipes I’ve tried.

In just a minute or two, you’ll have incorporated the wet and dry ingredients and made a dough ball like this. It’s still sticky, more in the middle than the outside because the outside is coated with dry flour. We’ll continue to work with that.

Sift a little more flour onto the dough ball. Proceed slowly as this is a learned method of working up the dough. The more you practice making biscuits, the more you’ll learn the “feel” for the dough. That way, you can add more flour if needed to reach the desired results. Too much flour will cause the dough to sort of dry out and break apart. Add just a little at a time and stir it around some more. Turn the dough ball over and scrape up anything that might be sticking to the bottom or sides of the bowl. Just place that right on top of the dough ball and work it back in.
As you work the dough, flip it over a time or two and let the flour coat the dough as you go. Take one portion of the dough and gently fold it over onto the top of the rest. This is very similar to kneading the dough but we’re doing it as we continue to form the dough ball.
As I’ve stated, it’s hard to do this and take proper photos of the process. Still, if you’ll give it a try, you’ll soon be making biscuits you’ll be proud to serve to anyone. You can do it. Don’t give up. Practice makes perfect is really true. And again, remember to keep working with a light hand and light touch throughout the whole mixing and handling of the dough process.
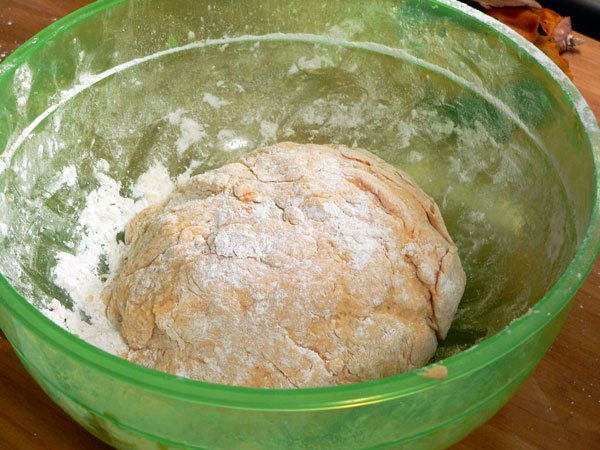
You will want to reach a point where the dough looks like this. It’s holding together, still a little sticky-tacky on the inside but holding together.
All-in-all, this part of forming the dough can be completed in just a minute or two. Maybe not the first time you try it but after a couple of times of making biscuits, you’ll be able to do this in no time.

Gently push the dough ball to one side. THEN….clean your fingers. Here’s how:
I always keep the bag of flour open and next to where I’m making bread. Sometimes, the dough ball will form and leave a handful or more of flour inside the bowl. Either way, grab a bit of flour in your hand and walk over to your trash can. Rub the flour around between your fingers and the dry flour will pull the wet flour away from your palms and fingers. Work it around a bit and just let it all fall into the trash can. It’s the easiest way I’ve found to clean any wet dough from my fingers. Very simple but….I didn’t try to take any photo’s of the process.

Sift a little extra flour into the other side of the bowl. Just a thin layer or so.

OK…now that I’ve told you how to clean your hands of any dough….grab a little more flour and dust your hands good.

I’m right handed so I take my left hand and gently lift the dough. I pinch up a small portion between my fingers, a little larger than a golf ball and………pinch it off.
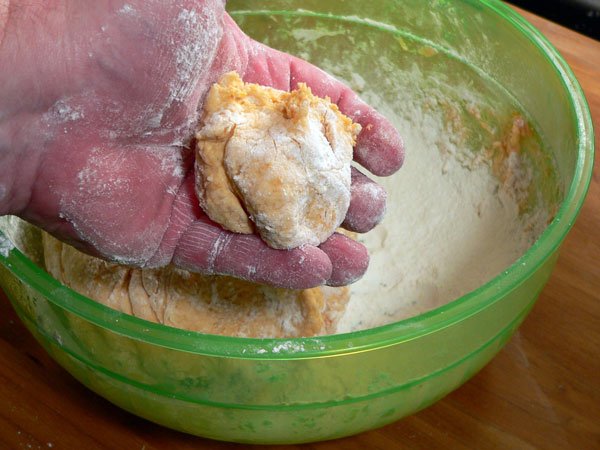
You can make them any size that you’d like. OK…this is a bit larger than a golf ball. Still, it’s not much bigger.

Take your other hand and apply just a light amount of pressure as you roll the dough section around between the palms of your hands. A few quick turns is all you’ll need. It’s like making meatballs if you’ve ever done those…or…like playing with clay as a child. You’ll feel the dough take shape in the palm of your hand. We’re just shaping it into a ball at this point, lightly pressing it together as we go. About 5 seconds is all you’ll need….if that much.

The dough will probably start to feel a little sticky again. But, you should have a fairly round ball of dough.
Place the dough ball into the dry flour on the side of the bowl. Gently roll it around, just enough to lightly coat it with more flour.

Give it another quick roll for about 1 second in the palm of your hand, then, GENTLY flatten it out into a disc. This one is about 1/2 inch thick. Don’t press it hard…remember to keep using that gentle touch as you go.
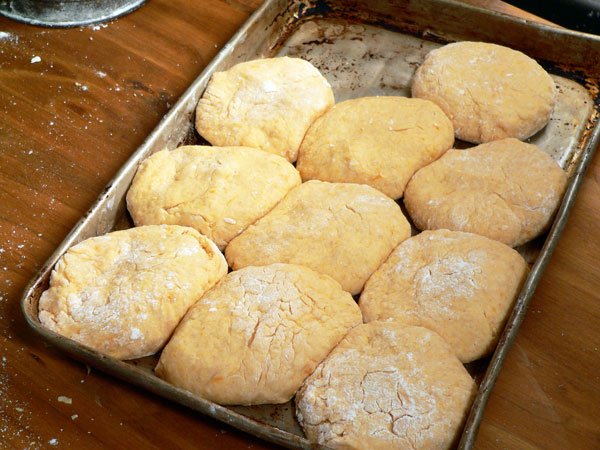
You will need a very lightly greased sheet pan, pizza pan or something similar to place the dough into once it’s formed. Start at one end and work your way up to the other. As you can see, mine aren’t perfect circles. And, I personally prefer to have my biscuits touching as they bake. Why? Well, I guess mostly because that’s the way mama showed me how to do it. I’ve just always made them this way. When the sides touch, you’ll get a biscuit with soft edges. If you separate them, the outer edges will brown more and be a bit crispier. It certainly can be done either way. Experiment with a few and see which you prefer best. I’m OK with that.
You could also brush the tops with some melted butter at this point. Sometimes I do and sometimes I don’t. But, I do always add some once they come out of the oven. Stay with me.
Just keep repeating the process until you’ve used up all the dough and made as many biscuits as you can. This recipe would easily make a dozen but I guess I got a little carried away and made them a little thicker than that. So, I ended up with a total of ten as you can see.
Bake them at 500º for about 8-10 minutes.
Watch them closely after about 8 minutes. The tops should brown just a little before you remove them. The bottom will typically brown much more than the tops so don’t overcook them or you’ll have burned bottoms. Nobody wants burned bottoms now do they?
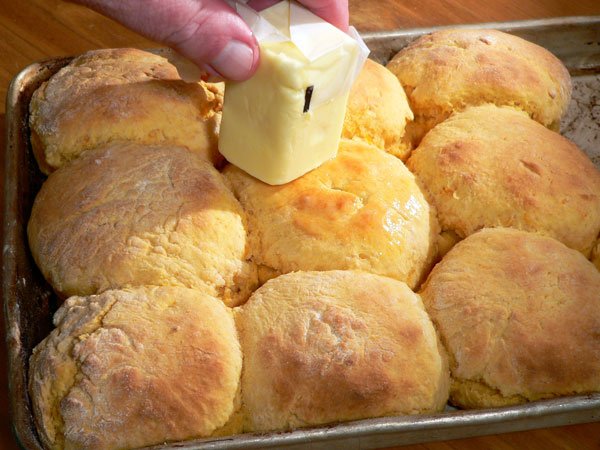
When they are lightly browned on top, remove them from the oven and sit on a wire rack or cloth towel to cool. You can brush the tops with a pastry brush and some melted butter…or do the lazy thing…..just take a stick of butter and rub it across the tops. The hot biscuits will melt the butter enough to where you can brush it all over the tops without messing up another utensil. Actually, I think that’s a pretty smart thing to do if you’re making just one pan. In the restaurant though….I used the brush method.

Don’t they look good? Fortunately, I still have a couple of these in the refrigerator. I’m fixing to go warm them up….I’ll be right back.

Serve warm and enjoy!
I know it might be a little difficult to grasp the concept from just photos but they really are very easy to make. I’ve tried rolling them out and as I said, I keep coming back to this way of making biscuits. They are perfect for everyday meals and even Sunday dinner. If I wanted to make party biscuits, I’d make the dough the same way then, roll out the dough about 1/2 inch thick and use a small biscuit cutter to cut them out.
The real secret to good southern made-from-scratch biscuits is practice. Get a 5lb bag of flour, some lard or shortening and a quart of buttermilk. By the time you use that up, you’ll be making biscuits you never dreamed possible. Try it…then let me know how they turn out in the Comments section below. I look forward to hearing all about it.