Follow our easy, step-by-step, photo illustrated instructions to learn how to make and water bath can our pickled okra in your own kitchen. Printable recipe included.

Pickled Okra is another great old Southern favorite. It’s a great way to enjoy okra all year long. Ours is a little spicy because of the added pepper in each jar, but you could leave that out if you prefer.

Please allow me just a moment while I pat myself on the back. I’m so proud of myself because this is the first thing that I have canned in well over two years. Old age has slowed me down more than I would prefer. Smile.
I first tasted store bought pickled okra back around 2010 when a co-worker asked me if I would like to try some she had just bought. I liked the taste of them but never bought any myself for unknown reasons.
Fried okra is pretty good, but like many folks, I just never cared for the boiled slimy okra that Mama use to make in my youth. Pickled Okra is a whole different treat though. I think you’ll enjoy it if you’ve never tried it before.
The recipe is really simple. And, with Okra showing up everywhere this time of year, pickling it is just another way you can enjoy okra throughout the year. Canned properly, these jars will keep on the shelf for well over a year, if you don’t eat them all up right away.
I’m writing this in September of 2020. The “virus” has kept many folks quarantined at home for months and it appears lots of new folks have taking up canning and home preservation of food items. Many things we could normally find in the stores are often sold out these days.
Canning jars, bands, and lids have sky-rocketed in price – if you can even find them. Thankfully, I still had the canning supplies I needed on hand, even after I had given many of my empty jars to a close friend over the past year.
I’m thankful and blessed to be back in the kitchen and using the water bath canner once again. I had pretty much considered my canning days to be over. So, if I can do it, you can too. It’s a really simple and easy recipe to get started with canning and food preservation for home. Canning 101 as I like to call it.
I haven’t had the chance to taste these yet, but I know they will be good. They need to set for several weeks to develop their best flavor, so I hope to pop open a jar before too much longer.
I only follow trusted recipes with my home canning projects. This one comes from a book published by the United States Department of Agriculture, so I’m pretty confident they will taste great. I used hot peppers per the recipe, but you can omit them if you don’t prefer to have a spicy type of Pickled Okra. It will be fine without them.
So, ready to give our recipe a try? Alright then, let’s head on out to the kitchen and… Let’s Get Cooking!

Pickled Okra – You’ll need these ingredients.
We’re adding a pepper to each jar of our pickled okra. It makes it a little spicy, but it’s totally optional. Just don’t add it if you don’t want the spicier taste. Feel free to use the hot pepper of your choice.
I must tell you that I am only making about half of what the printable recipe below calls for. I wasn’t able to purchase enough okra from the local grocery store to make the full recipe, but I did include the full recipe as the print out. Thanks for listening.
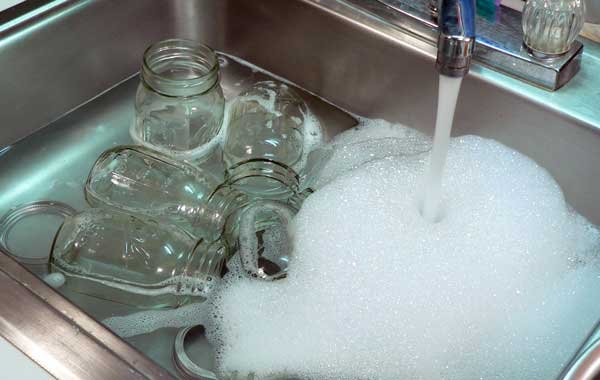
First thing you will need to do is wash your jars and bands. Do this in warm soapy water and wash each jar well. Be sure to check the tops of each jars to make sure none of them are chipped or cracked. Discard any jar that might have chips on it.
Rinse the jars and set them aside for the moment.

Place the jars in your water bath canning pot. Submerge the jars under water and bring the water to a light rolling boil. The jars need to boil for 15 minutes to sterilize them before you can pack them with product.
Let them do this while you prepare the okra.
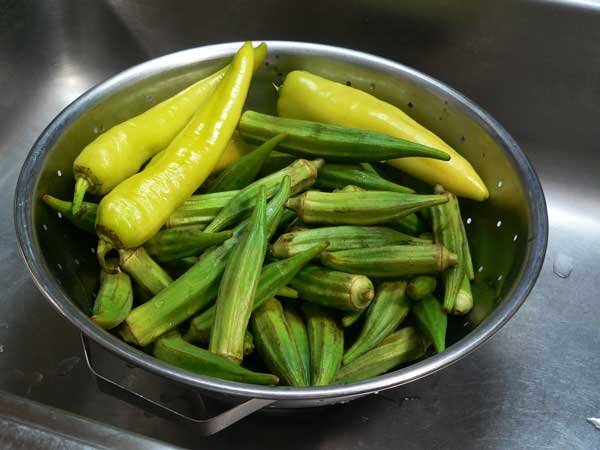
Wash the okra and the peppers under cool running water.

I like to trim the stem from the larger end of the okra. It only takes a few minutes.

Peel the garlic. We’ll be adding one piece of garlic to each jar.

My peppers were pretty large. I cut the end off so they would fit in the jar. This opens up the pods to add more of the flavor into the jars. Again, if you don’t want to add the peppers, just leave them out. Not a problem.

Place 6 cups of water in a saucepot.
Keep in mind, that the printable recipe below will make more pickled okra than I’m actually making. I’m basically doing half a recipe. I’ll keep telling you the amounts that are called for in the printable recipe. Confused yet? I don’t mean to do that, I just didn’t have enough okra to make the full batch.

Add 6 cups of apple cider vinegar to the pot. Make sure you’re using a 5 percent vinegar. It will say so on your container.

Add 2/3 cup of canning or pickling salt.

Add 4 teaspoons of Dill Seed. Be sure you’re using Dill SEED and not Dill WEED. There is a difference.

Add 6 small hot peppers if you want to use them. They are totally optional.

Add 8 or 9 Garlic cloves to the liquid.
Place the pot on your stove top and bring the mixture to a boil. Let boil for one minute, then remove from heat.

This is the way I typically set up my stove top for canning. The front pot on the left is where I keep whatever I’m preparing to can. The large pot on the front right is of course my canning pot.
The pot on the back left is where I place my jar lids and bands. The heat on this pot is on it’s lowest setting. The water just needs to be warm and not allowed to get hot because it could ruin your lids.
The pot on the back right is where I keep some extra heated water in case I need to add more hot water to the canning pot after I load my filled jars.

You’ll need some tongs to remove the sterilized jars from the canning pot. Place the jars on your countertop where you’ll be filling the jars.
Remove the hot peppers from the brine and place one pepper in each jar. It’s hard to see, but I’ve placed the pepper in the jars pictured above. They slid down into the jar once they had cooked a bit.

Place one clove of garlic in each of the jars.

Add 1/2 teaspoon of granulated Sugar to each of the jars. The sugar will help tone down some of the tartness of the vinegar.

Here’s the fun part. Tightly pack each of the warm jars with the okra. And, I do mean tightly. Alternate placing some of the okra bottom down and then top down in the jars. If your okra pods are too large to fit in the jar you can cut off some of the larger end. Save the pieces you cut off to stuff into the jars to fill up any empty spots.
You really do need to pack the okra in tight. I was afraid I might break the jar when I packed mine. Just be careful and fill each jar.

Use a funnel and add enough brine to each jar to fill it within 1/2 inch of the top of the jar.

This tool has notches on one end with marked measurements. Use it to fill your jars. Again, you need to leave 1/2 inch of headspace in the jar. Notice the okra doesn’t come up much higher than that either.

With the smaller end of the same tool, poke it down into the jars all around the edges to remove any air bubbles. This tool comes in most canning kits that you purchase. If you don’t have one, use a butter knife. It will work about as well. With the jars packed full, you’ll have to maneuver around in the jar a bit more to find a spot you can use the tool.

Use a damp paper towel or cloth to carefully wipe off the top of the jars. You need to wipe this clean so the red seal on the jar lids has a clean surface when it touches the jar. This will help insure a proper seal.
I like to wipe around the top outside of the jar where the threads are. This just makes your bands easier to remove, especially if you were working with something sticky.

Remove a lid from the warm water. Place it on top of the jar and center it up. You don’t have to worry about any water on the lid, so no need to try to dry it off. It will all work out fine.

Remove a band from the warm water and place it on the jar. Tighten the band down “FINGER TIGHT.” This means just tight enough to be sure it’s closed and not using all your might to tighten it. Smile.

With all the jars filled and the lids and bands secured, it’s time to place them in your water bath canning pot.
Clip the handles from your canning rack to the top edge of the pot. Use your jar lifter to carefully place the filled jars in the rack. Sometimes they like to fall over, so you’ll have to balance them upright in the rack.

Lift the handles and carefully lower all the jars into the pot. You need enough water to cover the jars by one inch of water. This is where that extra pot with hot water that I keep on the back burner comes in handy. Add as needed.
Let the water come up to a good rolling boil.

Once the water reaches a boil, cover the canning pot and start your timing of the canning process.
At my altitude, I had to let the jars boil for 10 minutes. It may be a longer time depending on the altitude of where you live.
The USDA recommends the following processing times based on the altitude of where you live.
0-1000 ft. = 10 minutes
1,001-6000ft. = 15 minutes
Above 6,000ft = 20 minutes
This is for pint jars using our Hot pack style of canning in a water bath canner.

After the proper amount of time has passed, carefully raise the rack out of the water and let the handles hook over the top of the canning pot. Just let the jars set here for about 5 minutes before you try to remove them.
You may hear that fantastic “ping” from some of the jars. That’s music to my ears and something I always listen to once the jars come out of the water. It makes all the work worthwhile. Smile.
But, don’t worry if you don’t hear it from all of the jars. Some will ping later as the jars cool, some you will never hear. It’s just part of the process. Enjoy the one’s that you can hear.
Carefully remove each jar from the rack using the jar lifter if you have one. Don’t worry about any water on the tops of the jars. Try not to tilt them as you remove them.
Place the jars in a draft free location on a folded towel on your countertop. The jars need to sit here untoched for 24 hours to ensure a proper seal to all the jars.
DO NOT press down on the center of the jars until the 24 hours have passed. After 24 hours, press the centers to be sure each jar has properly sealed. If the center of the lid pops back up after you press it, that jar hasn’t properly sealed and never will.
Any jar that hasn’t sealed can be placed in your refrigerator once it’s cooled and should be used first.
The okra needs to just sit for 2-3 weeks once you’re finished with the water bath canning process to let the flavors properly develop. It will be well worth your wait. Smile.

Enjoy!
Sealed jars should be stored in a cool dry place in single layers. Some folks like to remove the jar BANDS when they place them on the shelf. That way, if any jar hasn’t properly sealed you’ll soon know about it.
Properly sealed jars should keep for over a year. Congratulations, you’ve done a great job. Keep it up.