Can you really taste a difference with Cornbread cooked in a Cast Iron Skillet? We think so. It just seems to give it more of a crust on the bottom and sides and, that’s the part that has more flavor. Of course the real debate here in the South, is whether Cornbread is best prepared with sugar or without sugar. It probably depends more on whether your mother or grandmother used it in her recipe. So, what’s your opinion?

Recipe: Cast Iron Skillet Southern Corn Bread
Maybe I’m doing this recipe just to see if I can stir up a few comments. Well….maybe. It seems that just about any recipe site you visit on the Internet with a recipe for Cornbread, there’s always a debate about whether true Southern Cornbread contains sugar or not. What’s your opinion?
I’d probably be pressed to admit that true old fashioned Cornbread does NOT have sugar in it. More than likely, back in the day, it was difficult to keep sugar on hand so you used what you had very sparingly. If you were fortunate enough to have some sugar, maybe you used a little in the Cornbread you made.
As for me, I prefer mine WITH sugar. I just happen to like that so called “cake” type of Cornbread. I like a thick slice, lightly baked and slightly sweet. And, I don’t like dry Cornbread that falls all apart the first time you try to pick it up. That may be fine for crumbling into a bowl of Pinto Beans but, it’s just not a good “go along with,” type of Cornbread. You know, the type that “goes along with” some Mashed Potatoes and Country Style Steak.
I also think that most folks prefer what they grew up with. If your Mother or Grandmother used sugar, that’s what you prefer. So, it could depend on WHERE you grew up…or…where YOUR parents grew up. Confused yet?
My mother mostly just made a really thin type of cornbread. It had another type of taste all together and we’ll try to add a recipe for one of those before too long. My favorite was those little hoecakes she’d make. They were super good with some fried fish and coleslaw. Loved it!
But, for now, we’re baking up some Skillet Cornbread using my mama’s old cast iron skillet. It just puts a little different taste on Cornbread as opposed to some that’s baked in an aluminum pan. The heat from the pan adds more of a crust to the bottom and edges. And, since we’re using the pan itself to melt our butter, it’s a little more concentrated flavor of butter on the bottom and around the sides.
I’d really like to know how you prefer your Cornbread. This is just one recipe that we use, we have some others we’ll be adding later. For now, take a moment to leave us a Comment at the bottom of the page. You’ll also find a printable copy of our recipe below. So, if you’re ready, drag out that old cast iron pan and…..Let’s Get Cooking!

Skillet Cornbread: You’ll need these ingredients. Ooops….is that sugar?
Pre-Heat Oven to 400º.
I normally leave my cast iron skillet in my oven. I’m going to let it heat up as the oven heats up. You’ll need a hot skillet to pour the batter into as opposed to a cold one so, go ahead and stick the skillet in the oven and let it warm up.

Place one cup of Yellow Cornmeal in a medium sized mixing bowl.

Add one cup of Flour.

OK…here’s where the trouble begins. I’m using sugar in THIS recipe. We’ve got a couple of more favorites, some of which do not have sugar so, please afford me the opportunity to add some this time around. I’ll make it up to you later OK?

Add one half teaspoon of Salt. I know that looks like a teaspoon but, just pretend it isn’t…or…that I only added half of the spoonful.

Add one teaspoon of Baking Soda.
Purists will argue this point as well, but that’s OK. Yes, I’m using Self-Rising Corn Meal and Self-Rising Flour, so you may ask….why add the Baking Soda. Isn’t there already some Baking Soda in the Self-Rising products? And I’ll say, “Yes, you’re right.” I’m adding it to try to give it a little more RISE in the pan. I’m one of those that happens to like the “cake” type of cornbread most of the time. I also like a big old thick hunk of it. Thus, a little thicker slice just makes me smile. Plus, you’ll probably always remember now that Self-Rising Flour already contains Baking Soda. Lesson Accomplished. Will it make a difference? It would probably take a side by side test using one recipe with baking soda and the other without…but for now….I’ll take what I get. Maybe we can do that later……much later. (Smile)
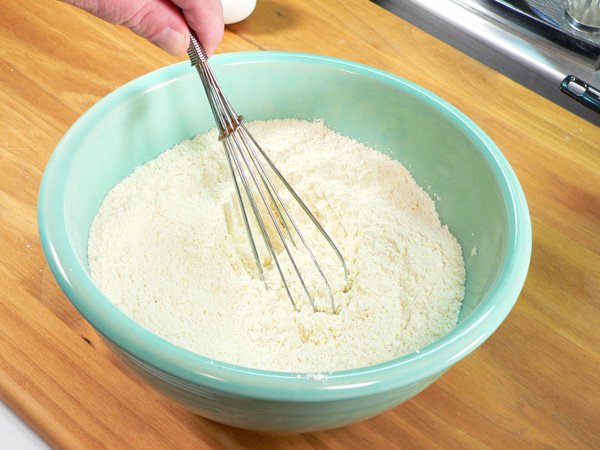
A whisk works really good to mix all the dry ingredients together.

Crack two whole eggs into a measuring cup and whisk them gently.

The two Eggs measured up to about one half cup. I need one and a half cups of Buttermilk for this recipe. Just add it in on top of the Eggs.

Whisk the Eggs and Buttermilk together.

Remove the heated skillet from the oven and add in the entire stick of Butter. Set it aside and let the Butter melt.

Add the Egg and Buttermilk mixture to the dry ingredients.

Pour all but about 2 Tablespoons of the melted Butter into the bowl. You want to leave a little Butter in the pan.

You’ll need something a little stronger, like a wooden spoon, to stir the ingredients together. Stir it just enough to mix it all together without over doing it.

Don’t over mix it….lumps in your Cornbread batter are a good thing.

Carefully pour the batter into the hot skillet. You may even here a little sizzle at this point. Just remember…the pan is HOT.

Use the back of the spoon and gently spread the batter out to the edges of the pan. You pretty much want a even layer, not a high spot in the middle. Notice how the edges are already cooking against the hot skillet. Now, place the pan in the oven.
Bake for about 25 minutes on 400º.
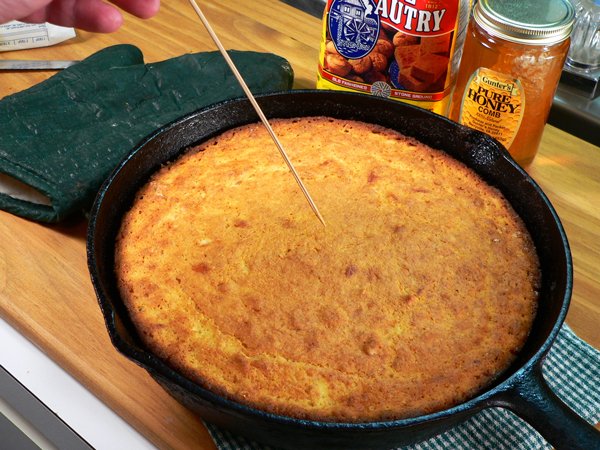
Ovens will vary so after about 20 minutes, start checking the Cornbread. You want a nice golden color with just slightly browned edges. The Cornbread should pull away from the sides of the skillet as it cooks. Use a wooden toothpick or skewer and insert it into the middle of the bread. If you can pull it out without anything sticking to it….the Cornbread is done. If you see small particles attached to the skewer, close the oven door and let it bake a few minutes more. Repeat the test until the skewer comes out clean. Remove from oven, sit on a towel or cooling rack and let cool for about 10 minutes.

I like to slice a couple of pats of butter and spread it across the top as it melts.

Can you see how all that butter has allowed the bread to pull from the sides of the pan? You should find only a little sticking to the pan…if any at all.

After it’s cooled for about 10 minutes, you can slice it up right in the pan. Or, if you prefer, place a plate on top of the pan and hold it all together as you flip the pan over. The Cornbread should slip right out onto the plate for easier cutting. You might even want to drizzle a little honey over the top of a slice. That sweet and salty taste combination is some kind of good.
You may find the bottoms and edges to be a bit salty. The heat from the cast iron skillet seems to intensify the flavors as it browns the cornbread during baking. That’s why you’ll find a little different taste when using a skillet as opposed to just an aluminum baking pan. The pans don’t cook the edges and bottom the same as the cast iron does.
Either way….serve the Cornbread while it’s warm….and Enjoy.