REVIEW: Join us, as we try out, and write about, the Ball® FreshTECH™ Automatic Jam & Jelly Maker. We’ll put it through it’s paces as we make Strawberry Jam following the Ball Fresh Preserving Store recipe. Is it all that it claims to be? Worth it’s price? Will it save you time and effort in your home food preservation projects? Let’s take a look and see.
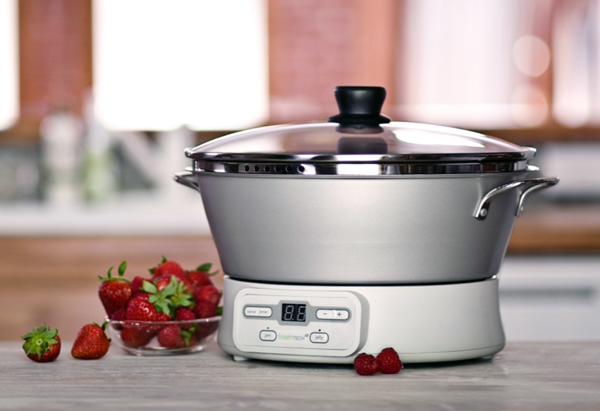
REVIEW: Ball® FreshTECH™ Automatic Jam & Jelly Maker
You Need To Know: Before we get started, you need to know that the Ball Corporation and Jarden Home Brands provided me with one of their Automatic Jam & Jelly Makers to try and review. All of the comments contained herein are totally mine and I have not received any money for writing this review. It is my purpose and intent to provide you with an accurate overview of this product and to give my personal opinions of this product. I didn’t just test this out one time, it was tested out numerous times, both by me, and by some friends from our local Cooperative Extension Service. I do hope you’ll read about it all the way through. We’ll look at the Pro’s and the Con’s of making the purchase. Thank You for listening.
Several weeks back, I was offered the opportunity to receive the Ball FreshTECH Automatic Jam & Jelly Maker to try out in my own kitchen. Jarden Home Brands, provided me with the Jam & Jelly Maker, a case of their new “green colored” jars, and several packages of their green colored bands and lids. The only requirement was that I would give an honest test and evaluation of the product, and write about it here on Taste of Southern. As you might imagine, I was thrilled with the opportunity, and I’m delighted to share that with you today.
It took a little longer than expected to actually receive the products. Maybe I was just getting excited and anxious, but after trading several emails with the public relations firm that was coordinating everything, the box finally arrived. And, a big box it was. Inside was the machine itself, the case of jars, and the packages of bands and lids. Now, I just needed to get started.
As it would happen, the cold weather of winter was hanging around a bit longer than usual this year. This was pushing Strawberry season a few weeks later than normal for our area, and I was waiting to get some fresh local Strawberries so I could make some jam with the new machine. Our North Carolina State Farmers Market was selling some “tunnel grown” berries, but I was holding out for the fresh local berries from some of our local farmers.
I had also learned that our local office of the North Carolina Cooperative Extension Service had scheduled a Strawberry Jam Making Class, and I went over to signup for it. I took several of their classes last year, and one of the first things they asked me was why was I going to take them again. I’ve been privileged to have known and worked with many of our local Extension Staff over the years, through my involvement with local TV and Radio, so it was all asked in fun, and I knew that.
As I paid my class fee and signed up, I mentioned that I had just received the Ball® FreshTECH™ Automatic Jam & Jelly Maker to test and review here on Taste of Southern. The staff said they had heard about it, but hadn’t seen or tried one. They were interested.
Susan, the Director of our local office, heard me mention it, and said that maybe I’d like to let her try it out. I told her that I hadn’t had the chance to test it myself yet, as I was waiting for local Strawberries first.
Susan said that she was already planning to make some jam ahead of the upcoming class, and that she would be in the kitchen at the Extension Office on Saturday of that week. She suggested that I bring the machine over, and we could both work with it at the same time. This sounded like a win-win situation to me, so I quickly agreed. Her added input would be great.
The following Saturday, I took the still unopened Jam & Jelly Maker box into the Extension kitchen area and sat it down on one of the counter tops.
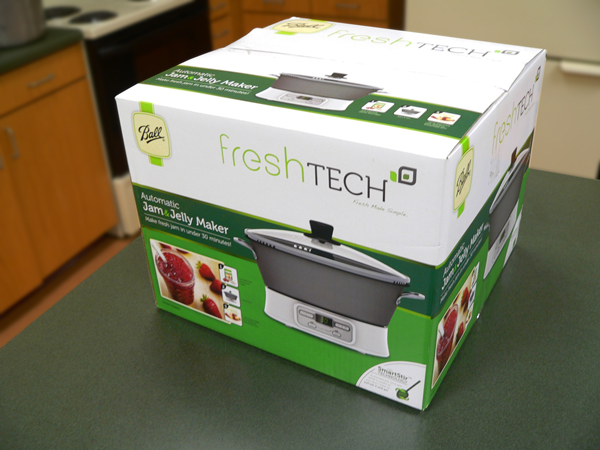
It was beautifully packaged, with some very appealing photos of Strawberry Jam right on the box. Shipping weight for the package is about 13 pounds so it’s not overly large, but not really small either. Time to open it up and see what’s inside.
It was very well packaged between formed styrofoam pieces, and individual parts were wrapped in plastic.
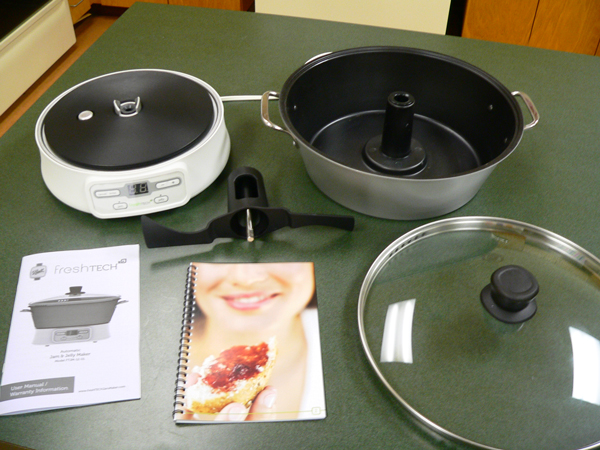
The only assembly required is to attach the knob to the glass lid. A screw is provided to snug the knob down, but I only tightened it by hand. There are four main parts to the Jam & Jelly Maker.
BASE
POT
STIRRER
LID
An instruction book is included with information on assembly and use of the unit, plus a neat little cookbook of recipes for the machine.
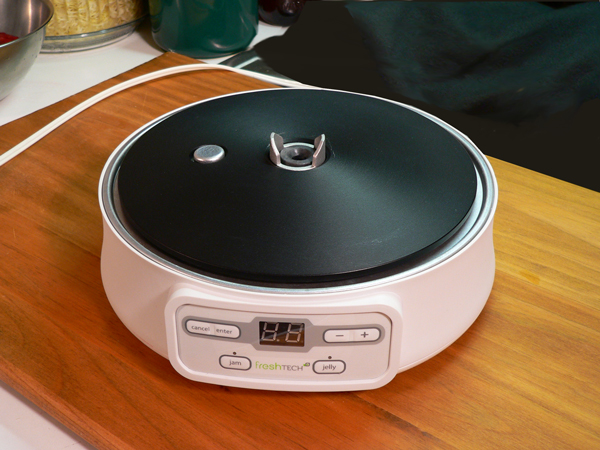
BASE Unit: This is the base-heating-control unit for the Jam & Jelly Maker. I’m going to switch back and forth a bit between photos taken at the Extension Kitchen, and some I took later here in the Taste of Southern kitchen. I just ended up with some better pictures for you from here at home, so I’ll use those as needed.
The BASE unit has the very simple control panel for operating the Jam & Jelly Maker. It offers two choices, “JAM,” and “JELLY.” You can see those along the bottom of the control panel.
It has a digital timer in the center, along with CANCEL and ENTER buttons on the left side, and PLUS and MINUS signs on the right side. These last two buttons allow you to adjust the time up or down as might be required on some of the recipes.
The BASE unit appears to be very well made. It seemed sturdy without being heavy, and has rubber feet on the bottom to protect your counter top. One of the first things I noticed here at home, was the shorter cord on the unit. This could be a good thing, depending on how many, and how close, your outlets are around your counter top work area. For me though, I could have used one a little longer.
The black looking disc on top of the base unit is the heating plate. The center post is made to fit up inside the POT and is part of the motor that turns the STIRRER once it’s attached.
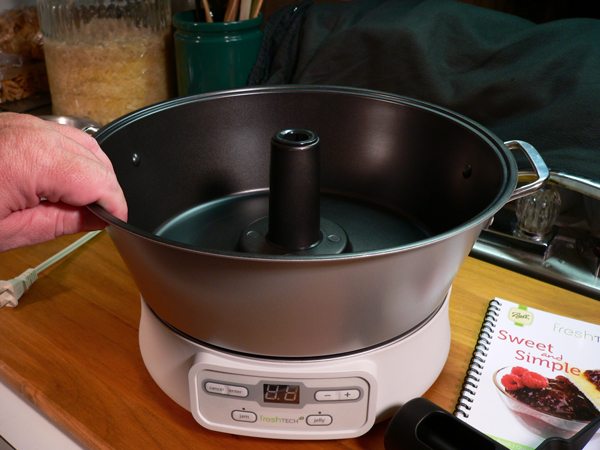
POT: This picture shows you the POT of the unit. It has a non-stick surface on the inside, is lightweight, and has two convenient handles. It looks like a very large Pound Cake Pan for the most part. The center unit you see sticking up is built into the pan and it slips right down on top of the locking unit and clicks into place. Simple enough.
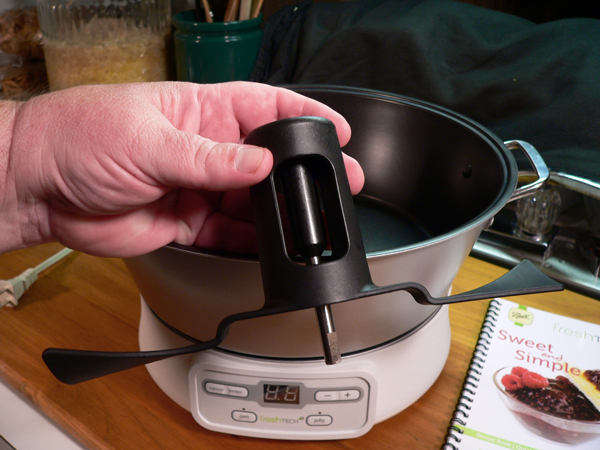
STIRRER: This is the stirring paddle for the Jam & Jelly Maker. It’s plastic with the exception of the metal rod down the center shaft. The end of the shaft is milled flat in parts, so it slips into proper place and locks into position. You just place it over the center shaft of the POT and wiggle it a bit left or right until you’re sure it’s locked in place. Again, simple, quick and easy.
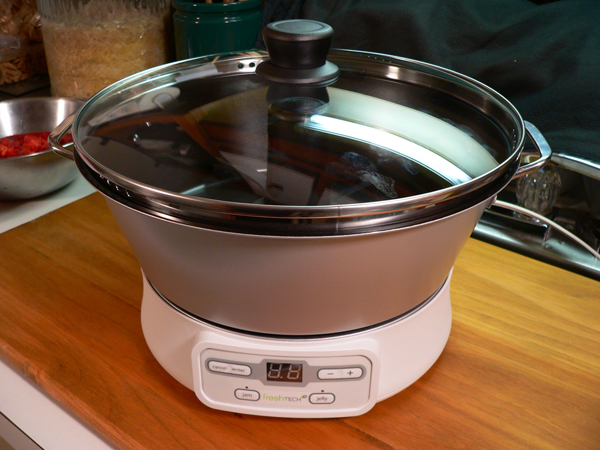
LID: As mentioned before, you will have to attach the knob to the glass lid prior to using it, but that was simple enough to do. It was really nice to have this full glass dome to watch everything once it starts cooking. If you’ll look closely, you can see some of the vent holes in the rim of the lid.
The glass part sits up a bit from the POT, and you just need to be sure you have it properly centered when you place it on the POT to start the cooking process. I kept getting the feeling the lip of the lid was suppose to fit down inside the POT, but it sort of balances on top.
We did wash the POT, STIRRER, and the LID prior to using the Jam & Jelly Maker. Once that was complete and the parts were dried, we were ready to get started with our first batch of Strawberry Jam.
Susan had already washed, stemmed, and crushed the berries. I’m not showing you that here, but I’m going to post a full step-by-step, photo illustrated recipe of how the whole process is done that will be here on Taste of Southern. I knew that I would be further testing it here at home, so I didn’t take a lot of photos on Saturday while we first tested the machine out.
So, if you’re ready for the next steps, let’s get started on making that jam.
Add the Pectin: I’ve plugged the machine up and we’ve got everything prepped and ready to begin.
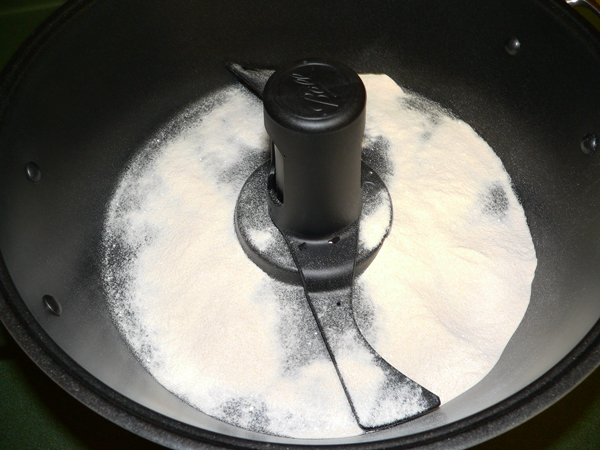
The first thing you’ll do is add the Pectin. They of course recommend that you only use Ball brand pectin. You’ll need to consult each recipe for exactly how much and what type to use, as it will vary. We’re making regular Strawberry Jam, so we’re using the Ball® RealFruit™ Classic Pectin which comes in a bulk type container, and is readily available at most grocery stores here in the South. It can also be ordered online if needed.
You’ll just need to spread the pectin evenly around the bottom of the POT. This recipe calls for 3 Tablespoons of Pectin.
Add Fruit: Next, we added 2 and 2/3rd cups of mashed Strawberries, right on top of the pectin.
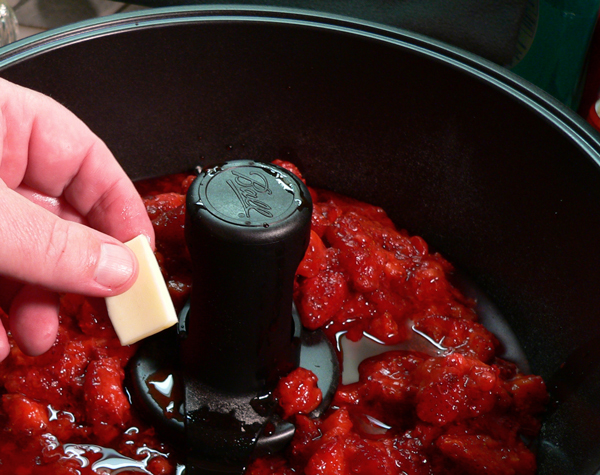
Add Butter: You’ll also need to add 1/2 teaspoon of Butter, to help reduce foaming.
DO IT! Make sure you add the Butter.
As you see, I highlighted that DO IT part. I’ll show you why a little further down as we made the second batch. Stay tuned.
Susan didn’t have any butter on hand. She did manage to come up with a couple of those small little cups of imitation, anything but Margarine – Margarine packs. You know, like the ones they give you at the drive through when you order pancakes for breakfast in the morning? It was the only thing she could find in the Extension kitchen’s refrigerator, and she admitted she just didn’t know how long it had been in there.
It was all we had, so we went ahead and used it. More on that later.
PRESS JAM BUTTON: With everything loaded into the POT, it was time to get the machine started. We pressed the JAM button on the control panel, and saw that the timer defaulted automatically to 21 minutes.
PRESS ENTER: Next we pressed the ENTER button, and watched excitedly as the STIRRER began to slowly move around inside the POT. We were cooking now. We just had to let the unit heat up and wait about four minutes until we heard it beep.
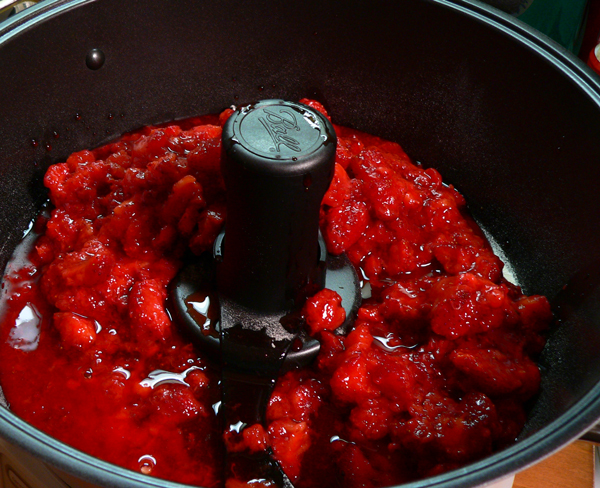
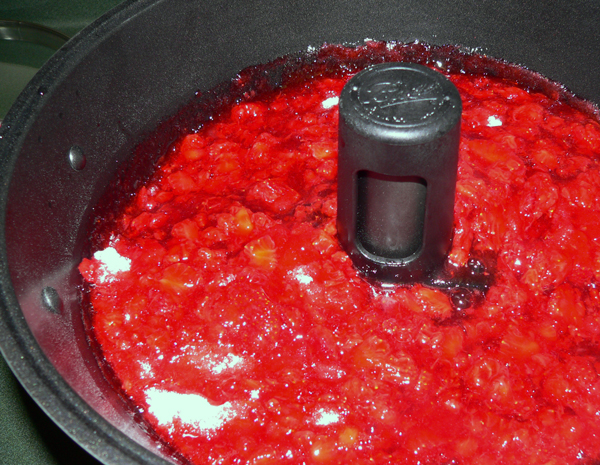
WAIT: Once the STIRRER paddle started to turn, the heat started building up inside the POT. It didn’t take but just a minute or two before we could tell it was getting hot. This is a photo of our very first batch of Strawberry Jam, just as it was happening in the Extension Kitchen.
Susan had “chopped” the berries instead of using a potato masher as the Instruction Book had called for. We questioned if this was the reason for such a little amount of juice from the berries at this point. You could see bare spots, and some wisp of smoke coming up as the paddle turned. Are we going to have enough juice?
BEEP, BEEP: After 4 minutes, the unit was hot enough to move on to the next step.
Add the Sugar: Once the timer beeped, it was time to start gradually adding the sugar. Susan had already measured out the 3 and 1/3 cups of Sugar that was needed. Once we sprinkled that across the top of the berries, it started to dissolve and increased the amount of liquid in the POT.
The Sugar melted and dissolved rather quickly. I hardly had it all in before reaching for the camera to snap this shot. Again, this is from our actual first batch over at the Extension Kitchen. Once we had the sugar in, it was time to cover the POT and let it do it’s thing.
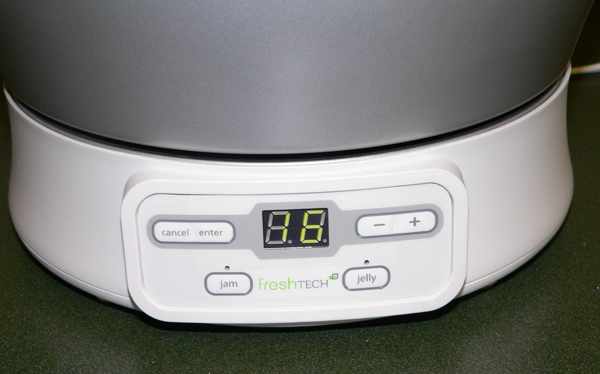
Control Panel: Here’s a better look at the Control Panel on the unit. It’s showing 18 minutes here, just before it Beeped that it was time to add the sugar.

Making Strawberry Jam. Once the sugar was added, we quickly placed the LID on the POT, and sat back to watch the rest of the show. You can’t tell it from this photo, but the timer is still clocking down. I think it was at about 16 minutes, but the camera flash caused the timer image to reflect differently.
So, while the Jam & Jelly Maker stirred the jam, we got busy prepping for the actual canning process. Everything had gone very smoothly, even for our first batch. It was VERY NICE knowing that neither one of us had to stand over the stove and stir the pot until the berries had cooked and thickened. THAT is the whole point and purpose of the Ball FreshTECH Jam & Jelly Maker, it does the cooking for you. Go take a break.
21 Minutes Start-to-Finish: Ball recommends that you not venture too far away from the Jam & Jelly Maker once it starts cooking. The timer will Beep again once the cooking process is finished, and you’ll need to be close by so you can hear it.
BEEP, BEEP: Once the unit beeped again, the cooking process had completed.
We heard the timer when it ended, but I personally would have liked it to have been a little louder. Ball knows this already, which is why they caution you to stay close at hand. If there had been some TV or Radio noise in the background, kids playing in another room, or just a couple of adults talking a little loud to each other, you might would actually miss it when it Beeped.
The instructions said we should press CANCEL on the Control Panel, then unplug the unit. The LID needs to be removed immediately and set aside.
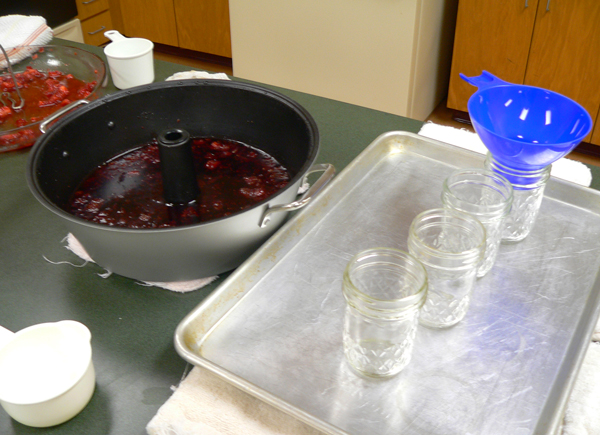
We lifted the POT from the BASE and placed it on another work counter where we had prepared everything else needed to water-bath process the jam we were making.
REMOVE: The next step is to remove the STIRRER. I don’t think there was one single time, either at the Extension Kitchen, or here at home, that I didn’t start to scoop out the berries BEFORE I removed the STIRRER. I just couldn’t seem to remember that part. It’s just me.
Do remember that it will be hot, especially if you should get your fingertips into the cooked berries. Ball recommends that you use a pot holder to pull the STIRRER from the POT. Just sit it aside until you get the jam in the jars.
Don’t forget, I’ve got another full article on how to make this jam using the Jam & Jelly Maker, and how to water-bath can it, here on Taste of Southern. You can check out that story by clicking the link: Coming Soon.
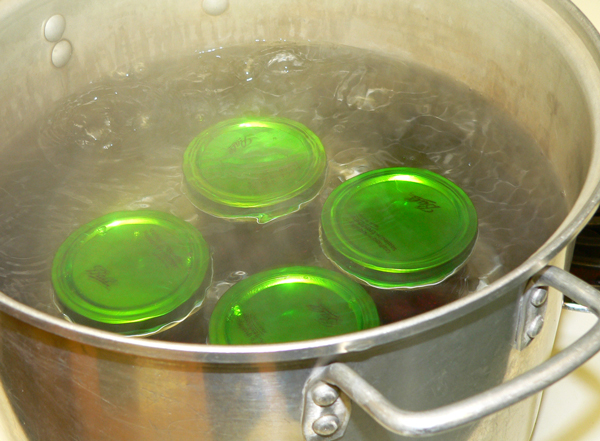
Water-Bath Canning: Finally, we moved the filled jars with their bands and lids to the canning pot. The Strawberry Jam recipe called for 10 minutes in the canning pot, then we could remove the jars and let them sit undisturbed for 24 hours.
This recipe made just enough jam for four – 1/2 pint jars, with about two teaspoons left over. Just enough for Susan and I to get a taste of the finished product.
I tasted it first, and then asked Susan to taste it. I thought I was picking up on a little “off type” flavor that just didn’t seem right. I didn’t mention this to Susan, waiting to see if she would say anything.
Susan noticed it too, and we both came to the conclusion that it had to be the older margarine that we used from the refrigerator. It had been the only thing we had available, but it was giving the jam just a little bit of an off flavor. It wasn’t anything the machine had done, or the pectin, we were just using bad margarine in the first batch.
CLEAN UP: One of the things many folks might take issue with, is the fact that the Jam & Jelly Maker BASE must be allowed to cool for 30 minutes before you can use it again. That’s just the BASE UNIT. You can go ahead and clean the POT, STIRRER, and the LID, so it will be ready for another batch.
Output: The Jam & Jelly Maker only makes enough jam for 4 half pints (8oz.), or 2 pints (16oz.) at one time. If you intend to make small batches of jam and jelly at one time, this will work great. For those that typically make twice this much at one time, this is one point to consider before purchasing.
Now, about that SECOND BATCH.
After completing the first batch of jam in the new little machine, we cleaned the parts and waited a full 30 minutes for the BASE to cool as instructed. We didn’t really have but a few minutes to wait as the jars had to be removed from the water-bath canner, and we had to prep everything for the second round.
I offered to go get some Butter, but we decided we would just try making the second batch without either Margarine or Butter. That might have been a mistake.

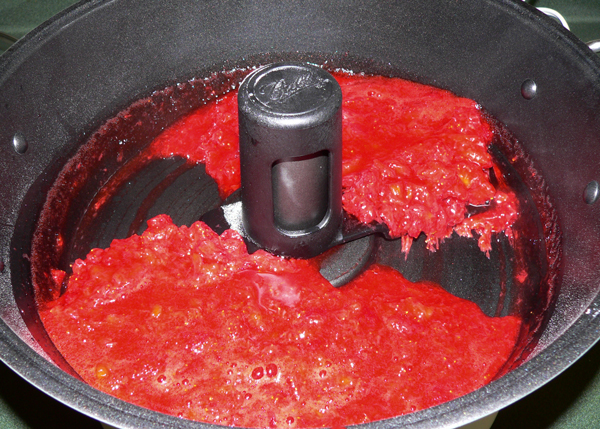
This happened when we didn’t follow directions and add butter.
Susan had stepped out of the kitchen and I was seated at one of the work tables looking over more recipes in the book. I kept glancing over at the Jam & Jelly Maker, and at about 2 minutes before the time was complete, this is what I saw.
Foam had taken over the pot and some liquid was dripping out from under the lid. I didn’t know if I should raise the LID, or exactly what step to take, so I grabbed the camera. (Smile)
With less than one minute to go, I snapped this picture and proceeded to watch the little puddles of jam form on the counter top. Once the machine Beeped, I hit CANCEL, unplugged the unit, and carefully lifted the top. As soon as it lost power, the foam started settling back down into the jam.
You really MUST add the Butter. You can thank me later for going the extra step and testing this out for you. (Smile)
Some of the jam ran up under the BASE unit, but it didn’t cause any problems other than being a little hard to remove. It was a lesson quickly learned, and I’ll always, always remember that I need to add Butter. (I don’t use Margarine at all.)
All total, we made two batches of Strawberry Jam that Saturday morning. We completed 8 half pint jars and left them sitting on a folded towel when we left.
The second batch tasted much better than the first, and without that off flavor. It most certainly was the old margarine that caused it.
We cleaned everything up, and I told Susan that I would leave the Jam & Jelly Maker until after class the following Wednesday evening. If she wanted to use it, or if anyone else in her office wanted to use it, they were more than welcome to test it out.
With that, we called it a day.

Extension Office Strawberry Jam Making Class:
The following Wednesday, Susan conducted both an afternoon class, and an evening class on How To Make Strawberry Jam. I didn’t attend the afternoon class, but I did sit in on the evening class. There were 12 of us all total that took Susan’s class, and we made Strawberry Jam from start-to-finish the “old fashioned way.” Yep, we stood over the stove and took turns stirring while the jam cooked.
Once the jam was in the water-bath canning pot, everyone sat back down and Susan let me give a brief talk on the Ball FreshTECH Jam & Jelly Maker. I told the class about our test on Saturday, and talked about some of the likes and dislikes we had discussed about the unit.
That’s Susan in the red apron in the center of all the class participants. Everyone took home a jar of freshly made jam when class was over. Normally the jars would need to sit for 24 hours, but Susan let them take home a jar with instructions to let it cool then refrigerate it for use pretty soon thereafter.
Class was fun and I had the chance to meet some new folks and make friends. It was good to see a couple of “fellows” in the class and the younger folks as well. I guess by now, they’ve all had the chance to make some Strawberry Jam at home.
Susan had labeled the jars that we made on Saturday. She marked the ones with Margarine and the ones without. I asked if I could have one of the jars without Butter from Saturday instead of the one that I had made that night. She gave the okay, and I brought the jar on the left in the picture above (with the gold band) back home with me. I had a special plan for it.

Graphic: Property of Whisk
We have a fairly new “kitchenware” store nearby, over in Cary, North Carolina called “Whisk.” I had been following them on Twitter, and saw they were having a Canning Jubilee Day at the store, along with a canning contest for Jams, Jellies, Preserves, and Pickled Vegetables.
I took the jar of Strawberry Jam over to the store on Thursday and entered it into the contest. I had never been to the store before, and I joked with the owner that I was coming to win his canning contest. I entered the Strawberry Jam, and a jar of my mom’s recipe pickles.

Judging for the contest was held, and I’m happy to say that the little jar of Strawberry Jam that was made in the Jam & Jelly Maker WON FIRST PLACE in the Whisk Canning Contest. How about that? Dan, the owner, told me he thought they had about 42 entries in the contest.
I went back in on Monday to pick up my prize. I won a very nice Norpro Canning Pot and took home this really neat custom made Blue Ribbon for winning. How cool is that? Thank You Whisk!
They have a great store, with lots of stuff for the kitchen, and they offer lots of cooking classes as well. Check them out if you’re ever in the area, or visit them online for more information. The staff was super friendly and very, very helpful.
PROS and CONS:
I must admit that I really like this little machine. It does have some drawbacks for someone that has been canning in larger quantities over the past years. I’ll try to go over some other things in just a moment.
I left the Jam & Jelly Maker at the Extension Office for a few more days. There were two other friends from Susan’s office that wanted to try it out. I was more than happy for them to do so, because I knew it would offer more feedback for my review.
I was already delighted and honored to have Susan work with it, as she is the Director of our local Extension Office, and she has much more experience in home canning and food preservation than I have. I’ve taken several of her classes and learned a lot. Her office is always as close as the phone, or as close as an Email, should we ever have questions. I knew their advice would be great to have.
It was about a week later before I was able to return to the Extension Office to pick up the little machine. I had left it for about 10 days now, so I told them I was there to borrow “THEIR” Jam & Jelly Maker. I just hoped they would let me have it back.
As it turned out, two ladies from the office had worked with the Jam & Jelly Maker, and made two more batches of Strawberry Jam. Kay showed me the jars they had finished just a day or so before, and as she tilted the jar, the jam inside was a bit “runny.” It hadn’t gelled properly and she didn’t know why.
This led into some conversation about possible reasons, and the best we could possibly conclude, was that they used an Imitation type Margarine when making both batches. Is that really the problem? We just don’t know, but it was the only thing we could figure out that might have caused it.
Susan picked on me during class about using Butter instead of the cheaper Margarine’s. I’ve certainly used my share in the past, but several years ago I started buying and using Butter in everything I cooked and baked, and I just can’t go back to Margarine’s. I can taste a difference, and I think the Butter is much better for you. In proper amounts of course.
I highly suggest you only use Butter if and when you work with the Jam & Jelly Maker.
More in-depth testing here at home:
Last Saturday, I bought TEN Pounds of fresh Strawberries, and I made 4 more batches of Strawberry Jam here at home with the Jam & Jelly Maker. I only used Butter, never had any issues with it foaming, never had to skim anything from the top once it was cooked. I’ve added the full step-by-step of the entire process, from washing berries, to water-bath canning the jars. You can read about it: COMING SOON
I ended up with NINE of the half-pint jars, and FIVE of the pint jars. I also had 2 full cups of juice leftover, so that’s in the freezer for later. All of my jam appears to have set up perfectly, and I can’t wait to go back over to the Extension Office and rub it in, let them know that it turned out fine. (Smile) I’ll just have to suggest that they should have taken Susan’s class.
As for all that Strawberry Jam… guess what my family is getting for Christmas? Shh… don’t tell. (Smile)
In Conclusion:
PROS:
1. – This sure beats standing over a hot stove and stirring berries for 30-45 minutes in hopes they’ll come out right. LOTS better!
2. – The Jam & Jelly Maker would be great for folks that have problems standing for periods at a time, or great for someone with kids that wants to teach them about canning, but is afraid for them to be around a hot open pot and possibly getting splattered.
3.- It’s very simple and easy to use. Great for experienced cooks, or great for beginners. Anyone could use it. Would I buy it? YES.
CONS:
1. – As Kay said, “If that machine could make more than four jars at a time, I’d buy one today.” Really, the only bad part is that it’s just a bit too small. We all agreed on this one. Kay told me she put up about 56 half-pint jars of Strawberry Jam last year. It took awhile she said, but she was able to make 7-8 jars at a time using the older methods of processing everything. I wonder if it would be possible for the Ball Corporation to just make a little larger POT for this unit. Hopefully something they might consider if the machine is popular enough.
2.- The current retail price is around $99.95 for this unit. A little bit pricey for it’s working capacity in my book. If it could produce more jam at one time, it would be a better value.
3.- Made In China. What’s that all about? The fact that this little machine was made in China as opposed to the good old USA, is definitely worth some points off. Ball Jars are a Southern tradition. I have a nice little collection of the older jars here at Taste of Southern. I can’t resist them at auctions I attend. I have the older colored jars with the zinc lids, and I have the older jars that have the wire bales to hold the glass lids in place. I have many on display, and just as many stashed away. I just like them. In fact, last year, Ball came out with a BLUE colored jar in their Heritage Collection. My brother, knowing how much I enjoy canning, gave me a case of them for Christmas. What does that tell you?
Most Asked Questions: Some of the things people I’ve talked with are asking most.
Q.- Can I use my own recipes?
A.- According to Ball®, you should only use the recipes they provide with the unit. They include a recipe book, and have a 100+ recipes, and growing, online that are perfected for using the Jam & Jelly Maker.
Q.– Does it can the jars also?
A.- No. This is the one I was asked most. This unit only stirs and cooks the jam. Once completed, the jam may be used right away, frozen for later use, or canned using the water bath canning process. Water bath canning provides longer storage life for the jam. However, Ball does have another piece of equipment that cans the finished jam using a slightly different style of water-bath canning. It looks interesting, but I haven’t seen one or tried one out. You can read more about it here: The Ball® FreshTECH™ Automatic Home Canner.
Q.- How much jam or jelly does it make at one time?
A.- It will normally make enough for four 1/2 pint (8oz,) jars, or 2 pint size jars (16oz.) I did make one batch, following their recipe, that produced 5 half pints. Not sure why.
I really do want to say Thank You to Lauren with the public relations company that worked everything out for me to be able to receive, test, and review the Ball® FreshTECH™ Jam & Jelly Maker. I appreciate all your efforts and your help. I’m very well pleased. Thank You also to Jarden Home Brands and Ball Corporation for exploring the possibilities of making home canning easier and more feasible for the next generation. I hope you’ll keep up the good work, and that more and more folks become aware of just how much fun, and how much healthier, home food preservation can be.
I hope I’ll be around long enough to see the larger version of the Jam & Jelly Maker, and that you’ll keep me in mind for testing it out. I can’t wait.
I appreciate your confidence and trust in me to provide a simple, straight forward, honest, evaluation of your products. I appreciate you not placing any restrictions on the offer, and for accepting everything here as my personal opinion and results. I wish you well, and do KEEP UP the great work. I hope we can work together again… real soon.
Thank You to Susan, Kay, Rhonda, and everyone in the Strawberry Jam Class for your help, patience, and input. It’s greatly appreciated.

Thank YOU, for taking the time to read all of this. It’s greatly appreciated, and if you’ve read this far, you’ll be among the first to know that we’re going to be giving one of these Jam & Jelly Makers away in just a few days. Good News huh? I hope you win.
..
Your Comments: I’ll be happy to try and answer any questions you as a reader of Taste of Southern might have about the Jam & Jelly Maker and my results. I can only speak for my own tests, but I’ll be more than happy to respond. Just post your question or comments in the section below and I’ll do my best. Please know that all comments are moderated. That means that I read each and every one of them before they are approved for our family friendly home here on the Internet. Your comment or question will not appear immediately, but I’ll post it and respond to if just as soon as I can. Thank You in advance.
Sign Up For Our Free Newsletter: Before you go, be sure to Sign Up for our FREE Newsletter. Each week, I try to send out an Email to let you know about the latest recipe that has been posted here on Taste of Southern. I’ll also let you know about any Giveaways, Contests, or anything else that might be taking place around here. I do hope you’ll join us. All you have to do, is fill out the requested information in the Sign Up box below, or in the one you’ll find in the top right hand corner of each page of our site. It’s really quick and easy to do. And, should you ever decide that you’re just no longer interested, it’s even easier to un-subscribe. Do it while you’re thinking about it, and I’ll be looking forward to seeing your name on our list. Thank You for your support, and for sharing our recipes with your family and friends.
Be Blessed!!!
Steve