Follow our easy, step-by-step, photo illustrated recipe on how to make Pork Tenderloin Biscuits. These are an old Southern favorite, and so quick and easy to make. Have some for breakfast, freeze some for later. Printable recipe included.

Southern Pork Tenderloin Biscuits Recipe
Pork Tenderloin Biscuits have long been an old Southern favorite for breakfast. While the fast food places of today don’t seem to carry them, the local Mom & Pops Restaurants know they are a good seller.
A hot and buttery Buttermilk Biscuit with a good sized portion of fried pork tenderloin is a great way to start the day. You really don’t need anything else to go with it, unless you require a morning cup of coffee.
Growing up, we raised a few hogs many years. I remember we kept several in a pig pen down by the edge of the woods on the back side of our garden plot. The further away from the house the better it seems. Something about the aroma of the pen I think. Smile.
If the weather was going to be good and cold on Thanksgiving, Daddy would plan for the “hog killing” that would be bad news for the pigs but it meant we would have a good amount of pork in the freezer for the coming cold months of winter. We were always grateful.
The process would start out early in the morning, with several neighbors helping out along with the family. I could give you a rundown of the day, but I’ll save that for later.
Mama would get the tenderloin once Daddy had removed it, and would head to the kitchen to prepare a mid-morning treat for those involved in the days work.
Biting into one of her homemade Buttermilk Biscuits with a piece of that just fried tenderloin on the inside was something that made you forget how cold it was, or how hard the grownups had been working that morning. It was just a special treat to a long workday, and the first of many meals from the mornings work that would be enjoyed for months to come.
Thankfully, Mama did teach me how to make her biscuits, but we no longer have to go through all that work to be able to enjoy a good hot tenderloin biscuit. I can ride across town and purchase one, or if I’m more inclined, I can whip up a pan of biscuits and fry up my own tenderloin in just a few minutes.
I’ll enjoy one or two while they’re good and hot, then I’ll wrap the rest and place them in the freezer for a quick breakfast biscuit later on. And, I’ll always think about how it was when we got them as fresh as you could get them.
Tenderloins are readily available in grocery stores throughout the South. It’s quick and easy to prepare, but it can go wrong real fast if you overcook it. It’s a great meal to share with family and friends.
So, if you’re ready to give it a try, check out my recipe for Mama’s Buttermilk Biscuits here on Taste of Southern, head on over to the kitchen, and… Let’s Get Cooking!
How To Make Pork Tenderloin Biscuits: You’ll need these ingredients.
Before we move forward, let me share a few thoughts with you on fresh pork tenderloin.
There is a distinct difference between “Pork Loin” and “Tenderloin” when shopping for it at your favorite grocery store. Tenderloins usually come two to a cry-o-vac style package with each tenderloin weighing about one pound a piece. Pork Loin on the other hand will be much larger, weighing 3 to 5 pounds each.
Pork Loins make for a good “pork chop biscuit” but tenderloins are what we’re working with in this particular recipe.
You may also see several single tenderloins in packages that have been marinated or flavored. While those are very good, we’re working with a plain tenderloin here. Thank you for listening.

To begin, rinse the tenderloin under some cool running water. I’ve got both here, but I will only be using one in this recipe for tenderloin biscuits. I’ve posted another recipe using the other tenderloin here on Taste of Southern. You might like that one as well.
Roasted Pork Tenderloin with Apples Recipe.
I also have a recipe that uses the larger “Pork Loin.” You can view that one at the link below.
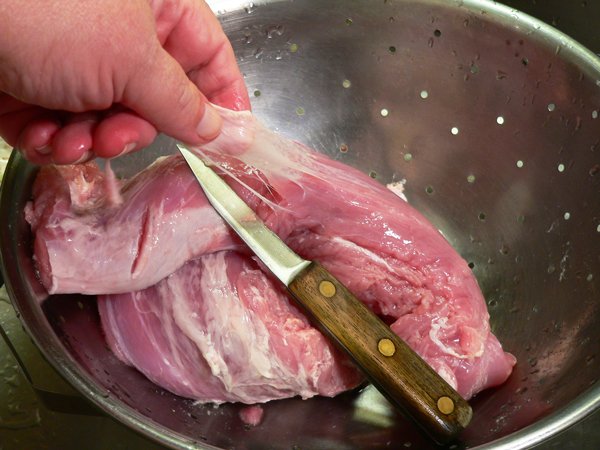
Carefully cut away the thin silver skin with a sharp knife.
This is best done with a dry tenderloin on a cutting board. The silver skin is a thin layer, silver looking in color. Just slip the point of your knife under one end of the silver skin, then slide the blade underneath, cutting it away without cutting into the tenderloin itself.

You’ll also want to cut away the thicker “sinew” that will usually be at one end of the tenderloin. This piece is tough and would be difficult to chew. It also will shrivel while cooking and cause the tenderloin to shrivel up.
Do the same thing here, slip the point of your knife under one end of the sinew, push the knife away from you as you slide the blade underneath the layer of sinew and remove it.
Here’s the trimmed and ready to slice tenderloin. Notice the right end is thinner than the left in this photo. If you were going to roast this, or even brown it in a skillet, it’s best to tuck the thin end under itself and secure it with kitchen twine. This would allow both ends to be about the same thickness and would help it to cook more evenly.
But, we’re going to pan fry this one.

With a sharp knife, slice the tenderloin into pieces that are about 1 to 1 1/2 inch thick.

Place a couple of slices of the tenderloin between pieces of plastic wrap, or get that ziploc type bag that has been hanging around on your counter for the past several days and finally put it to some good use. I totally forgot why I had this bag out, but it came in handy. Smile.

We want to flatten the slices. I found my measuring cup to be good and sturdy, so I used the bottom of it to pound the tenderloin medallions into much thinner pieces. The edge of a heavy saucer, or bottom of a sturdy coffee cup will also work. Wait… What? They have a “meat mallet” that can be used for this? Who knew? No, I don’t have one of those in my kitchen. Use it if you have one. Smile.
The slices need to end up being just about 1/2 inch thick or slightly thinner. The thinner they are, the easier they are to chew when cooked.

Place about 1/2 cup of flour, doesn’t really matter if it’s plain or self-rising, in a small bowl or on a plate.

Place a slice of tenderloin on the flour.

Add a dash of black pepper to taste.

Add a dash of salt to taste.

Coat both sides of the tenderloin in the flour, then shake off any excess flour.

You’ll need a skillet, with about 1/4 inch of cooking oil just under Medium heat.
Carefully place the slice of tenderloin in the hot skillet.
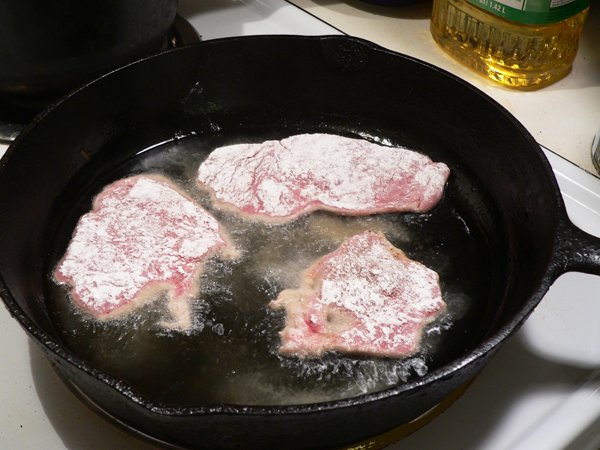
You can easily get a couple of slices in the skillet at one time. Just don’t over crowd the pan.
Fry the tenderloin on each side for about 2 to 3 minutes. The thinner you have it, the quicker it will cook.

Turn the slices over and let the other side fry for 2 to 3 minutes.
When the bubbling starts slowing down and gets quieter, the slices are probably done.
Repeat this process until you have fried up all the slices. When done, remove them from the pan and let them drain on a plate that has been lined with a couple of layers of paper towel.

Enjoy!
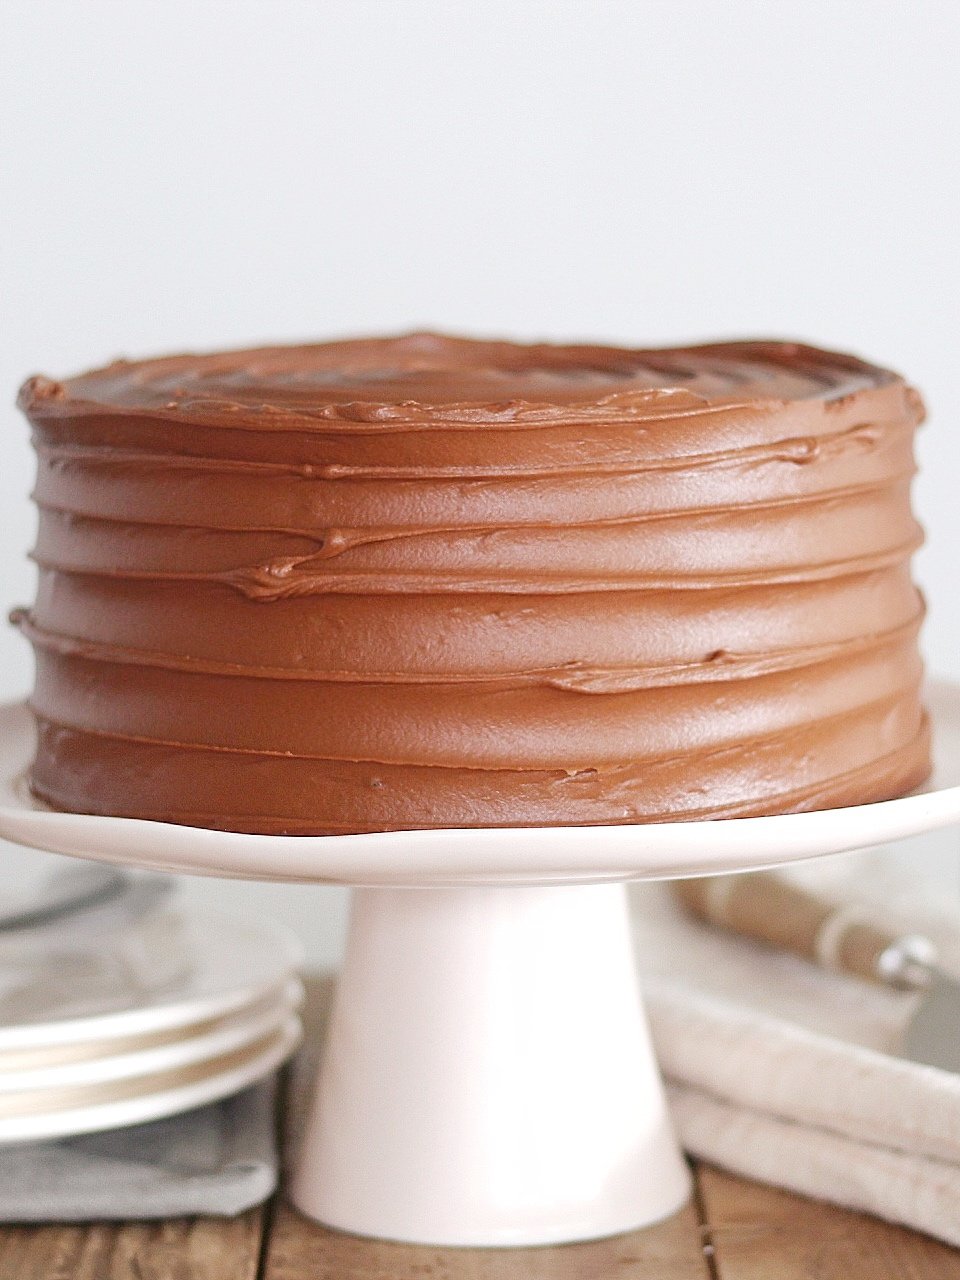
Place a piece of fried tenderloin, or maybe even two, between a sliced Buttermilk Biscuit.
I must admit, I like mine with just a little bit of Duke’s Mayonnaise. That’s some mighty good eating in my book. While you could add a fried egg, maybe some cheese, I prefer to enjoy mine just like you see them pictured above. I might have even enjoyed two of them after all the pictures were taken. Just saying. Smile.