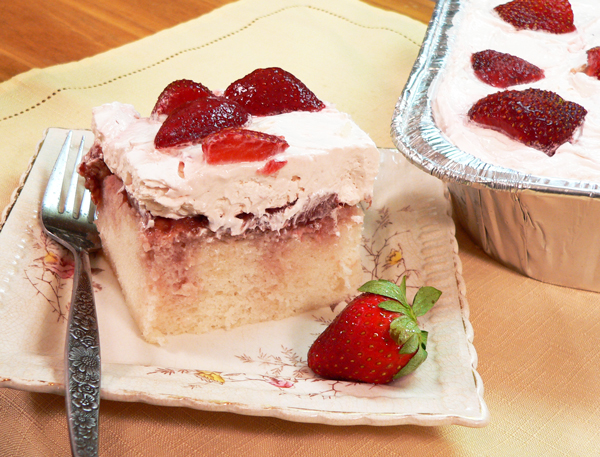
This is it…..Mama Ruth’s Famous Strawberry Cake. You’ve heard me talk about it…now…you can cook one of your very own. It’s really a very quick and easy way to fix a scrumptious dessert. Mama Ruth uses a boxed cake mix and just a few other simple ingredients. You can make it with fresh Strawberries or, use some of the ones from your freezer or grocer. You’re gonna love it. Thank You Mama Ruth…for sharing!

Mama Ruth’s Strawberry Cake Recipe:

This is Mama Ruth.
I don’t even know where to begin telling you about Mama Ruth. She’s such a joy to see walk in the door. She’s always smiling and always ready to give you a great old big hug whether you’re working or not. It’s just the Mama Ruth way. And, her reputation for being a great cook is well known around the area. After all, we talk about her all the time where I work.
Mama Ruth brings us all cakes on our birthdays. Most of the time, she’ll bring one of her home made Cheese Balls, some crackers and other goodies as well. At Christmas, it’s always lots of great homemade cookies and candies. Yep…we’re spoiled.
A few years back, it was Mama Ruth and Papa Cleo that would make the delivery. Papa Cleo is no longer with us but, Mama Ruth keeps those goodies coming and, for that, we’re all very grateful. We miss you Papa Cleo.
I’m not sure how it all got started, her bringing cakes to everyone that is but, I was really excited the day I first saw her walk through the door with one for me. I’d heard all the talk about how good her cakes were and I couldn’t help but wonder if I’d ever actually get one of my own since I was the newcomer at the time. Mama Ruth didn’t disappoint. That was about 4 years ago I think, and the cakes have been there each year since. Thank you Mama Ruth. She’s even been dropping hints to see what type of cake I might want for my next birthday which is getting closer and closer. She must have them written down because she knows all of our birthdays. How cool is that.
Seriously, I could write all kinds of good things about her. I just hope that you might get to meet her one day. You’ll be blessed if you do, I promise. Until then, you can check out lots of our recipes here on Taste of Southern and see the comments she’s left for me. She is always encouraging my efforts with the website and for that….I’m also very grateful. (Keep it up Mama Ruth.)
Mama Ruth enjoys talking about recipes about as much as I do I think. She has even written her own cookbook….for her family. She created it for her children so they could have copies of her favorites and I’ve been lucky enough to have received one myself. She typed it all up, made the copies and created a really neat little book. Please follow her lead and at least start writing down some of YOUR favorite recipes for your family so they don’t get lost forever. It’s very important. That’s the reason I started Taste of Southern….to try and save the traditional family favorites from my growing up years.
She put a lot of time and love in creating her cookbook. I’m sure she knew WHY she was doing it and, I know that not only her family but, lots of her friends will be forever grateful. She even hand wrote a personal note to me in mine and that just makes it that much more special.
So, hopefully this is just the first of many of Mama Ruths recipes that we’ll get to share with you here on Taste of Southern. As I said, I could go on and on about this very special friend. I’m blessed to even know her….let alone….enjoy her cooking.
I know you want to give it a try so….grab some fresh strawberries and…..Let’s Get Cooking!

You’ll need these ingredients.
Fresh strawberries are just perfect for making this cake but, since they aren’t available all year around, feel free to substitute some you may have frozen earlier. You can also use the packaged berries found at the grocery store. Either way, I’m sure you’re going to love this cake. By the way, Mama Ruth’s recipe actually called for Duncan Hines Cake Mix. I already had this so I went ahead and used it. Just sayin.

IMPORTANT: Follow the directions on the box for the particular cake mix that you’ll be using.
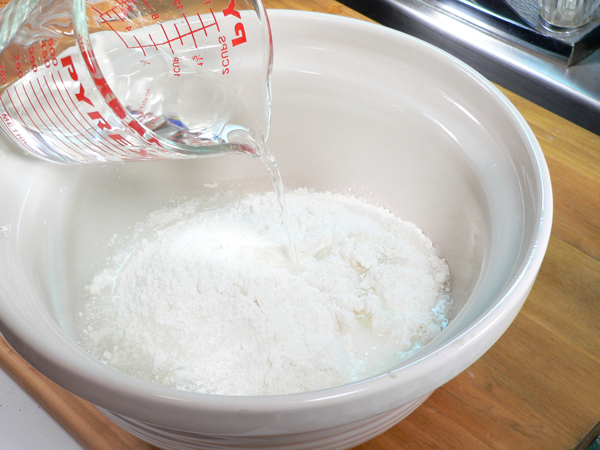
I started not to include the step-by-step for the cake mix since each manufacturer has their own way of doing things. But then, I decided why not and, went ahead and took the pictures. I just wanted you to see the whole process as we re-create Mama Ruth’s Cake. Here, we’re adding the cake mix flour to a large mixing bowl.
Add the water.

Add the oil.

This boxed mix called for just the Egg whites and we’re adding three. Save the yolks for a breakfast omelet later.

Use your mixer and start off slowly to incorporate all the ingredients. Mixers can throw all of the ingredients out of your bowl in less than a second if you aren’t careful. Now, I’m not saying that’s ever actually happened to me. I’m just trying to warn you in advance that it COULD happen. OK?

Once you have everything slightly mixed, you can increase the speed up to medium. The directions on the box that I’m using said to mix at medium speed for two minutes. Double check the box you’re using and follow whatever it suggests.

After I mixed for the required two minutes, I thought my batter looked pretty smooth. The box said I’d probably have some lumps in the batter but I think I took care of them pretty good.

This is my sheet cake pan. I poured a couple of Tablespoons of cooking oil in the pan, then used a paper towel to coat the bottom and the sides of the pan to help keep the cake from sticking. Normally, I’d also add some flour and shake it all around but, the directions on the box didn’t call for doing that.
OK….lets go ahead and get this out in the open while we’re here. Yes, this is my one and only sheet cake pan. Yes, it looks a little rough but, those are just memories of lots of great cakes gone by. There’s a lot of history behind this particular pan. It’s been in my kitchen ever since I got married years back and its seen some use. I know I need another one but, hey, this one still works. Besides, it doesn’t look like that until you use a digital camera and blow up the size of the pictures and post them on the Internet. If you could see it in real life…..oh never mind….it just looks the way it looks. Let’s move on.

Pour the batter into the lightly greased sheet cake pan.

Scrape out the bowl and be sure you get it all.

Use the back of the spoon and starting in the center, gently work the batter out into all the corners and edges.

Spread it out as evenly as possible. I always try to leave it a little lower in the middle of the pan since it’s going to rise up in the middle once it starts cooking. I don’t know if it really helps to do it but, it’s worth a try right?
Bake at 350º for about 25-30 minutes, or as directed on your box.
Again, you’ll need to follow the baking directions printed on the box of mix that you’re using. They vary, so check the recommended baking times carefully. Also, depending on where you live, you may need to adjust depending on your altitude.

While the cake is in the oven, go ahead and start working on the strawberries. You’ll begin by cutting off the green caps from each strawberry. Use a small paring knife for this step or, if you have it, use a strawberry huller. You just need to cut off the cap without cutting away too much of the red fruit.

You’ll need to remove all of the caps from the berries. You may also find some bruised berries that need to be thrown out. Just discard the caps and any bad berries. I toss them in the trash instead of washing them down the drain…..in case you were wondering.

Now, you want to wash the berries to remove any leftover stems, pieces of caps and any dirt that might be on them. Yes, I wash each berry one at a time under lightly running cool water. It’s really quicker than you think and, that way, you know each berry is good and squeaky clean.

After they’re all washed, slice each berry into a medium sized sauce pan. Smaller berries get sliced once down the middle, larger berries get sliced two or three times, depending on just how big they are. Try to keep them all about uniform in size.

Go ahead and add about 1/2 cup of Sugar to the sliced Strawberries. The sugar will dissolve very quickly and start pulling juice out of the berries. Place the sauce pan on the stove with the burner set at about Medium heat.

Let the berries come to a low rolling boil. You’ll need to stay with them and stir constantly letting them cook for about 5 minutes. Remove from heat and set aside.

Keep a close watch on your sheet cake as well. Oven times will vary as we’ve mentioned.
You’ll want to test the cake to be sure it’s done. I do this using either a wooden toothpick or a wooden skewer. I really like the skewers and keep them in my kitchen drawer. You can get a bag of them for about a dollar and, for me, they work great for testing cakes and breads. Just insert the skewer into the thickest part of the cake then, pull it out. If it comes out clean, the cake is done. If not, you need to let it bake a minute or two longer. I tested the cake before removing it from the oven, its just a little difficult to get a good picture of it that way.

Gently poke holes throughout the entire cake. The wooden skewers really work great for this. They leave a bit larger hole than using a fork but, a fork will also work. Just have fun with it and do it while the cakes still hot.

Remove about 1/4th to 1/2 cup of the juice from the pot of cooked Strawberries. Set aside and save for later.

Now, spoon the remaining berries and the juice over the top of the sheet cake you just riddled full of holes.

Spread the berries over the cake as best as you can, allowing the juice to sink into the holes in the cake.
Set the cake aside and let it cool completely.

Unwrap the Cream Cheese and place it in a large mixing bowl. The Cream Cheese should be at room temperature by now and just the right consistency to work with.

Add 1/2 cup of Sugar right on top.

Add the Vanilla Extract.

Add the Strawberry juice that you reserved earlier.

Once again, gently start mixing on your lowest speed. You just want to stir up the Cream Cheese and mix it slightly.

Pull the container of Cool Whip out of the refrigerator and dump it all into the bowl.

Mix it all together until it’s fluffy. Fluffy is a really neat word isn’t it? Wonder who came up with it. Fluffy…say it out loud. Fluffy! (Smile)

Bring back the completely cooled cake.
OK…the pan is really bothering me now. Seriously….it didn’t look that way when I was cooking the cake. What could have happened? It seems to look worse and worse in each picture. That’s it….I’m getting a new one before I make another cake. Situation resolved.

Grab a spatula and scoop out great old big hunks of the whipped topping. Plop it right down the center of the cake.

Gently start spreading the frosting out towards the sides and corners of the pan. Do this slowly so as not to disturb the berries and get them all mixed in with the topping.

Keep working it until you’ve got it as evenly spread out as possible. Then, have some more fun by making all kinds of swirly designs in it. Just use a light touch and don’t go too deep. If it doesn’t look right, smooth it out and do it all over again.

If you want, you can add some fresh sliced berries to the top. Decorate it anyway you want, it’s your cake.
While I like the look of the fresh berries on the top, just keep in mind that the red juice from them is going to start to run out into the frosting before long. The cake is best I think, if it’s refrigerated overnight. The juices that seeped down into the holes just add to the moisture of the cake itself and, it just seems to get better and better the longer it lasts. Well, that is…IF it lasts.
Thank You Mama Ruth…for ALL the Strawberry Cakes you’ve shared with us over the years. And, for all the other cakes and goodies as well. I really appreciate you and hope I’ve done your cake justice here on Taste of Southern. Now, we’re sharing it with the entire WORLD.
I’ve had lots of folks ask me about Mama Ruth’s cake so, now that she’s shared the recipe, maybe everyone can try it for themselves. I’m sure they will love it just as much as I have.
Enjoy!!!