Easy to follow, step-by-step, photo illustrated instructions on how to make and can Peach Butter. This really simple recipe only calls for sugar and peaches, and is a great way of “Saving Summer In A Jar,” so you can enjoy the delicious taste of peaches all year around. We show you how to make it, and then how to can it, using the water bath process. Printable recipe included.

Old Fashioned, Homemade Peach Butter Recipe:
Saving summer in a jar doesn’t get much easier than making this delicious Peach Butter. You only need two ingredients… fresh peaches and granulated sugar. That’s it!
This is a great recipe to start learning how to can and preserve fresh fruits, and one that you will enjoy for many months after. Of course, even if you have plenty of home canning experience, this is just another way to store up those fresh peaches while they are available.
I picked up a half bushel of peaches this week while travelling through Lilesville, North Carolina. A couple of years ago, I made a special trip to Pee Dee Orchards just to get peaches and try out their Peach Ice Cream. So, I had to stop once again since I was in the area and passing right by. Pee Dee Orchards is located on Hwy. 74 in Anson County, just about a mile from Pee Dee River.
They were pretty busy on that hot Saturday afternoon and lots of folks were enjoying cool homemade Peach Ice Cream along with picking up some freshly picked peaches to take home. They were selling them in 1/4 peck bags up to 1/2 bushel boxes and were keeping several employees busy as they tried to keep the shelf and table stocked.
I’ve sampled peaches several times this year but hadn’t really found one that had a good peach flavor until I bit into one of these from Pee Dee Orchards. I also get good peaches from Auman’s Orchards over in West End but I’ve yet to make it up that way this year. As it would turn out, the GPS system took a different return route home and I passed right by Auman’s Orchards coming back home. I didn’t stop but I do hope that maybe I can get back up that way within a couple of weeks.
I think you’ll enjoy the Peach Butter if you’ll give it a try. I’ll be looking for your comments in the section below so please let me know how it turns out for you. Ready to store up some “summer in a jar?” Alright then… Let’s Get Cooking.

Old Fashioned Peach Butter: You’ll only need two ingredients.
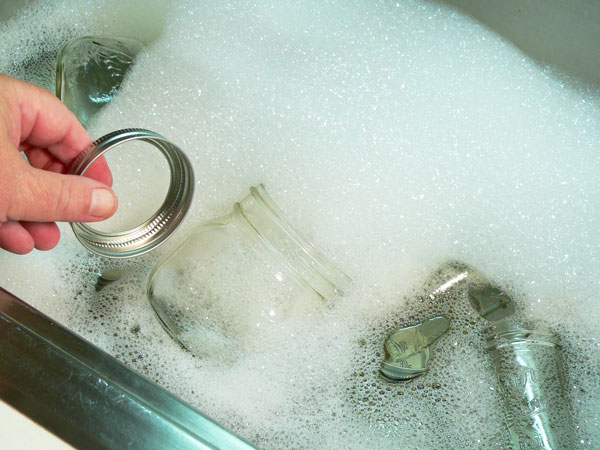
We’ll begin this recipe by washing our jars, and the bands for the jars, in hot soapy water. While you’re doing this, be sure to take a close look at the jars, especially the tops, to see if there are any chips or cracks in them. We’re also washing the bands that will hold the lids in place. Bands are reuseable for many times but you MUST use new lids each time you can. Wash the jars, rinse them and set aside until you’ve got them all clean.

I use my canning pot to sterilize my jars. I fill it about 3/4ths full of water and bring this up to a boil. As the water is heating up, carefully place your jars inside and make sure they are completely under water. The jars need to boil for 10-15 minutes in order to sterilize them. Some modern day dishwashers have a cycle that will do the same thing. You can use it if you have it.
Let the jars go through this sterilization process while you prepare the peaches. After they have boiled for 10-15 minutes, you can reduce the heat down and just keep them hot until you’re ready for them. It’s going to take a little time to cook the peaches down, so the jars will probably be ready before you actually need them. You just want to be sure they ARE ready when the peaches are ready.

Wash the peaches under cold running water to remove any dirt and the fuzz. You’ll also want to remove any stems or leaves that might be attached. If you have a large amount of peaches to work with, you could just fill the sink with water and wash them that way.
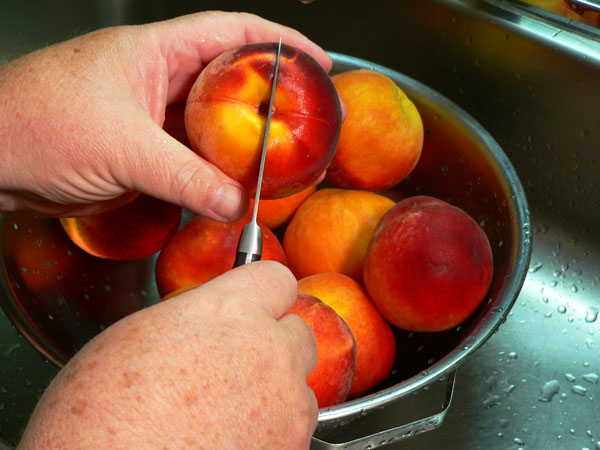
Use a sharp knife and cut a cross mark (+) in the stem end of each peach. It needs to be about one inch long and try not to go too deep with the cut, just basically enough to cut just below the skin. Cutting the peach this way will help you remove the peel in the next steps.

Fill a large pot with water and bring it to a boil on your stove top. Once the water reaches a rolling boil, drop the peaches into the water. Let them stay in this hot water for anywhere from 1 to 2 minutes until the skin softens. It shouldn’t take long for most peaches.

Immediately remove the peaches from the hot water and plunge them in cold water. I generally fill the sink and just place the peaches in the sink. These are actually in water but it’s kind of hard to tell. You could also add some ice to the water to make it colder.
The peaches need to stay in the cold water for about 2 minutes before you try to remove the peel.

After about two minutes, you should be able to very easily slip the skin off the peaches. Lift one of the edges from that cross mark you made and peel the skin away from the peach.

Remove the skins from all of the peaches. Those in the colander have had the skins removed. I always try to keep them in water the entire time I’m working with them. Peaches have a tendency to start turning dark once they are cut but we’re cooking these very shortly so it shouldn’t be a problem.

You’ll need to slice the peaches and remove the seed that is inside. Discard the skins and pits.

Slice the peaches into small chunks for easier handling.

Drain the peaches and place them in a large stock pot.

Now, add 1/2 cup of clean water back to the peaches. Place this on your stove top and let the peaches cook until tender. This shouldn’t take but about 10 minutes. Just keep stirring them every few minutes. They’ll start producing more liquid in the pot so burning and sticking to the bottom shouldn’t be a concern.

After the peaches have cooked until they are soft, you can either place them in a food processor or use an immersion blender to chop them up. You don’t want to overdo it and liquify them, just mush them up real good.

Make sure you get all the bigger lumps out and look for a consistency similar to that of applesauce.

Next, add in the sugar and stir it well.

Place the peaches on your stove top over Medium heat.
This is how I always set my stove up for canning. I place my canning pot over the large burner on the right. My food is on the left front, and right behind that is where I place a pot with the bands and lids. The pot on the right back burner is just a pot of water that I keep very hot so I can add it to the canning pot as needed.
At this step, the jars are still in the canning pot but they have already been boiling for 10 minutes so I just reduce the heat under them and let them stay in the water while the peaches cook down. Once the peaches start to thicken, you have to continually stir them and that doesn’t leave much time to be fiddling with jars and trying to get them ready.

This is a look at the lids and bands in the pot on the back left side of the stove. The lids of course have the red rubber strip on the bottom side and the bands are the metal parts that secure the lids to the jar. As mentioned above, the bands can be reused over and over until they wear out but you MUST use new lids each time you can a new jar of anything.
Please note that the lids and bands are NOT in boiling water. I keep this pot on very low heat at all times. The warm water serves to soften that red rubber compound so it can better seal when placed on the jar. You do not want to boil them at any point. I always prepare one or two jars with lids above and beyond what I think I might actually use. If I don’t use a lid, I can still use it later after removing it from the water. It’s OK to do this because it hasn’t been applied and sealed to a jar. Just let it cool down and dry then store it away until you need it later.

I also go ahead and setup my counter area so that I’m ready once the peaches are ready. I have a towel to place the sterilized jars on when I remove them from the hot water. The plate is used to place a jar in while filling it and makes cleaning up a little easier. I’ve got the magnetic wand to lift the lids and bands from the water, the tool to measure the proper amount of head space as called for, and the jar lifter on the right, is used to add and remove hot jars from the canning pot. The pot holder on the left is for the hot pot of peaches and another towel to the far left is where I’ll set the jars once they are filled and waiting to go into the canning pot.

There’s much more to be said about cooking the peaches to proper consistency than I can type up all in one place here in the recipe. This is a bit of a learned process as you grow in your canning and home preservation process. Maybe one day we can go into more detail about it and I do in some of my other canning projects that are here on Taste of Southern.
The peaches need to be at a low simmer as they cook. As mentioned, you’ll need to continually stir them as they begin to thicken. I’m sure you’ve seen those little active volcano’s that can appear in thick soups as they cook. The peaches will start to bubble and erupt all over the place if you don’t keep stirring them and it just gets worse the longer they cook. You also certainly don’t want them to scorch or stick to the bottom of the pot so… stir and keep stirring. This will take anywhere from 30-45 minutes on average but could take longer. At least you know you have everything else ready for when the peaches are ready.
I test by the spoon/sheeting method as described here: Spoon or Sheet Test
The link above goes into much more detail about how to test your jams, jellies and butters for the proper temperature to gel. You’ll also find lots of other valuable information about canning and preserving foods at home, I suggest you check it out if you’re new to canning.
For the spoon test: As you start out of course, the peach butter will be very runny. The longer it cooks, the thicker it gets. After awhile, you’ll start to see large drops as you dip into the mixture and hold the spoon above the pot. Once the large drops start running together and forming a “sheet” as they fall off the spoon the butter is ready to jar up. Remove the pot from the stove and place it on the pot holder or a folded towel.
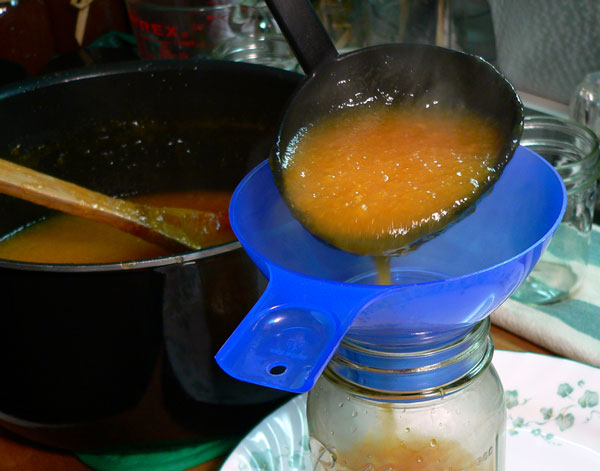
Carefully remove your jars from the canning pot and set them up on the folded towel. Place one jar in the plate next to the pot of peaches and insert a funnel into the jar. Ladle the peach butter mixture into the jars and fill it up to within 1/4 inch of the top. Now is also a good time to turn the heat back up under the empty canning pot and get that water back up to a low rolling boil.
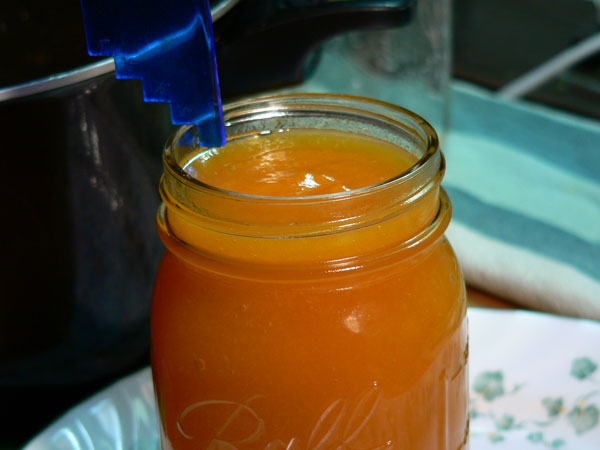
Head space is the amount of space between the top of the peach butter in the jar and the actual top of the jar itself. The Ball Blue Book recommends 1/4 inch head space for Peach Butter. There are highly recommended guidelines for filling all of your jars of jelly, jams and other items that you should follow. The tool above has various markings on it to help you find the right amount needed. As you can see, I needed just a little more peach butter added to this jar. These measurements are extremely important for food safety and just as important should you decide to place any of your canning projects into your local or state fair competitions.

Once you have the proper head space, you want to remove as many bubbles as you can that might be inside the jar. You don’t have to go overboard with this but any large bubbles should be worked out if possible. You could use the other end of the tool for measuring head space if you have one. A butter knife works well also. I like to use these wooden skewers to remove bubbles. Just insert it into the jar, all the way to the bottom, and run it around the edge and through the middle a time or two. Bubbles will follow it up to the top and burst or at least to where you can poke them and burst them.

You’ll also need to take a clean damp cloth and carefully wipe the outside threads on the jar and the very top of the jar itself. You need to remove any food particles that may have dripped on the jar and clean the top so there isn’t anything that would prevent the jar from properly sealing once you apply the lid and band. Besides, it’s kind of sticky.

Remove one lid from the water it’s been in. You don’t have to remove all the water or dry it… just shake it gently. Carefully center the lid on the top of the jar making sure it’s sitting flat on top.

Shake the water from the band as well and carefully place it over the top of the lid. Don’t force the lid but make sure it’s going on straight and then tighten it just “finger tight.” That means don’t use your full strength to tighten the lid. Give it a little twist once it’s securely seated just to snug it up a bit on the jar.

Some folks place the closed jars in the water bath canning pot as they fill them. I usually sit them on a folded towel until I get them all ready. It doesn’t take long to fill the few jars that we’re making and then I load them all at the same time. Either way seems to work.

While I’m loading the jars, I’ve got the canning RACK suspended on the top of the pot. Canning racks are made with a curve in the handles for just this purpose. It keeps the jars up out of the water until you have the rack loaded. I’ve got 4 half pint jars and one pint jar in this batch.
.

Once the rack is loaded, it’s time to drop the jars under water. Use some gloves or tongs and carefully lift the entire rack and jars up just high enough to lift the handles away from the top of the canning pot. Then, lower the rack with the jars into the boiling water. Fold the handles down over the jars and make sure all your jars are sitting up as straight as possible. The jars need to be under about 1-2 inches of water at this point. This is why I like to keep some extra water simmering on the stove. I can go ahead and fill the pot with as much water as needed and it heats right up to that boil and I don’t have to wait another 5 to 10 minutes for it to reach the boiling point.

Place the cover on the pot and start timing the process.
We’re using the Water Bath Method to process our Peach Butter. Most jams and jellies are done this way while other things like vegetables must be processed in a special pressure canning pot.
Process time will vary in many instances based on the “altitude” of where you live. You’ll need to look into this further before proceeding with any canning project. The link I mentioned above will also provide lots of that type of information for you.
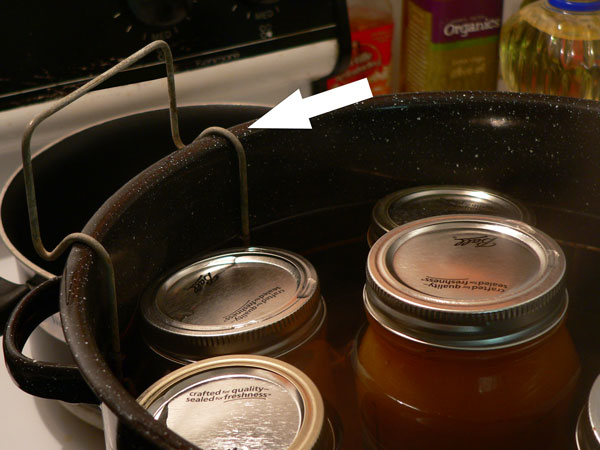
Here’s a better photo of how the canning rack hooks over the top of the canning pot. I had to let the Peach Butter boil for 10 minutes before removing the lid and raising the rack back up. Be very careful with the lid. There is nothing but hot steam underneath when you go to lift it off the pot. It’s too easy to burn your hand or arm if you aren’t careful.
After the 10 minutes, I used tongs to lift both handles and raise the jars out of the boiling water. I turned the heat off and will let the jars sit in this position for about five minutes before I remove them.

Use the jar lifter and remove the jars from the rack. Be sure you place the jars on a folded towel and in an area where they will be away from any air conditioning vents or drafts. Place the jars about an inch or two apart so they have plenty of space between to cool evenly. The jars need to be able to stay in this place for 24 hours before you move or disturb them at all. DO NOT press the top of the lids or try to tighten or remove the bands at this point.
You don’t have to be concerned about any water that might be accumulated on the tops of the jars. It will dry up and evaporate on it’s own.
Now comes the fun part. You may have already started hearing the jars “ping” or “pop” as they begin to cool. That’s about like music to my ears and brings back lots of memories of watching mama can and preserve stuff back when I was a child at home.
As the jars cool, the cool outside air pulls the hot inside air out of the jar. This motion causes a vacuum inside the jar and pulls that rubber band around the lid down tight on the top of the jar to perform the sealing process. It makes the pop or ping sound as the metal lid is pulled down once the air is pulled out. Kind of cool isn’t it? Just avoid the urge to press down on the center of the jar for 24 hours.
After 24 hours: After time has passed, press down on the center of the lid and see if the lid pushes down. It should already be down and will stay down at this point if the jar is properly sealed. If it’s down, remove the band. Gently try to lift the jar by placing your fingernails under the edge of the lid and lifting. As long as the lid doesn’t pop off your jars should be properly sealed.
It’s also recommended that you leave the bands off the jars while they are in storage. The jars should be placed in a cool, dry area and can be stored for about one year or somewhat longer as long as they remained sealed. Do not sit your jars one on top of the other. By leaving them in a single layer and by not placing the band back on them, you would be able to see if any of the jars ever lose their seal while in storage. You’d probably smell it before too long if a lid loosened and the product inside started to spoil and seep out.
Home canning and preserving can be a great way of “saving summer in a jar,” as we like to call it, as long as you follow the safe and suggested methods of doing it. I’ve just given you some guidelines here to show you how it’s done but I highly suggest you either attend classes or visit your local Agriculture Extension Agent office or website for more information.
I do hope you’ll give our Peach Butter recipe a try and I’ll look forward to hearing all about your canning adventures in the Comment Section below.

Be proud of yourself and… ENJOY!
Disclaimer: The steps listed in our canning and freezing section are to be used as guidelines to help you learn these processes. The Water Bath canning process has been around for a long time. Times change, procedures for safety change. This information is the best we can provide at the date it was first presented. I highly suggest that if you have an interest in preserving foods for you, your friends and/or your family, that you seek out more information than just what we’ve presented here. Stuff happens. Things go wrong, errors are made, sometimes jams and jellies don’t set. There’s more information available. Seek it out and learn all that you can about safe and proper home preservation of foods. More information, even classes, are readily available through your local Cooperative Extension Service location. You’ll find one pretty close to just about anywhere you live. Even though I’ve won some awards for my Food Preservation, I do not hesitate in encouraging you to learn all that you can and proceed with safety….knowing you’ve done all you can to protect anyone that you share your goodies with. Thank you once again.