
Freezing fresh Strawberries in Sugar is a great way to enjoy Strawberries throughout the year. It’s really quick, easy and a great way to get started in the home preservation of fruits and vegetables. Sadly, local Strawberries are only available for a few weeks each year so, freezing them insures you have a good supply to last for months to come. Give it a try, you’ll love them.

How To Freeze Strawberries In Sugar:
Freezing Strawberries is a great introduction into home preservation of fruits and vegetables. It’s so simple to do and the rewards are awesome because you can enjoy them for many months to come. In this “How To” section, we’re adding some sugar to our berries for added sweetness and flavor. You can certainly freeze the berries without sugar and, we have another “How To” on preserving them that way.
My first venture into Food Preservation was trying to make sweet pickles like my mom did years ago. I always loved her sweet pickles and she used the juice from them in lots of her recipes. The juice was more of what I was really after because it just makes so many dishes that much better. Mama used the pickle juice in things like potato salad, deviled eggs, chicken salad and other things. I always believed and, still do, that it was her “Secret Ingredient” for such great food.
Of course, the Sweet Pickles recipe was quite an adventure unto itself. The entire process takes about 3 weeks overall, and then you water bath canned them to store and keep them throughout the year ahead. We’re going to do that recipe later on this summer so be on the lookout for it.
Strawberries, on the other hand, are probably one of the things that got me more involved in home food preservation. A friend shared a quick and easy recipe for Strawberry Freezer Jam and it was just super delicious. That led to creating regular Strawberry Jam and using the water bath method of preserving to “put up” some jars of jam.
If you’re interested at all in learning how to do some Canning and Freezing, let me suggest that you start with some Strawberries while we still have them available. With freezing, you don’t need any special equipment other than freezer approved containers to store your berries in. So, if you’re ready to give it a try….Let’s Get Cooking!!!
Freezing Strawberries in Sugar: You’ll need these ingredients.
WOW….how much easier does it get? Just fresh Strawberries and some Sugar are all you’ll need. See…I told you this would be simple.
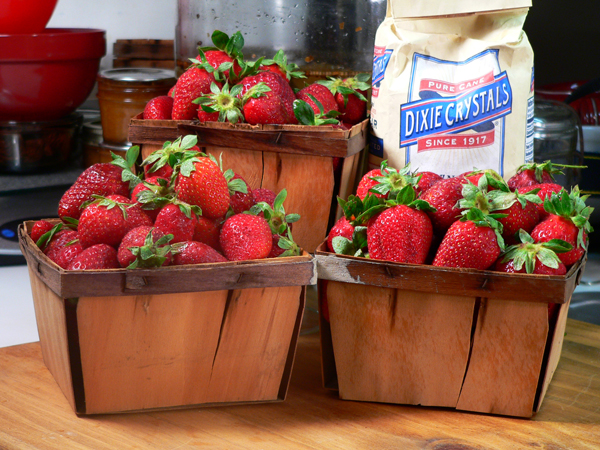
There are some things to consider before we start though. First of all, fresh Strawberries are highly perishable and must be handled gently. Whether you go out in the field and pick your own or, you buy some already picked, be sure to look for plump fresh looking berries with bright green caps..or hulls…as they’re called. You want the freshest and best berries you can find.
Sadly, depending on your source, you might find lots of unripe berries at the bottom of the bucket or container if you’re not careful. Older berries may be placed in the bottom of a container and then topped with fresher berries in order to make a sale. Most reputable farms and produce stands don’t do that though. Still, you’ll need to watch for them. Look for any leakage around the bottom of the container. If the bottom of the container looks wet or stained, it’s probably because the berries on the bottom are overly ripe, avoid those and, look for some that are better.
Strawberries do NOT get any sweeter once they are picked. They will turn darker and get mushy but, they do NOT get any sweeter than they are when picked. Keep that in mind when you make your purchase. The hulls (caps) should be bright green in color. If the caps are turning dark, it’s a sign the berries have been picked for a day or two. Look for the ones that are bright green and fresh in appearance.
If at all possible, plan to pick up your Strawberries on the same day that you intend to freeze them. Berries can be picked in the morning and worked with in the afternoon or evening. You can get away with placing them in the refrigerator overnight but try to avoid that if you can.
DO NOT WASH the berries until you’re ready to work with them. If the container is inside a plastic bag, remove the container, spread the berries out onto a sheet pan and give them breathing room before placing them in a refrigerator. Try to keep them away from the fan area that would be blowing air directly on them. I know it sounds like a hassle but, these few steps will assure you of a tasty finished product.
You might also want to seek more information about how to pick the best fruits by searching out the local Cooperative Extension Service in your area. They will normally have pamphlets or material online that can assist you. You’ll find them a great source of information for both canning and freezing….plus….many times they offer classes on how to do it. So….let’s get started.
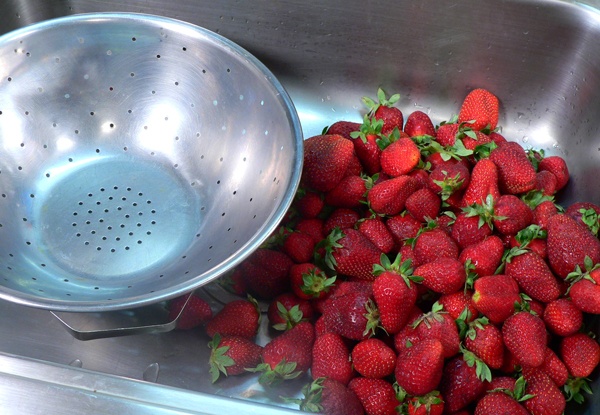
Normally, I’ll just place my fresh Strawberries in a clean sink along with my colander. Strawberry juice can quickly stain your counter tops, cutting boards or any cloth they might come in contact with. I avoid this situation by doing all the work right in a clean sink.

You can purchase a tool made specifically for removing the hulls or caps but, a simple paring knife will do the trick. Just slip the blade under the hull and slice off a slight bit of the top of the berry along with the cap.
A Strawberry Huller can range in price from a dollar up to about ten dollars. It inserts into the top of the berry and with a quick twist, it removes the hull. If you’re a kitchen gadget fanatic, you might want to look into it. I’ll just stick with the paring knife thank you.
I prefer to remove the caps BEFORE washing the berries. Many sources suggest that you wash them first and then remove the hulls. I just don’t think you get them as clean that way so I remove the cap first. The sources say that removing the caps first allows more water to be absorbed into the berry. They suggest that you wash the berries with the hulls still on them, remove the hulls and, then wash the berries lightly AGAIN to remove the stems and any pieces of stem. That just sounds like more work to me but I think you’ll be safe either way.

Remove the caps from all of the Strawberries. You’ll also want to remove any bruised or bad berries you might find. Just toss the hulls and all into the trash or into your compost pile.

Yes, I wash each berry one at a time. Push the berries aside in the sink so water isn’t running directly on them the whole time. I did that after I snapped the picture above. Just hold each berry under lightly running cold water and gently rub it with your fingers to remove any dirt, stems or pieces of hulls left on the berry. Place them in the colander after each one is washed.
You don’t want to just fill the sink with water and wash the berries. First of all, you don’t want them soaking in the water and secondly, from all that I’ve studied, it’s possible that one contaminated berry could contaminate all the others in the sink of water. Now, I highly believe in and practice safe food handling to the best of my knowledge and ability so, any step that eliminates a problem is much needed.
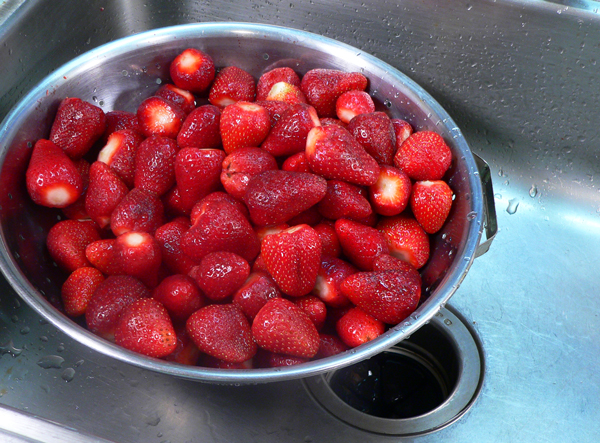
Once you’ve washed each one, just let them sit in the colander for a few minutes to allow the excess water to drain off. As you can see, I haven’t cut into the berry very deep. A huller will dig a deeper hole into the berry to remove the cap. I could see where using one of those might cause you to want to wash the berries before you remove the caps. Just saying.

Now, take each berry and slice it up. Smaller berries get sliced down the middle into halves.

Larger berries get sliced into quarters. Just try to keep the pieces as uniform in size as possible.

Slice up all the berries. Don’t they look good already?

I know that up to now, you’ve probably tasted more than one or two berries, you just can’t help it, they’re so inviting. That’s OK….because you want to know how sweet they are. Tasting will help determine how much sugar you need to add. If the berries are sweet…you add less sugar. If the berries are a bit tart you might want to add more sugar.

I used 3/4ths of a cup of sugar to each quart of berries. I had three quarts, thus I added three scoops of sugar. Just spread it out over the top of the strawberries in the pan.
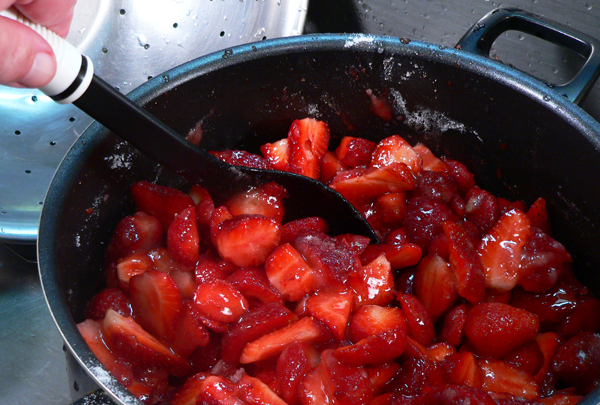
In no time at all, the sugar will dissolve and start pulling juice out of the berries. Gently stir the sugar into the berries using a large spoon. Do it slowly so you don’t break up the berries. You just want to make sure the sugar is fully dissolved and that you don’t have any sugar crystals remaining in the berries. Oh yeah….now’s a good time to grab another taste. I knew you were thinking of it. Just don’t get carried away…it’s easy to do at this point.
Let the berries sit for a few minutes to make sure the sugar has dissolved. Just don’t let them sit for more than five minutes if you can help it.

Gently spoon the sugared Strawberries into some plastic bags or storage containers that are approved for freezing purposes. Not all bags and containers are designated as suitable for freezing so be sure to double check them before using them.
You’ll want to fill the containers up to about 1/2 inch from the top. The remaining space is called “headspace.” That’s a term you’ll see a lot in canning and freezing. The amount of headspace needed will vary from one item to the next.
Wipe the tops of the containers to remove any syrup or pieces of Strawberries. Any thing left on the container tops could prevent a good seal when you apply the lid. Once they’re ready, place the lids on the container and make sure they are sealed correctly. If you’re using plastic freezer bags, try to remove any air from them and then seal them securely. Don’t over stuff the plastic bags so they will lay flat in your freezer.

Once you’ve sealed your containers….label them with the date they were packaged and it’s also a good idea to write what they are on the label as well. Sometimes, it’s hard to tell exactly what’s in a package after it’s been in the freezer for awhile. Once you’ve labeled them, get them in the freezer as quickly as possible. That sugar is still pulling juice out of the berries and they don’t need to sit out any longer.
Strawberries can be stored in the freezer at Zero Degrees Fahrenheit for between 8-12 months. While freezing them will make their texture much softer, you can substitute frozen strawberries for fresh in just about any recipe. And of course, they are absolutely delicious spooned over some ice cream, pound cake or just enjoyed cold, straight out of the container. Thaw them slightly before using.
I remember when mama would pull a carton of her frozen strawberries out of the freezer, she’d let them sit for just a little bit to start thawing out. I’d grab a spoon and scrape a little of those softened berries off the top and eat them. It was like eating Strawberry Popsicles.
See how easy it is to store up some fresh Strawberries to enjoy throughout the year? And, by preserving and canning your own products at home, you know exactly what ingredients are in them….and….what chemicals and preservatives AREN’T in them. I do hope you’ll give it a try and leave me a comment below to let me know how you did. I will warn you though…you might just want to try something a little more intensive next. That’s OK…you can do it.
Now, if you’ll excuse me, that dish of extra Strawberries up there in the picture is calling my name. Want some?
ENJOY!!! Now and for later


