Follow this step-by-step, photo illustrated recipe for making our Southern Fried Grits recipe. If you’ve never tried them, I’m sure you’ll be just as surprised as I was the first time I ever tasted them. It’s certainly not going to be what you think or expect….especially when you top them with syrup. Grits and syrup? Oh yes. Perfect for breakfast as a main dish or just a side dish. Go ahead….give them a try.

Southern Fried Grits Recipe:
I know what you’re thinking. How in the world can you possibly think that frying grits and, topping them with maple syrup, can in any way taste good? Not to worry, you really aren’t going to believe me until you actually give them a try yourself. It’s “what to do,” the next time you have some leftover grits but, I bet you’ll soon be making EXTRA grits just so you can prepare them again.
It happens often, you make a pot of grits but end up with a little leftover at the end of the meal. Don’t throw them away, save them following the instructions below and fry them up the next morning for a delicious side dish with some bacon and eggs. You can serve them plain but, they’ll be even better when you drizzle some maple syrup over the top.
I had cooked up some grits one morning not too long ago for myself but made a little more than I could devour. It’s not the first time, I just seem to do it often. I hate to admit it but, normally I’d just scrape them out into the trash can and throw them away. On this particular day though, I got busy with something else and the grits stayed in the pot on the top of the stove for a couple of hours. Naturally, they hardened up into one big mass in the bottom. I was using the last of some locally stone ground grits I had on hand and I hated to see them go to waste.
I wondered if they could be warmed up just like they were so, I stuck them in the refrigerator for the next day. Afterwards, I searched the Internet and found that Fried Grits were an old southern tradition that I’d never been exposed to. I’d never heard of them let alone tried them. Then, I saw that they were often served fried with maple syrup poured over the top. What….maple syrup? It just didn’t sound appetizing at all. I love grits but, I’m sorry, I just didn’t think they could be any good topped with syrup. Boy, was I ever in for a surprise.
Next morning, I fried up my first batch of grits. I just placed them in my skillet as I cooked breakfast but I couldn’t bring myself around to pouring the syrup over them. I topped them with a pat of butter and found they were pretty good just like that. At least I’d found a way to save leftover grits. But then, I pulled out the bottle of pancake syrup and drizzled a little over the last couple of bites that remained.
Apparently, I must have liked them because, over the next couple of days, I tried them a few more times. I found that dredging them in flour and a light egg wash would give them a crispier outside that just went well with the syrup. It’s almost like eating regular pancakes. Seriously. Don’t take my word for it though, cook up a batch, have them for breakfast and you’ll see just what I’m talking about. Ready to give them a try? Alright then….Let’s Get Cooking!

Southern Fried Grits Recipe: You’ll need some grits of course….some that have already been prepared.

You’ll start by making up some grits. I used quick grits and I can’t wait to give them a try with some stone ground grits. Just follow the directions on your package and fix them as directed. While they’re warm, pour any that are leftover into a shallow type dish or baking pan. I’m using a small plastic take out container to make mine. The grits filled it about one inch up the side. I’d suggest you not fill it more than 1/2 an inch thick though. Thinner one’s will be a bit more crunchy overall and a little easier to handle.
When the grits are cool, wrap them with plastic wrap or aluminum foil and, refrigerate overnight so they can firm up.

Next morning, setup a simple dredging station to coat the grits in. You’ll need about a cup of flour in one dish or a plate. Then, crack an egg into a small bowl and stir it up good with a fork, pour that into a separate dish to make the egg wash.

Remove the grits from the refrigerator and flip them out onto a cutting board. As mentioned, these are a little thicker than I’d actually recommend you make.
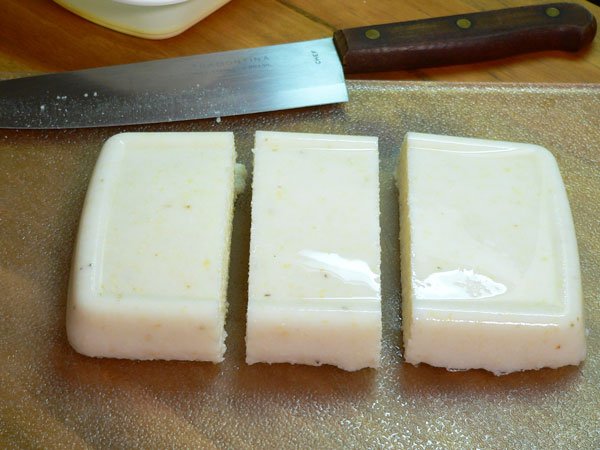
Slice the firmed up grits into sections. You can make smaller slices, triangles or thick slices. Just don’t slice them too thin or they will probably break apart.

The grits will probably be moist enough that you can just dip them into the flour as is. Mine had released enough water that I actually had to pour the water out of the container they had been in while in the refrigerator.

Flip the sections over and coat both sides with flour. You’ll also want to coat all of the ends. Handle them gently so as not to break them. They’re amazingly firm but, you don’t want to break them apart while you work with them. As you finish each one, lay it on a plate until you’ve got them all coated.
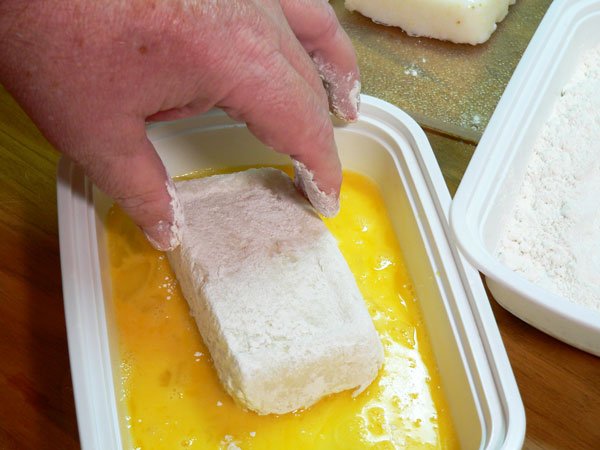
Dip the floured pieces into the egg wash.

Coat the section in the egg wash, flipping it over to coat both sides. Dip the ends to be sure all sides and edges are coated well.

Now, lay them back into the dish with the flour, working with them one at a time.
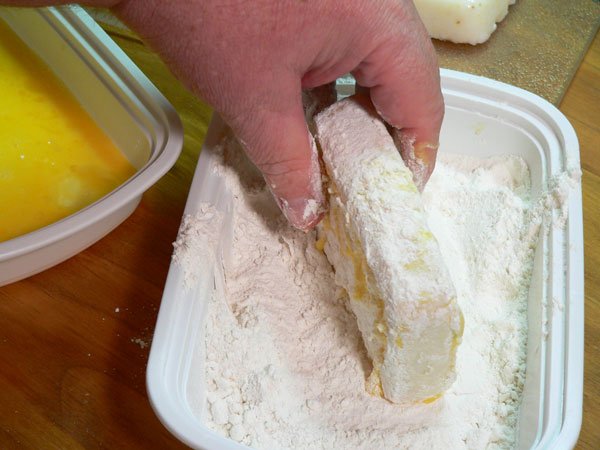
Just work them around with your fingers until you have coated both sides and all the ends and edges again. Shake off any excess flour, place on a plate and let them dry for a few minutes.

You’ll need a frying pan placed over medium-low heat with about 1/4 inch of cooking oil in it. I used my cast iron skillet to make these. As I’ve already mentioned…three times now…..mine were a bit thick. Make yours thinner and that way the oil should come up about half way on the sides of the sections as they are frying to be sure the ends get fried as well. Frying them over a lower heat will help them brown better without burning them.

When you notice that the bottom edges and sides are starting to brown a bit, use a spatula and carefully flip them over. It took about 5 minutes to cook the bottom sides. Remember, the grits are already cooked, you’re just browning the coating at this point. You may need more or less time on yours depending on how hot your frying pan actually is.

When the other side and edges are browned, remove them from the frying pan. Place them on folded paper towels and let them drain for a minute or two.

You can serve them plain with some bacon and eggs……or……

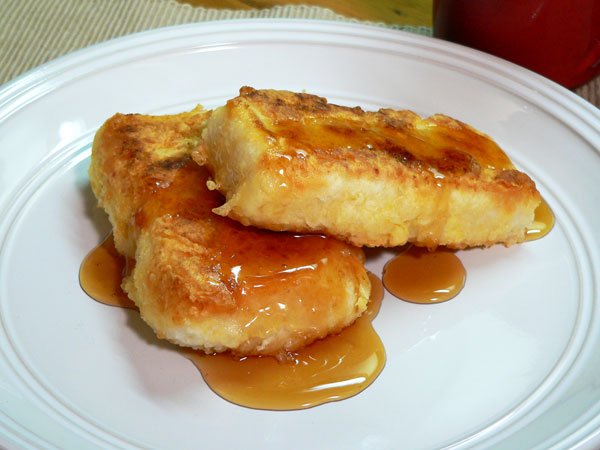
Go for it…..cover them in some maple syrup and Enjoy!!! You can thank me later. Please leave us a comment and let me know if you like them.