Rich, flaky, buttery tasting pie crusts made-from-scratch are easier than you think. Great pies begin with great ingredients and there’s no reason to create a pie with anything but a homemade pie crust. Family and friends will love it when you tell them you made the crust too. You’ll see and taste the difference. Put your fears aside and get ready for a whole new adventure in baking.
Basic Pie Crust Recipe: Makes ONE pie crust.
PLUS….we’re including instructions on how to turn this into a pre-baked crust as well…keep reading.

Basic Pie Crust: You’ll need just a few ingredients.

Begin by scooping a couple of cups of flour into your sifter.

Sift the flour into a bowl.

Spoon the flour back into the sifter.

Sift the flour for a second time.

Use a spoon and scoop flour from the bowl to fill up your measuring cup.

Fill the measuring cup to overflowing.

Use the back of a knife or something similar and level off the top of the flour across the measuring cup….this equals one level cup.

Add all the flour needed into a mixing bowl.

Add the salt.

Add the sugar.

Gently whisk the dry ingredients together.

This is the way I “cube” my butter. Stand the stick of butter on end and slice down the middle with a sharp knife. Remember to keep the butter as cold as possible until you’re ready to use it. Often times, I’ll place the stick of butter in my freezer for a few minutes before I start to slice it. Cold butter is very important to the recipe.

Turn the stick of butter around and slice down the middle again.

Lay the stacked slices down and slice through the layers to create the “cubes” of butter.

Add the butter cubes to the flour.

I like to toss the cubes around in the flour to coat them. It keeps them from all sticking together so much.

Add in the cold shortening.

A pastry cutter comes in really hand to “cut” the butter into the flour. You could use a couple of forks, couple of knives or even your fingers to work the butter into the flour. Just remember that if you’re using your fingers, the butter will warm up pretty quickly. Again, keep the butter cold as much as possible by working quickly at this point.

Work the pastry cutter around through the butter and flour until you’ve reduced it down to pieces about the size of peas.

Gradually add the ice cold water…a little at the time. You need to use really cold water during this step. Begin by adding one or two tablespoons of the ice water and gently stir with a fork. The exact amount of water you need will vary from one recipe to the next so, start with just a spoonful at a time and add more only as needed. I think the warmer the butter gets, the less water you need because the water in the butter itself will help the flour stick together. I used 3 Tablespoons in this one.

Use a fork to stir the water into the flour. The secret here is to add just enough water to reach the point where the flour will stick together. You’ll see this begin to happen as you add the ice water. Stay on the safe side and add the water slowly. You don’t want to overwork the dough at this point. Stir it just a little and add more water as needed. The more you make pie crusts, the easier it will become to recognize what’s needed in this mixing process to get just the perfect crust. You know…as the old saying goes, “Practice makes perfect.”

When it starts to stick together…it’s ready to shape.

Use your hands and quickly shape the dough into a ball. If you’ve added too much water, the dough will be sticky. You can add a little more flour if needed. Or, if the dough is not sticking together, add a little more water until it does stick together. Again, the more you do this, the better you’ll get at it. Don’t be discouraged if it doesn’t come out great your first time around, just jump right back in and try it again. You can do it.

Wrap the dough in plastic wrap and gently pat it out a bit. Place the wrapped dough in the refrigerator for at least an hour or two before using. Or, if possible, leave it overnight. The dough just relaxes down and seems to work better when used the next day. Dough may be refrigerated for one or two days if needed for later use. You can also wrap the whole thing in aluminum foil and freeze it for up to several months but, who can wait that long for pie…right?

When ready to proceed, remove the dough from the refrigerator and take off the plastic wrap. Lightly flour the surface of your counter with more flour and then place the dough on that. Lightly dust the top of the dough ball with flour as well.

Grab a little of the flour in your hand and rub it across your rolling pin. Then, take the rolling pin and smack it down on the dough a time or two to flatten it out a bit. If the dough is really cold, let it sit for about five minutes and then proceed with rolling it out.

Using just a light pressure, begin rolling out the dough. Start in the center of the dough and roll out to the edges. Watch it closely because the dough likes to stick to the rolling pin when you get to the edges. Sprinkle a little more flour on it if need be. Roll it a time or two in one direction, then lift it and turn it to roll it out in the other direction.

Lift and turn the dough to keep rolling it out into a circle. If the dough is sticking to the counter surface or to the rolling pin…lightly dust either with a little more flour. The dough will typically roll out with just a few turns. Try not to overwork the dough too much but, make sure you’ve rolled it out about 1/8th to 1/4 of an inch thick. You can lightly place your pie plate on top of the dough to make sure it’s large enough. You’ll need a good inch or more beyond the rim of the pie pan to allow for the dough up the sides of the plate and the overhang around the edge.
Can you see those yellow chunks of butter in the dough? You really want those. Butter consists of water and fat. As the pie bakes, the water will evaporate and leave pockets of air…that’s the flaky part. The fat in the butter and the shortening is what makes the pie crust tender.

Carefully lift one edge of the dough and roll it up and over your rolling pin. Roll all of the dough onto the pin. This will make it easier to transfer the dough from the counter top to the pie plate or pan itself. If you’re using a rolling pin with handles, like mine, make sure you place your thumb on the large middle part that’s holding the dough when you go to pick it up. Otherwise, it could easily turn on you and you might end up with a big sheet of dough on the floor. You can thank me later.

Move your pie plate onto the counter. Place the rolled up dough on one edge of the pie plate and unroll it to the opposite side. See how easy that was? You’re well on you way to becoming a master pie baker.

Use your fingers and gently press the dough down into the edges of the bottom of the dish. Pat it out so that it’s even all the way around the bottom. This will keep it from drawing up as it bakes.
If the dough develops a hole or tears, pinch off a little of the extra from the overhanging part and patch it. I could have rolled mine out a little bit larger because you can see on the bottom left corner of the picture that my dough isn’t totally covering the pie plates rim. I’ve also got a bit of a separation up in the top right corner that’s bare. Hey…I’m just trying to be a good friend and show you how things happen when you’re making a pie crust. It’s easier to explain the “fixes” that way. So yeah….maybe I did that just so I could tell you about repairing some problems if they arise. Yep..that’s it…that’s what I was doing. (Smile)

Now, take a sharp knife and run it around the outside of the edge of the plate rim and trim away the excess. I made a bit of an attempt on that upper right edge to repair that bald spot. See it?

Take a fork and gently press it into the top edge of the pie crust all the way around. It’s what mama always did to add a little bit of a fancy edge to her crusts. Just looking at this picture floods my mind with all types of memories of her doing this with her crusts. Of course, her’s looked much better than mine but, that was years and years of experience I was watching as she made her crusts. Nope…that’s just a little bit of trash or something in my eye…I’m OK. (pausing to reflect for a moment)
REFRIGERATE THE CRUST AGAIN FOR 30 MINUTES BEFORE USING.
You can lightly wrap the whole thing in plastic wrap if you want but, I just placed it in the refrigerator like it was. The dough needs to relax a little more before you add the filling.
Taking pie crusts a few steps further. The following is just for your information and is in by no means the complete and last word in pie crust making. We’re just gradually touching a few topics that you might want to look into further.
Depending on the TYPE of pie, you may want to either hold moisture in…or…let moisture out. If you’re making a juicy fruit pie, you’ll want to hold moisture in. Some folks make an egg wash and brush it into the bottom and up the sides of the pie to help seal the dough before adding a juicy type of filling. To do this, break an egg into a small bowl and add about a tablespoon of water. Whisk it together well and brush the bottom of your pie crust in the dish. Add your filling and bake.
Other types may need to let moisture out of the crust as it bakes. Quiche or savory pies may need this. To do this we’ll use a fork to poke a few holes in the bottom of the crust.

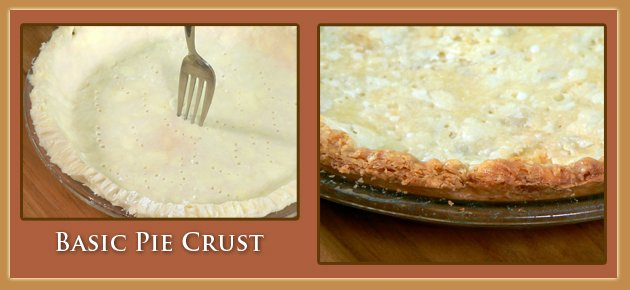
Simply take a fork and “Dock” the bottom of the crust…or…what it simply means is…poke holes in the bottom. Add your filling and bake.
You may also come across a recipe that calls for a pre-baked crust. The steps below will help you with that.
Pre-Baked Pie Crust Recipe:
OK…we’re going to take this one step further and make this a Pre-Baked Pie Crust. I’m using this particular crust for a Tomato Pie recipe that can be found here on Taste of Southern that calls for a pre-baked crust.

To begin the pre-bake process, take some light aluminum foil and gently press it into the dough in your pie pan. Fold the edges of the foil over the edges of the rim of the crust. Don’t press it into the dough but just gently resting on the dough.

Open up a bag of dry beans and pour them into the foil lined crust. You could also use dry rice for this…just something that will give it a little weight as the pie bakes. Your favorite Kitchen Store will probably also carry some “pie weights” that can be used and re-used for this purpose. Until you’re ready for those, about any type of dried beans will work great and…you can also re-use them as needed.

Spread the beans around evenly.
Preheat your oven to 425º and bake the pie crust for 20 minutes.

Remove the pie crust from the oven. Remove the beans and after they cool, store them in a Mason Jar for the next time you need them to pre-bake a crust.
REDUCE OVEN TEMPERATURE TO 375º and return the crust to the oven.
Return the uncovered crust to the oven and bake for about 10-15 minutes longer until lightly browned. Remove from the oven and let cool completely before adding your ingredients.

Notice the air pockets that have formed in the crust. This is where the water from the butter has evaporated and left the air pockets. That’s the “flaky” part of our crust. Cool huh?

Here’s another view. The completed crust, pre-baked and ready to be filled with all kinds of great things.
Enjoy!!!