Follow our easy, step-by-step, photo illustrated recipe to learn how to make Applejack Fried Apple Hand Pies. This old timey Southern favorite is good by itself, and even better topped with ice cream. Printable recipe included.
Apple Jacks – Fried Apple Hand Pies, made from scratch.

Many of the recipes here on Taste of Southern are attributed to my mother. She often told me that it was Daddy that taught her how to cook, but I don’t have many memories of him standing over the kitchen stove.
Daddy made some great barbecue when we killed hogs. He also liked to make Potato Candy, and of course he often made these Fried Apple Hand Pies. He called them Apple Jacks, or Applejacks. Not to be confused with the cereal you’ll find in the grocery store however. Smile.
After we moved from the country into more of the city life, Daddy opened up a produce stand in our front yard, out by the roadside. He had three different garden spots that he took care of for the most part, and he left me in charge of the produce stand and it’s customers throughout the day.
When Fall rolled around, we’d often have one or two trucks that would stop by our produce stand with fresh mountain grown apples for sale by the bushel. Daddy would always buy several bushels and resell them in the produce stand. It was always good to see those big fresh apples on the shelves along with our end of summer produce items fresh from the garden.
When the apples came in, Daddy would take to the kitchen to make up a batch of these Applejacks as he called them. They were always so good tasting, and I looked forward to him making them often.
What we didn’t eat right away, would end up in the wooden cabinet with the glass doors that we called the pie safe. They would lay on a plate, uncovered, and disappear pretty quickly from there too. Smile.
Daddy never tried to sell them in the produce stand that I recall. But, I see them ever so often at the Farmers Market, or maybe some old timey type store that I always have to visit when I see one. They are always wrapped in clear plastic and sitting right beside the cash register. I can’t resist their looks or their tastes, I have to have one.
I do hope you’ll enjoy one of my memories of Daddy in the kitchen. I’ll be interested to learn how you like them. So, if you’re ready to give them a try, let’s head on out to the kitchen, and… Let’s Get Cooking!

Daddy’s Fried Apple Hand Pies – Apple Jacks, you’ll need these ingredients.
I’m using dehydrated apples that I dried myself. You can make these with fresh apples, but this is the old timey way of doing it.

Place the dehydrated apple slices in a large mixing bowl.
A few years back, I purchased a cheap dehydrator at a local auction I attended each week. Then, it sat in its box on a shelf for well over a year before I finally decided to try it out. What you see above is the first and only thing I ever tried to dry with it.
I think this is about one entire apple, plus about half of another one. I sliced them pretty thin, and even though the dehydrator had five racks in it, it just didn’t hold very much when you spread the slices out on each rack.
The whole drying process took a good 24 hours to get them to this point. So after leaving the little dehydrator machine running all day and all night, this is what I ended up with. Smile.

To re-hydrate the apple slices, you’ll need to cover them with water and let them sit on your counter top overnight.
You can purchase dried apples online or at some local stores and farmers markets. You could also make these with the apple pie filling in the can, or even dice up some fresh apples, whichever you prefer.
Daddy would dry apples out in the sunshine, or most often as not, would use fresh apples to make his Applejacks.

Next day, place the apples and enough of the liquid the apples had been sitting in into a medium sized sauce pot. You’ll need enough liquid to cover them good with. Of course, they still float so you’ll just have to adjust accordingly.

Add the sugar.
This will be a matter of taste. I started out with 1/2 cup, but ended up adding another 1/4 cup after the apples had cooked down for awhile. I like them a bit on the sweet side, but you can adjust the amount according to your own preferences.

Add the cinnamon.

Add the nutmeg.

Place the pot with the apples over Medium heat on your stove top. Bring it to a boil, then REDUCE the heat to a low simmer and let the apples simmer for 45 minutes to an hour until the apples are tender and the liquid has reduced down. You’ll need to stir these about every 15 minutes to be sure they aren’t sticking to the bottom of the pot.
At this point, you should taste the apples to see if you think they need more sugar, cinnamon, or nutmeg. Adjust according to your own personal tastes.
I like to cook them down until there is very little liquid left in the pot. Don’t let it all boil away, but you don’t want a lot of liquid going into your hand pies.

When the apples are cooked to the way you want them, remove them from heat. Add the butter and stir it into the apples until it’s fully melted.
COOL THE APPLE MIXTURE COMPLETELY BEFORE MAKING HAND PIES.

Prepare your dough.
I’m making these with the exact same dough I use in our Mama’s Buttermilk Biscuit recipe. Just make the dough for the biscuits, then pinch off a small amount for each hand pie. Flour your board and rolling pin, then roll out each piece of dough into about an 8 inch circle.
You’ll find some pretty good canned biscuit dough in your local grocery store. Get the one’s more like an old fashioned biscuit, you know something GRAND. Smile. Roll them out just like we did above.

Spoon a small amount of the filling onto the dough. Notice I’m not placing it exactly in the center of the dough, but to one side of it. Leave a clear edge around the outside. Also, try to add as little actual liquid. A slotted spoon works great for this.

Dip your fingers into a bit of cool water and spread the water around the bottom half of the dough. This will help the dough seal together much better in the next steps.

Fold the top half of the dough over the filling, keeping the edges together as close as possible.

Work your fingers around the edge of the dough and the filling inside, and gently press the dough layers together.

Use the back of a fork to crimp the edges of the pie together. It helps to dip the fork in flour so it doesn’t stick to the dough. Avoid pressing into the area that holds the apple filling.

Place a skillet over Medium heat on your stove. When the pan is hot, add about 1/2 an inch of oil or shortening to the pan and let that heat up to the frying point. About 350F degrees.
Gently lower one of the apple hand pies into the hot oil. Let it cook until you see the bottom edges starting to turn brown.

When you notice the bottom edge turning brown, use a spatula to gently flip the hand pie over. Be careful, it might splatter a bit. Let the apple hand pie cook on the second side until lightly browned. This will take about 2 to 3 minutes per side. The filling is already cooked, we’re just cooking the dough part now.
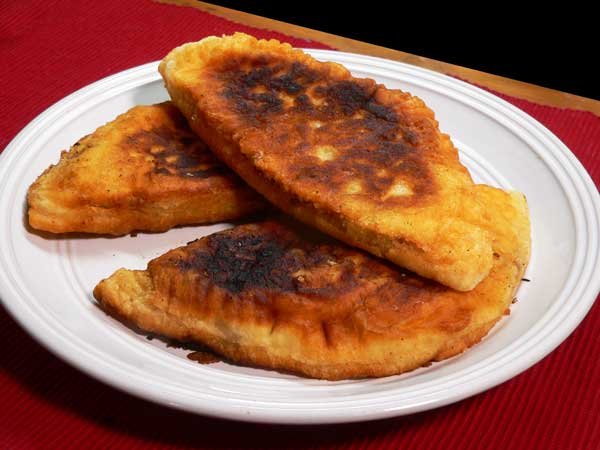
As you can see, cast iron pans have a bit of a hot spot in the center. I can’t decide if that’s a smiley face in the middle or if it’s Mickey Mouse ears. Smile.
Depending on the size of your hand pies, you might be able to cook two or three at a time. Daddy always made large one’s so that is how I make them as well.
When they are done, remove them from the skillet and place on a wire rack to drain and cool.