Follow our complete, step-by-step, photo illustrated recipe to make this sweet, moist, and very delicious Strawberry Bread.
We used fresh Strawberries to make this fruit bread. You’ll love it.
Strawberry Bread Recipe
I think we call this bread, instead of cake, so we feel less guilty about enjoying more than one slice. It’s just my opinion of course, but if you like it, feel free to use it. Smile.
Seriously, this is a very moist, very delicious bread, that taste a lot like cake.
I tried several Strawberry Bread recipes, before finding one that I liked and that turned out not being soggy. Strawberry Bread can sometimes turn out more like bread pudding than just a bread. This recipe is adapted from one by King Arthur Flour. I did make some changes.
Strawberry season is just kicking off around here. I’m fortunate enough to have several berry farms close by, and I’ve tried them all.
When a reader of my Newsletter suggested a fairly new place near the coast, and insisted they had some really sweet berries, I had to check it out.
I was headed to North Myrtle Beach, South Carolina recently, and I did drive a few extra miles, but the results were worth it.
If you’re ever near the Oak Island, Southport, North Carolina area, please stop in and say hello to the very friendly Melissa Hight and all the fine folks at Brunswick Berries and Produce located in Bolivia, North Carolina. You can pick your own, or buy berries already picked. I promise, you will not be disappointed. Nice and sweet.
I started to call this Brunswick Berry Bread, but I might need permission to do that. Smile.
I’m not sure if I just under baked some other bread recipes or not, but I failed nicely several times in trying to make a good Strawberry Bread. The juice from the berries can sometimes change the ratio of ingredients and cause fruit bread to turn out soggy, or like bread pudding.
I baked this a little longer than the others, and was well pleased with its moistness, it’s texture, and it’s taste. Yes, it uses 2 cups of sugar, which causes it to taste more like pound cake, but keep referring to it as bread and go ahead and have another slice. You can thank me later. Smile.
Ready to get the kitchen smelling good? Alright then, grab a container of fresh strawberries, head on out to the kitchen, and… Let’s Get Cooking. Or, should that be baking? Smile.
Strawberry Bread, with fresh strawberries. You’ll need these ingredients.
Prepare your loaf pans. I’m using two loaf pans that have been lightly sprayed with a oil and flour baking spray. The recipe makes two loafs.
Remove the hulls/stems from the strawberries with a huller or a paring knife. Then, rinse the berries under cool running water to remove any dirt.
These Brunswick Berries were picked after they were fully ripe, that’s what makes them sweeter. Berries do not get sweeter if you pick them with some white or green showing. Yes, they turn red, but not sweeter. I really liked hearing Melissa say that about the berries they pick for their store.
Lots of folks aren’t aware of that fact and pick berries before they should be picked.
Dice the berries.
It may take a minute or two longer to cut them with a knife, but we’re trying to make as little juice as possible. Chopping them is possible, but it makes more juice.
Either way, I’m going to just let them stay in the colander and drain while I prepare the batter.
It’s best to sift the flour first, before measuring. This helps to aerate the flour.
Once sifted, spoon the flour into your measuring cup. Then using the spoon or a butter knife, even off the top of the flour so you’re using level cups. Measure out the needed amount of flour into a large mixing bowl.
Add the sugar to the flour.
Add the baking soda. Again, use a level teaspoonful.
Add the salt.
Mix all the dry ingredients together until fully combined.
I ended up transferring this to a larger mixing bowl. This one wasn’t going to be big enough.
You’ll need another bowl to mix the wet ingredients together.
Add the oil.
Place the eggs and the vanilla flavoring into the bowl with the oil.
I always suggest you crack your eggs into a smaller bowl first. It makes it easier to see and remove any small pieces of egg shell that might fall into the bowl. I also used a fork to stir the eggs some first.
I took a photo of adding the eggs, but for reasons unknown, it was very blurry. Smile.
Whisk all the wet ingredients together until fully combined.
Pour the wet ingredients into the dry ingredients.
Grab a sturdy wooden spoon and stir everything together, just until fully combined.
Don’t worry about having a few lumps, but do be sure you get all the sugar mixed in well.
Place the drained berries into a bowl and sprinkle them with the two Tablespoons of reserved flour.
Use a spoon to gently toss the berries and flour together, lightly coating the berries.
This will help keep the berries from all settling down into the bottom of the loaf while it’s baking. It actually does generally work, so don’t skip this step.
Add the coated berries to the batter.
Use that large wooden spoon again to gently fold the strawberries into the batter.
Divide the batter between the pans.
Yes, I’ve switched baking pans. I didn’t actually have a photo of two greased pans, so I slipped an old one in at the top of this post. Did you catch the difference? I was just testing you to see if you’re really paying attention. Smile.
And, this pan is a bit larger, so I had enough batter for this one, and a smaller aluminum loaf pan that I had hanging around. The recipe calls for two loaf pans of average size.
Place the pans in your oven that has been pre-heated to 350F degrees.
I placed the rack in between the middle and the bottom rack position in my oven.
For the record, I wanted to be sure this loaf was done, so mine baked for one hour and 30 minutes.
After one hour, I placed a small sheet of aluminum foil on top of the loaf. I just laid it on top so the top of the loaf wouldn’t burn. It helped for the most part, but mine did burn slightly around the edges on each end. The bottom and top were browned nicely, but they didn’t burn.
Ovens will vary, so watch the bread carefully after about 55 minutes.
Test your bread with a wooden skewer or toothpick to determine whether it’s done or not.
Insert the toothpick into the loaf and if it pulls out clean, without any crumbs attached, the bread should be done. If it has crumbs, or looks wet, place the loaf back in the oven to bake a little longer.
The bread also should have a bit of a hollow sound when tapped on top.
If you look closely, you’ll see that my smaller loaf burned a bit around the edges. I should have pulled it out sooner, but I wanted to be sure they were done.
When the bread is done, remove the pan from the oven and place it on a wire rack to cool for about 10 to 15 minutes.
After 15 minutes, turn the loaf out onto your wire rack to let it completely cool.
You might need to run a thin knife around the inside of your pan to help separate the loaf from the pan in order to remove it. Mine tried to stick a little, but the knife trick worked and when I flipped it over, it came right out.
The bread needs to cool completely before slicing. I let mine cool overnight, wrapped gently with a tea towel until the next morning.
Enjoy!
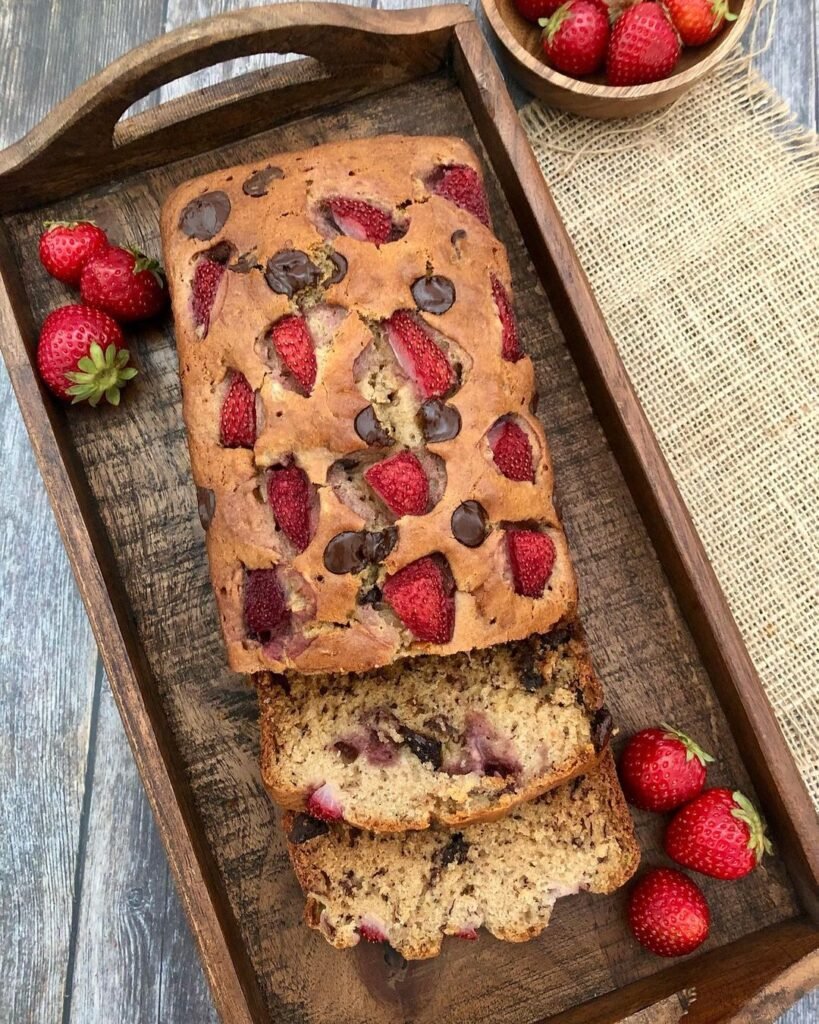
The texture of this bread was more like that of a pound cake. And, as you can see, the flour coating on the strawberries did keep them from all settling to the bottom of the pan as it baked.
While it didn’t have a strong berry flavor, I found it very tasty and hard to keep from going back for more. It was very moist, and I’m sure something I’ll enjoy a few more times while we are getting fresh strawberries around my area.
If you decide to try it, please share your Comments with me below the printable recipe. Smile.


