
Follow step-by-step, photo illustrated instructions and learn How To Render Leaf Lard. Making your own lard at home, is much easier than you might imagine, and we’ll show you just how to do it. Leaf Lard is considered to be the finest lard for baking, especially when making pie crusts from scratch. It just takes a little time to render down, but well worth the time involved. Printable recipe included.

How To Render Leaf Fat to make Leaf Lard:
Leaf Lard is said to be the very best lard one can use to make pie crusts. It’s suppose to produce a very flaky crust and is favored because it has very little pork flavor as compared to regular pork lard.
Derived from pork fat, it is considered a premium lard, and is made from the small amount of fat that surrounds the kidney area in pigs. Mostly used in baking, it provides a moist, flaky crust for homemade pies. It’s considered to be more healthy than regular lard and many of today’s chefs also prefer it because it smokes less when heated.
Most of the so called lard you find in supermarkets today has been rendered from fat taken from various parts of the pig, mostly the “fatback” from the back of the pig. It’s not as pure and in order to make it shelf stable, it is usually overly processed and hydrogenated.
Because it is more pure, and has not been processed like commercial lard, Leaf Lard must be refrigerated or frozen, to keep it from going rancid and producing a bad taste when used. Many chefs today will only purchase leaf lard from a well known source, or just render it themselves. You can do the same at home, and we’ll show you the easy process in the few steps listed below.
While it’s fairly easy to render down, you must remember to stir it about every 20-30 minutes during the 4-6 hours it takes to render over super-low heat on your stove top. It’s not something you’ll complete in an hour or two, so be sure to allow yourself the needed amount of time to render it down slowly.
I became intrigued with the idea of making Leaf Lard at home, after reading so much about it over the past year or two researching recipes for Taste of Southern. It is supposedly the best lard one can use when making pie crusts from scratch. So, always looking to bring my pie baking skills up a notch, I decided I had to find some Leaf fat and render it out myself here at home.
As a youngster, I remember the cold days of hog killing time each winter. By the middle of the day, a fire had been built underneath the big black wash pot that had been setup in the yard. Fat, only hours removed from the pig, was cut into cubes and placed inside the heated wash pot. There always seemed to be someone stirring the pot with a big wooden paddle, much like a boat oar, and the process of rendering down the fat turned into an all day affair. It takes a good amount of time to make lard that way.
Later in the evening, you could see the browned chunks of the fat, floating on top of the oil. When they started popping, the oil would be removed and strained into a large bucket. The remaining pieces of pork were now “Cracklins” and were often lightly salted and enjoyed as a snack once they cooled a bit. Some of the cracklins would later be ground down and added to cornbread to make Cracklin Bread. It gave the cornbread a bit of a bacon flavor and is still considered an old Southern favorite.
Youngsters were hardly ever allowed to stir the pot more than just a few seconds. The adults always were fearful of the kids being too close to the fire and I guess it’s a good thing they looked out for us that way.
Many supermarkets still carry a type of lard in their stores today all throughout the South. Lard took a bad wrap for many years as shortening and cooking oils became a favorite, but that trend has started moving back towards good old lard as of late with many claiming it to be much healthier than any of the other types of shortenings. Leaf lard, as mentioned, is supposedly the most healthy and purest form of pork lard.
Finding pure lard now requires a bit of searching. Finding rendered Leaf lard requires even more searching. I asked for it at a large pork processing facility that has its own store about a year ago and the guy behind the counter, an older man, had no idea what I was talking about.
A few weeks back, I saw where one of the vendors at an area Farmer’s Market would be selling Lard and Leaf Lard at his booth over the weekend. I made a special trip just to pick it up and was a bit surprised when I saw it was pieces of fat as opposed to rendered lard. Not to be outdone, I purchased it anyway and brought it home to render myself.
I paid $2.00 per pound for the Leaf fat, and bought just about 1 and a third pounds that had been wrapped in small packages. Leaf fat comes from right around the kidneys of a pig, so there isn’t much actual Leaf fat per pig. Again, it’s not the same as the fat from the back of a pig.
So, if you’re feeling a bit “pioneerish,” let’s give this rendering process a try. We’re in hopes of creating some high quality Leaf Lard, and we will be looking for those cracklins as a special treat once we’re finished. Ready to give it a try? Alright then… Let’s Get Cooking!

How To Render Leaf Lard: You’ll need about one pound of Pork Leaf Fat.
Although it’s labelled as Leaf Lard, it’s actually just Leaf Fat, but the term is freely used between both. It’s not LARD until it gets rendered down.
Leaf Fat can be stored in the refrigerator, but it’s best if you pop it in the freezer for about 30 minutes prior to slicing it up. Because of that, I failed to actually get a photo of the pork fat outside of the packaging. In other words, I just forgot. Forgive me?

Hopefully, you’ll get an idea of what it might have looked like before I sliced it up. I had placed all four packages in my freezer, and was pulling them out one-at-a-time, as I used them.
Here, I’ve sliced it into several pieces, about 1/4 of an inch thick, maybe just a little larger.
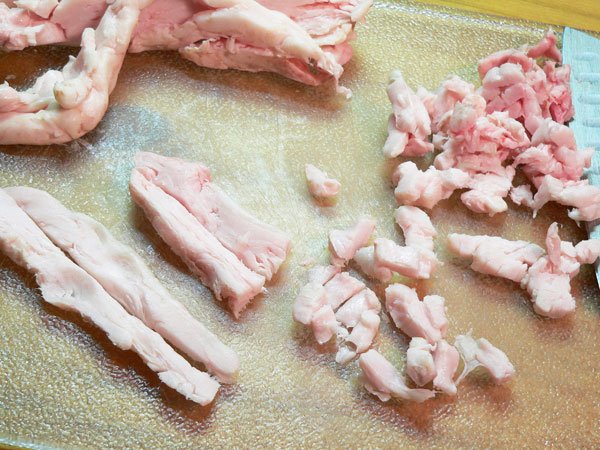
After I sliced it, I sliced some of those pieces in half also. Then, all the longer slices were diced into small cubes. The smaller pieces are suppose to yield more fat as it renders down.

It didn’t take too long to cut it all up. Keeping it good and cold is the key to making the work go easy. It does get a bit slippery so be careful. And, you’ll certainly want to be using a good sharp knife.

You’ll need a good thick pot if you have one. A cast iron pot would be great if you have that. I decided not to try this in my cast iron skillet because I didn’t want to overfill the pan with all the fat.
Begin the rendering process by adding 1/2 cup of water for each pound of fat you’re planning to render. This is a “small batch,” so I’m adding half a cup. Place the pot over Medium heat on your stove top and let the water come up just to the boiling point. Adding the water will help prevent the fat from burning or scorching as it begins to heat up.
Once the water is hot, REDUCE the heat down to the lowest setting your stove provides.

Place the diced fat into the pot. You’ll want to use a wooden utensil to stir this with throughout the process. Just stir the fat around a bit and mix it in with the water.
You’ll need to stir this about every 20-30 minutes, just to keep it from sticking and scorching on the bottom.

This is how it looks about two hours after it’s been rendering over the lowest heat setting on my stove dial. The water will evaporate out, and you’ll have just liquid fat in the sauce pot. I set a timer on my computer to remind me to stir it every 20 minutes while I was working on another project.

I’m going to strain the liquid fat after it renders for about 30 more minutes. I want to get the best liquid out of the pot early, so it will be less likely to have any off flavor in it. To do this, I’m going to strain the oil and bits through three layers of cheesecloth. I’ll place the cheesecloth in the funnel, which I will then place in the top of this storage jar.

Even on super low heat, this stuff gets pretty hot, so be careful when working with it. I was able to pour most of the liquid straight into the funnel with the cheesecloth. After that, I spooned the remaining oil and fat pieces into the top of the funnel and let it strain and drain for just a minute or so.

As you can see, I got almost a full pint from the first straining. It looks yellow at this point, but it will cool down into some very white Leaf Lard eventually. This is after letting the fat pieces render at super-low heat for just under three full hours, stirring it about every 20 minutes.

Return the diced pieces of fat back to the sauce pot and place it back over the super-low heat on your stove top. We’ll let this continue to render for several more hours, until the pork pieces have given up as much of the fat as they intend to release. These pieces are on their way to becoming “Cracklins,” which we’ll use later to make Cracklin’ Bread.

I rendered the fat down for about 3 more hours, still stirring it every 20-30 minutes. I’ll strain it one more time at this point, mostly just to see the difference between what I strained off earlier and now that it’s been going for almost five hours.

There really wasn’t much more left in the fat at this point. This is about 1/2 cup, if that much. It looks a little bit darker than the first batch, but that could just be because of the container.
Please note that I did actually strain this through the cheesecloth, just like I did the first time around. After I had done that, I placed the pan with the shriveled up pieces of pork fat back on the stove top for about 30 more minutes. It really wasn’t necessary though, as it didn’t yield but a few more drops of oil.

This is what you’ll have when you finish. These are called “Cracklins.” I placed them on a paper towel lined plate to drain off any excess oil that might be left in them.

Some folks like to sprinkle a little salt on these and eat them as they are. They’re very crunchy at this point with just a slight hint of oil left in them.

Our finished products. I have about one cup of Cracklins’ on the left. The middle container holds the second straining of the oil, which did turn out a bit darker than what I strained off the first time, so that proved to be the best thing to do. As you can see, the almost full pint jar on the right has some lovely white Leaf Lard, just begging to be used in a homemade pie.
I’ll place tops on all of these and place them in the refrigerator now that they are cooled. It took several hours for the liquid fats to solidify to this point as it cooled. I plan to use the Cracklins right away to make some Cracklin Bread. The darker oil will be used, pretty much like bacon grease, for frying and seasoning. The pure white Leaf Lard, will be used to make pie crusts and for other baking purposes.
All total, I rendered out a full pint of lard from just about 1-1/3rd pounds of fat. I was very pleased with the overall yield from such a small amount. This will last several months for sure, and as mentioned, it’s considered the very BEST lard for making pie crusts. We’ll also see how that goes… real soon.
If you don’t think you’ll be using all of it within the next 4-6 months, it would be best to freeze part of the Leaf Lard. It should hold in the refrigerator for 4-6 months without any problems, but it will eventually get to tasting a bit rancid and that would be noticeable in any baking you might do with it. Freeze it, just to be on the safe side. All you’ll have to do is take it from the freezer and place it in the refrigerator a day or so before you need it so it can thaw out.
Enjoy!


