
We’re canning and preserving Strawberry Jam today on Taste of Southern. This recipe is one of the best ways to get started in the home canning and preservation of jams and jellies. It’s really easy and produces a treat that the family can enjoy anytime of the year. Only a few special tools are required and you’ll be on your way to making jams and jellies just like grandma did.

Recipe: How To Make Strawberry Jam
How To: Can Strawberry Jam
Strawberries pretty much got me started in the processes of Home Canning and Food Preservation. And, I started pretty late in life with doing it. But, since then, I’ve become an Award Winning Food Preservationist. How cool is that? Does that mean I know it all? Absolutely not…and…I highly suggest that you read my little Disclaimer at the bottom of this post.
It does however mean that, I can at least maybe get you started or perhaps even offer a bit of a refresher on this fascinating world of making your own Homemade Jellies and Jams…..just like Grandma use to do…..maybe even better.
I was going to say that I wasn’t really sure what peaked my interest in home canning but, then I remembered exactly what it was. For years I wanted to make sweet pickles just like my mother use to make. I loved her sweet pickles. I didn’t actually eat a lot of them but, they were just so good. The best part was that I knew that those sweet pickles were pretty much the “Secret Ingredient” in many of the dishes that my mother prepared on a regular basis. She used the juice of those pickles in her Chicken Salad, Deviled Eggs, Potato Salad, Cole Slaw and other such things. They were just flat out awesome if I must say so myself. Apparently it wasn’t just me either. Everyone loved my moms cooking. I just wished I’d paid better attention to what she did when she was with us. Still, that’s what our Taste of Southern home on the Internet is all about, trying to save what little I DO know about not only mama’s cooking but, other family and friends as well.
So, a few years back, I finally gave it a try. I made my first batch of sweet pickles based on her recipe. It was a 3 week process overall and that sort of got me thinking about trying some other things. Yep, the pickles turned out pretty good and certainly brought back a good number of memories for me.
I started reading about canning and preserving here on the Internet and, as I did, my interest peaked into giving some other things a try.
A longtime friend told me about some Strawberry Freezer Jam she had made and how simple it was. She gave me the recipe. (You can find the recipe all over the Internet it seems.) I purchased my first bucket of Strawberries and gave it a try. The Freezer Jam turned out to be really good and I was pretty proud of what I’d done. But, in the back of my mind, I kept thinking about doing some actual canning with a canner and, that Water Bath Process I’d watch mama do and, that recently I’d been learning about.
Before long, I’d purchased my own canning pot, a few canning jars and the other needed ingredients. I think I studied the process of how to make the jam for days before I actually got up the nerve to give it a try. I made sure I had everything I needed then….I bought more Strawberries.
I sweated it out in the kitchen that day, working through the entire process, reading notes taped to the kitchen cabinet above the sink as I went. Then, as I lifted the jars out of the Water Bath Process canner, I started hearing those familiar “PING…PING…PING” sounds that instantly took me back to days in the kitchen with mama. I think I was totally hooked based just on hearing that sound of success.
As it turned out, I must have got lucky because my very first jars “set” properly. I was SO PROUD. Ha!!! From there, I went on to making Fig Preserves..several times….and far more than I could ever use. Amazingly, I got a little more comfortable with it and, it got just a little easier each time.
I could go on and on much longer but, you’re here to see how it’s done. Again, I urge you to seek out more than just the information I’ve included here. Learn as much as you can if you have no prior experience but DO….dive on in and give it a try. Fortunately as it turns out, Strawberry Jam is one of the best recipes you could probably get started with. I do hope you’ll give it a try and I also hope you’ll leave me a Comment below and share your thoughts, memories and, experiences with me and our readers here at Taste of Southern.
So….if you’re ready….Let’s Get Cooking!

Strawberry Jam: You’ll need these ingredients and a few recommended pieces of equipment.

This is pretty much my typical stove setup for most of the items that I can and preserve. On the back left side burner, I place a smaller pot for warming up the jar bands and lids. On the front burners, I have a large pot to cook the jam in on the left side and, on the right front burner, that’s my enameled canning pot. The canning pot has a rack that fits inside to hold the jars and a lid. It’s a fairly simple piece of equipment that can be found in the South in places like WalMart, some grocery stores or hardware stores. You could also just use a large stockpot if that’s all you have.
Sometimes you might find one at a Yard Sale or Garage Sale. If that’s the case, make sure the pot doesn’t have any holes or chips in the enamel surface. The enamel can sometimes chip off and the pot could have started to rust or even rusted out long enough to form a hole. Just check it carefully before you purchase it and , check it each year when you start canning your fruits and vegetables.

I begin by filling the canning pot about 3/4ths full of water. Then, I’ll place it on my largest burner and turn the heat up to about medium and let the water start warming up. I’m going to need a little time to prep the Strawberries so, I can just let the water heat up gradually for the time being. Of course, you’ll want to make sure that the pot has been washed well in hot, soapy water and is as clean as you can get it.
I’ll be using this pot to sterilize my jars once the water gets up to boiling temperature.

I fill the smaller pot just under half full with water and place it on the lowest heat setting my stove has. Then, I add the jar lids, placing them rubber side up and just let them gradually warm up. The red ring is the rubber part of the lid, the rest is metal. The rubber needs to be softened a bit in the warm water to insure a better seal. When the lid is placed on the jar, the rubber part comes in contact with the top rim of the jar. The band is then placed on top of the jar and screwed down finger tight. This rubber ring is what seals the jars tight in the process and must always be handled with care.
Jar lids, pictured above, should NEVER be re-used to try and seal jars again during canning of something else. They are a one use only product. Of course, you’ll keep them to close up the jar as long as you have your jam or jelly, that’s OK…just remember you can’t use them again to seal jars. You’ll need brand new one’s for that purpose.

While the water in the canning pot is heating up and, the bands and lids are slowly warming up, go ahead and place the canning jars you’ve selected in a sink of hot soapy water. Canning jars are another part of the process that can be re-used from one year to the next. Whether you’re using new jars or old jars, carefully inspect the tops and the entire jar for any chips or cracks. Again, if in doubt, throw it out. Better to err on the safe side. Scrub each jar very well both inside and outside, making sure you remove any leftover jams or jellies etc., that might have been hiding in the bottom or around the rims of the jars.
You’ll also want to wash the jar BANDS that you’ll be using. Jar bands CAN be re-used from one year to the next, as long as they are in good condition. If using older bands, check them for rust and overall condition. If in doubt, discard it. You’ll want to wash them in hot soapy water before using them to make sure no food particles are on the inside of the band. You should also wash any new bands you might be using. Only takes a minute and worth the safety factor.

Once they’re good and clean, set them aside on a clean towel. I didn’t have them all in the picture above during washing but, these are the jar lids and jars I’ve prepared. I think it’s better to prepare more jars, bands and, lids than you think you might actually use. It doesn’t hurt to have them handy and ready at least.

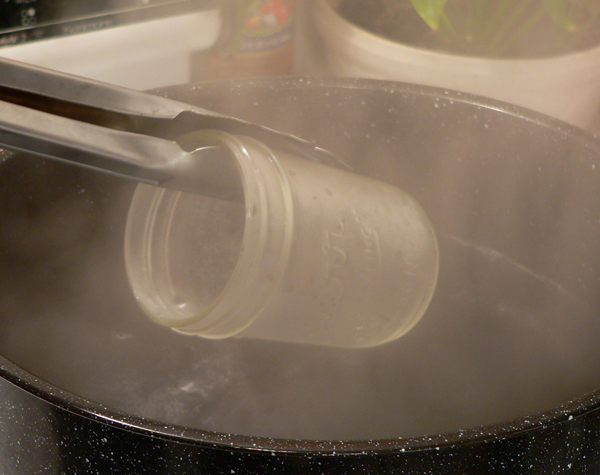
Once the water in the canner has got up good and warm, I use some tongs and carefully place each jar in the water. You just want some warm water at this point. Once all the jars are inside and fully covered with water you can increase the heat and bring the water and jars up to a rolling boil. We need to let them boil for a good 10 minutes or longer to STERILIZE them prior to adding the cooked Strawberry Jam.

I put my bands right on top of my lids and let them warm up gradually right along with the lids. You don’t want to boil the lids as this could severely damage the rubber seals on them. Just get them warm and let them stay in the water until needed.

While the jars are warming up, you can go ahead and start the prep of the Strawberries. I just place a colander in my sink and dump the Strawberries right along side of it.

Use a paring knife and carefully remove the green cap from the berries. Cut right beneath the cap and try not to cut too deep into the berry. You’ll also want to cut out any bruised spots you might find or, just discard any bruised or bad berries you might come across during this process.
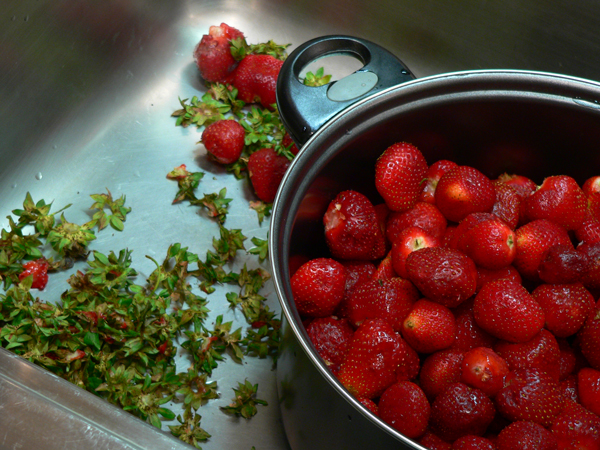
Remove all the caps and throw them away.
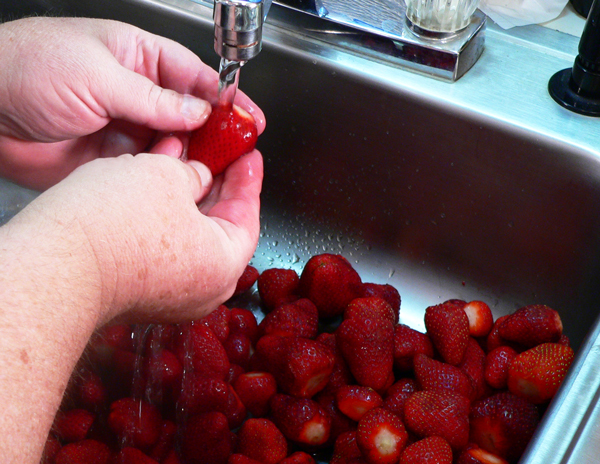
I’ve said it before, YES, I wash each berry one at a time. It’s quicker than you might think. I just hold each one under lightly running cold water and gently scrub it between my fingers to remove any dirt or leftover caps and stems. It’s also a great way to find any badly bruised spots that might need to be cut away. Place the washed berries back in the clean colander.

Lightly rinse the whole thing once again and just let them drain for a few minutes.
While they drain, make sure the water temperature of the jars in the canning pot has come up to a gentle rolling boil. Also, make sure ALL the jars are completely under water. Add more hot water from your sink faucet if needed. The jars will need to stay at this boiling point for at least 10 minutes or longer. While that’s taking place, we’ll start cooking up the jam.

Place the berries in the pot you’re going to be cooking them in. Make sure you’re using a large enough pot for the job. A good rule of thumb is that the pot should be just about halfway full. Now, lets get ready to mash up some berries…ready?
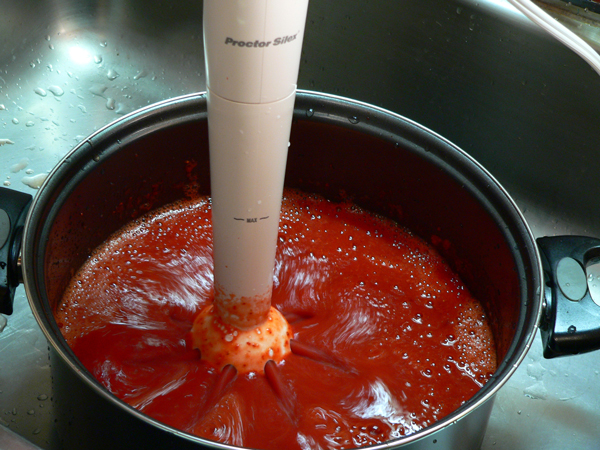
There are certainly more ways than one to mash up the berries. You could do it with something like an old fashioned potato masher. You could also place them in a food processor or blender and pulse them for a brief moment or two. Even a large slotted spoon would probably work, anything to break up the berries. Here, I’m using an Immersion Blender that I had recently purchased at a local auction I attend. I got it new for just a dollar or two and it made quick work…very quick work….of mashing up the berries. I may have even gone a bit too far with this…I was just having so much fun with it. Seriously though, you don’t want to PUREE the berries, jams normally have some pieces of fruit in them.
Food Preservation Lesson: Jam is described in the dictionary as “a preserve of whole fruit, slightly crushed and boiled with sugar.” What it doesn’t say is that PECTIN is added to the sugar to aid in the proper set or gel of the fruit, in this case…Strawberries.
Pectin is a white carbohydrate that occurs in ripe fruit, especially apples. Most of the powdered Pectin you’ll find at the grocery store is made from apples. Thus, it’s a natural product that you’re adding to the berries. It helps to thicken or “gel” the jam or jelly.
Jam is typically made with the fruit or berry being crushed and allowed to remain in the finished product along with it’s juices. The degree to which the berry is crushed is up to you. You may like some chunks of berries in your jam or you may not. Jelly on the other hand, is normally made by straining out just the juice from the fruit or berry being used. Jellies are free of any pulp of the fruit.
End of lesson.

Once the berries are crushed, you’ll need to measure the pulp to see how much sugar you’re going to need to make the jam. Pour it into a measuring cup, make note of the amount and pour that into another container. Do this until you have an accurate measurement of all of your fruit pulp.

Using the number of cups of fruit, measure out the proper amount of sugar that you need. You’ll want to work with small batches of Strawberries as you make your jam, so use the ratio included in the pectin box recipe to determine how much sugar you will need based on how much crushed fruit you have. I’m not listing an exact amount because what I made and what you will make might differ. Use the info in the recipe and you’ll be fine.
NOTE: Most boxes of Sure-Jell or any pectin you use will have a simple recipe on what proportions of sugar, fruit and pectin are needed. Consult that information for making your jam. I’m just trying to give you a visual idea of the process it takes.

Place the pulp back in your cooking pot and place it on medium heat on the stove top. Keep a close watch on everything at this point.
From here on out, things are going to start happening quickly and need to be worked on as quick as possible. The first time or two you can any type of things, it can start feeling a little hurried or rushed. Just relax and follow the directions and you’ll have Strawberry Jam in no time.
Your jars should be boiling gently at this time with a timer counting down that they have been sterilized for a good 10 minutes or longer. The bands and lids should be in warm water, not hot and ready and waiting to be used.
Your work area should be clear and setup with enough space to work with. Towels should be handy, along with mitts, to handle the hot products. Planning ahead for this moment will make things go a lot easier….trust me. Just don’t let it get the best of you. You Can Do It!!!!

Now, open the pack of pectin and slowly stir it into the berry mixture. Add it slowly and stir it briskly to keep it from clumping up. Sprinkle a little in at a time and stir it until it’s mixed or dissolved into the mixture.
Note: It’s also possible to mix the pectin in with about a half cup of the sugar you’ll be using and slowly stir this in. Some recipes on the pectin boxes might recommend that you do it this way. They say it helps to keep the pectin from clumping. I think you’ll be OK either way, as long as you just….keep stirring away.

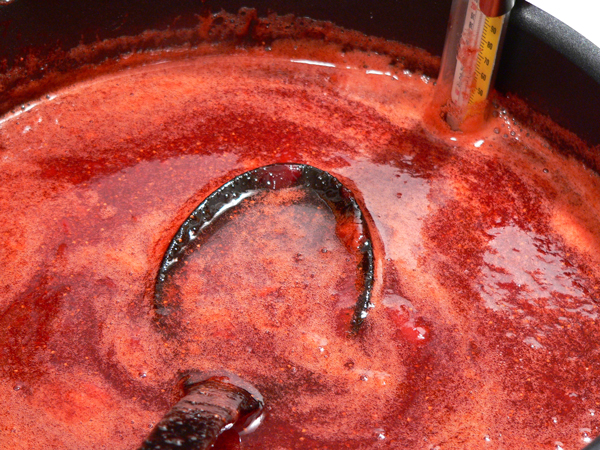
Raise the heat just a little above medium and keep stirring. You’re going to bring the berry pulp up to a full boil, one that can’t be stirred away. I use a wooden spoon so I can safely scrape the bottom of the pot and keep anything from sticking or burning.
Please note that the pectin can easily be overcooked and lose it’s ability to thicken…according to the experts. I’ll take their word for it. Again, pectin is a naturally concentrated apple product and some jams, jellies or preserves can be prepared without even using it. If you left it out, you’d have to cook the berries longer to reduce the liquid down to a thick mixture. The longer it’s cooked, the more flavor and vitamins are lost in the process. Adding the pectin reduces the cooking time needed. It’s sort of like adding flour or cornstarch to your gravies to thicken them up.
We could go on and on about pectin it seems. You’ll find it in both powdered and liquid versions. You’ll also find some that says No-Sugar-Needed or like what we’re using here….with sugar. Pectin can help reduce the amount of sugar you use. Thus, you could use the No-Sugar-Needed version if you’d like to make it as sugar free as possible.
You’ll find lots of information on canning and freezing here on the Internet and through the local Cooperative Extension Agency in your area. I highly suggest that you read up and learn more about the whole process, using a reliable source for your information. Many local Cooperative Extension Services offer classes in canning, jam and jelly making and other home food preservation. Check your phone book or the internet for the office nearest you. You may also find restaurants or chef’s in your area that offer classes. They’re fun, plus they’re a great way to learn and share with others. It’s not necessary that you take a class but it IS necessary that you follow all the suggested guidelines so you can SAFELY prepare and store your homemade goods. You’ve gone through the process of making it….make sure it’s safe and will have a good shelf life.
Once the pectin and fruit has come to a full rolling boil, ADD the Sugar. Do it gradually, stirring it as you go…but at the same time…do it quickly. (Does that even make sense?) In other words, add a little sugar, stir it to let it dissolve or mix in then, add a little more and repeat. Just keep stirring it as you go. It’s fixing to start REALLY happening now.
Once ALL the sugar has been added in, bring the mixture back up to a hard boil. Do this fairly slowly, over medium heat as opposed to a higher heat. Working the heat up slowly helps to keep the mixture from foaming so much. You’ll have some foam, that’s expected. By bringing the heat back up to a rolling boil slowly, you should be able to reduce the amount of foam you’ll have though.
BOIL IT HARD FOR ONE MINUTE: As you stir the sugar and all, the mixture will start coming back up to a good rolling boil. Again, that’s a boil that you can’t stir away. You’ll see it continue to boil as you stir. At that point, start a countdown of 60 seconds and continue to let it boil as you stir it for ONE MINUTE.
Remove the jam from the heat and set it on your counter top where you intend to fill the jars.
FOAM: I didn’t get any good pictures of it but, the foam will be easily visible in your jam. It’s that lighter colored pink stuff you see in the picture above. It’s not a problem and it is edible….it’s just air bubbles after all. Most people prefer to skim off as much as possible just for appearance sake. Use a ladle or large spoon and skim off as much as possible and place it on a plate or saucer. It’s hot so don’t just toss it in the trash right away. It’ll melt a plastic trashcan liner so just let it cool for now. It’s time to start filling the jars.
By this time, the jars in the canner should have had plenty of time to boil and become sterilized. Use some sterilized tongs (I just slip mine in the water for a few minutes with the jars) then, carefully lift the jars out of the boiling water.

Place them on a folded towel on your counter, near the area where you will fill them. Go ahead and remove them all and sit them on the towel, then start the next step.

I like to sit my jar on a plate. Strawberry juice and jam can be messy and hard to clean up. Place the jar on a plate, then insert your funnel. Funnels are relatively inexpensive and highly recommended for filling jars. You can thank me later.

Use a ladle and carefully add the hot jam into the jar. Being careful means making less of a mess. Again, you can thank me later. I haven’t even mentioned yet that this stuff is sticky now. Try not to let it drip on your jars.

Headspace: The space from the top of the jam in the jar…to the top of the jar….is called “Headspace.” This space may vary depending on what type of jelly, jam, fruit or vegetable you’re working with. Always consult your recipe for the proper amount needed for what you’re working on. You can just “eyeball” it if you’re a pretty good judge of measuring. Or, you can purchase a tool that you can measure it with. As a matter of fact, you can purchase a canning “kit” that has a jar lifter, magnetic wand to lift the lids with and, a plastic measuring tool that will measure the amount of headspace. I’m seriously considering making that purchase. (Smile) Strawberry Jam normally calls for a Headspace of 1/4 inch.

You can easily see in this picture that my jam is fairly thick at this point. The next step is to use a knife or skewer to remove any air bubbles that might be in the jar. Just slip a butter knife in the jar…or in this case, the skewer….and slowly work it around the edges and middle of the jar. This will allow any air bubbles trapped inside to rise to the surface. A few bubbles aren’t going to hurt anything so not to worry about those. Still, you wouldn’t want a LOT of them and it really depends again on what you’re making as to how many air bubbles you might encounter. Some things seem to have more than others. Just look for them as you’re working and try to work them up to the top so they can burst.
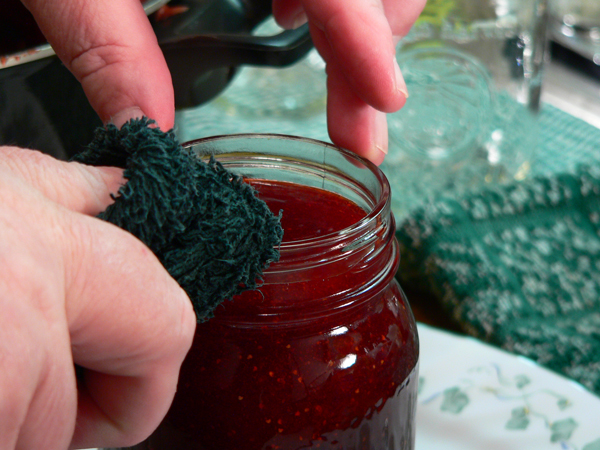
Use a clean damp cloth and carefully wipe the entire rim of the jar. Work all around the very top part because that’s where the rubber seal in the lids needs to rest. Any jam on the rim could keep the jar from sealing properly, which in turn, could result in the loss of that jar of jam. You’ve worked too hard to do that so, wipe the jar until it’s good and clean….and not sticky.
Also, wipe the outside of the jar around the threads to remove any jam that might have dripped on them. While any food particles on them might not affect the seal, it could cause the band to stick so tight you can’t hardly remove it. Do your best now for best results later.

Carefully remove the warmed lid from the pot and water it’s been in. They make a really neat tool called a wand that has a magnet on one end. You just use the wand to pick up the lid. Seriously, I’m saving up for one of those, I think it will be a nice investment. OK….you got me. I already HAVE all this stuff. I was just moving a bit too quick to get a few pictures today and I don’t actually have one of me using it…OK? They do work nicely though. I used my tongs until I bought one…it came in that kit I mentioned.
Carefully center the lid on the jar, making sure it settles down on top nicely.

Use the same wand with the magnet to remove one of the jar bands from the pot of water. Lower the band over the lid and make sure it’s seated correctly on all the threads. Don’t force it….just work it gently until it feels right. Then, use your fingers and snug it up. They say to finger tighten the band and not use all your strength to tighten it. You just want to snug it down…finger tight…then you’ll know everything is adjusted properly as we head into the water bath process of canning.

Place your rack in your canner. The rack keeps the jars from sitting directly on the bottom of the pot, which could cause them to break from overheating. The rack also is designed so you can hook the handles over the top of the canner until you get the jars all situated in the rack. Then, you lift the rack handles and lower them all into the water at one time so they all process evenly. How cool is that?
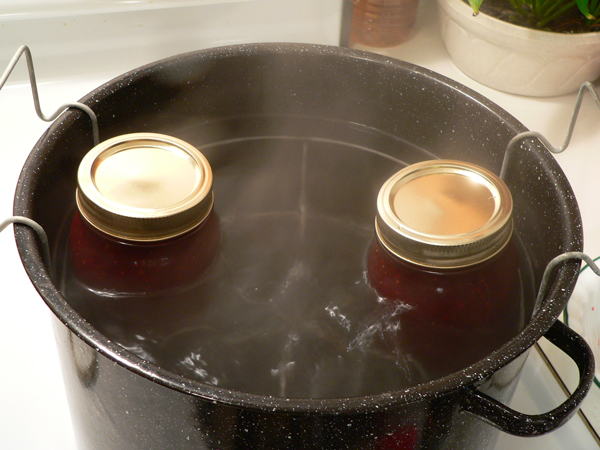
Place the sealed jars in the rack. As you can see, they are only part way submerged at this point. You can mix the sizes of the jars as long as the canner is big enough so that they are fully under water when you lower the rack.

Lift the handles and lower the rack down into the water. The jars need to be fully submerged with at least TWO INCHES of water covering the tops of all jars. Canning pots come in different sizes so make sure your pot is big enough for it’s intended purpose.
Be sure to check the package of pectin that you purchased for the proper amount of processing time you need. For jam, it’s probably going to be at least 5 minutes or maybe longer. I’m not including an exact time because the time will vary, strangely enough, depending on the altitude of where you live. It will change from sea level to higher altitudes as to the number of minutes needed for processing during this water bath method.
WATER BATH: The process we’re using to make our Strawberry Jam is called the Water Bath Method. It’s fine for most jams and jellies. Another process uses a Pressure Canner to can the jars under pressure. For safety reasons, some produce and meats being canned require the Pressure Canner Method. We could go into a lot more detail about it but, I suggest you seek more detailed info from your local Cooperative Extension Service or your local library…or hey…maybe here on the Internet using some reliable sources. We’ll probably be doing some pressure canning later on during the summer for beans, tomatoes etc. We’ll save the more detailed info on Pressure Canning for those recipes.
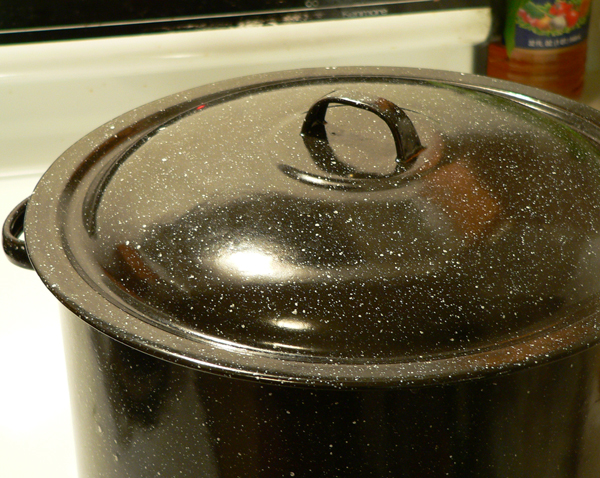
When the water gets back up to a rolling boil…cover the canner and start the timing process. As I said, for our Strawberry Jam, the pectin box recipe suggests we go 5 minutes, based on our altitude.

Once the correct amount of time has passed in the water bath process, use some tongs or a couple of large spoons and grasp the canning rack handles. Carefully lift the jars back up out of the water and hook the handles on the top of the canning pot. Just let them sit here for a few minutes and rest. You may or may not hear some of the jars ping as they seal at this point. It’s OK if they do.
Prepare a spot on your counter where there is no draft or air conditioning vent nearby. The jars need to sit for 24 hours undisturbed in a draft free location. It’s best to NOT sit them directly on the counter, especially if you have marble or granite counter tops. The jars are very hot and if you place one on a cold counter…it could break. That wouldn’t be good. Fold a towel into about 2 layers of thickness and just set the jars on top. If you have some water on the tops, don’t worry about it, it want hurt anything. I use a folded paper towel sometimes to carefully wick the water up off the lid but, it really want hurt the next step.
PING. PING. PING. I love that sound. I love it when I can count the number of pings that I hear as the jars complete their sealing process. The “ping” is the sound made by the top center button of the lid being sucked down as air is pulled out of the jar. It’s an awesome thing to hear them all as they happen.
RESIST the urge to press on the top of the jars for at least 24 hours. If you press on the top, it could keep an unsealed jar from sealing. After 24 hours you can safely press the center to see if the button in the middle of the lid is down. If it is, you’re pretty much assured of having done it all right. Shelf life for jams and jellies may vary but, they normally are safe and good for at least one year…maybe longer.
If after the 24 hours have past and, you happen to find a jar that did not seal, just go ahead and place that jar in your refrigerator and use it first. It will be perfectly OK. There could be any number of reasons as to why that one specific jar didn’t seal but don’t fret…just go ahead and enjoy it first. All the other jars that have sealed properly can now be stored away in the cupboard or your pantry if you have one, until needed.

Congratulations….you’ve just made your very own Homemade Strawberry Jam. Print yourself up some labels and mark the jars as to their contents and when they were processed. They also make great gifts for family and friends. You may not want to giveaway any from your first batch since you worked so hard on them but, you may just find yourself back at the Strawberry Farm…getting some more and doing it all over again. I must warn you…home preservation of foods can become a little addictive.
See my label? I printed up some, wrapped the tops of the jars with those little fancy cloth jar toppers, tied the labels on with string…and gave them to my family at Christmas. I included several different jars of stuff I’d made last summer and tried to make them all look “gourmet fancy.” Ha!
I can’t help but think during the process of canning, about all the stuff that my mom and dad prepared as I was growing up. I’d be in and out of the kitchen and just catching glimpses of mama as she worked with her canner. Sadly, I can’t say that I ever gave any real thought to how much time and effort she put into making all those great things for us to enjoy year round. She did it because she loved us.
Having canned some items of my own, I quickly came to realize that if someone gives you something they have canned themselves….they must think you’re…very special. There’s a good deal of time, effort and love inside those jars.
Again, canning is something that you’ll find gets easier the more you do it. Just do your homework, use this recipe as a guide if you will…then go out and get some of the best, freshest Strawberries you can find. You’ll be very happy to tell your friends that you did it yourself and, your family will enjoy your efforts for months to come. There’s just something special about Homemade I think.
Let me know how it turns out if you give it a try. I’ve got a section below just waiting for YOUR comments.
Enjoy!


