Follow our complete, step-by-step, photo illustrated recipe for making this “taste of sunshine” three Citrus Marmalade. We’ll take you through the complete process of not only making this marmalade, but also how to can this marmalade in a water-bath canner. You can do it. Printable recipe included.

Three Citrus Marmalade
What exactly is a “marmalade”?
According to the Ball Blue Book Guide to Preserving, which we use for most all of our canning recipes here on Taste of Southern, it’s a “soft jelly that contains small pieces of fruit and peel evenly suspended in a transparent jelly. Marmalade is cooked in small batches and brought to, or almost to, the gelling point. Marmalades are similar in structure to jam”.
Okay, now that we’ve got that covered, let’s move forward.
I’ve long been contemplating making a Citrus Marmalade, but this is the first year that I’ve actually gotten around to doing it. I wanted to make some this year to enter into our North Carolina State Fair and their Food Preservation Category.
I first tried an Orange Marmalade many years ago upon a trip down to Florida. My late wife and I stopped at one of those stores that sold oranges and about anything you could make WITH oranges.
Looking through the shelves of jams and jellies, I spotted an Orange Marmalade and purchased a jar to bring home.
Every time I’d open the jar and spread some of that marmalade on a piece of toast, I was quickly transported right back to that little store down in Florida. It just tasted like Florida sunshine in a jar, and I enjoyed it right down to the last bit.
I’ve always wanted to try and make some, but this isn’t just a orange marmalade. This is a Citrus Marmalade that consists of Oranges, Grapefruit and Lemon. It’s a little different from the Orange Marmalade that I remember from Florida, but it’s getting better and better each time I taste it.
While it only has a few ingredients, it does take a little effort to slice the peel into small slivers. Other than that, it’s pretty easy. Plus, I like that it has to set for 12 to 18 hours about halfway through the process. You can do part one day, then finish it the next. This aging old fellow appreciates a recipe like that. Smile.
This will make some great gifts for family and friends too. Just saying.
So, if you’re ready for a taste of citrus, let’s get in the kitchen, and… Let’s Get Cooking.

Citrus Marmalade Recipe, you’ll need these ingredients.
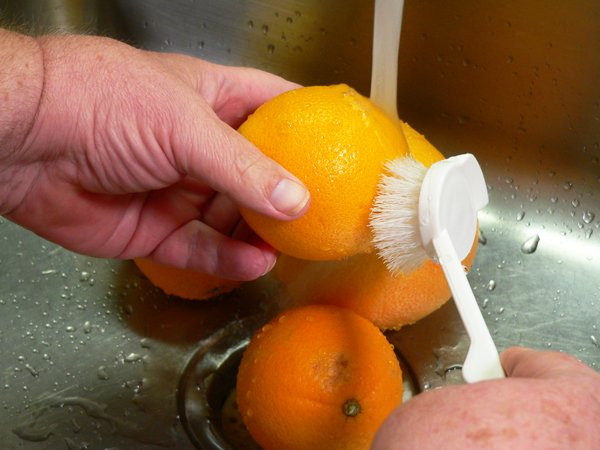
Scrub the fruit well under cool running water.

Cut the oranges into quarters, then use a spoon to scoop out the pulp. Save both the peel and the pulp.

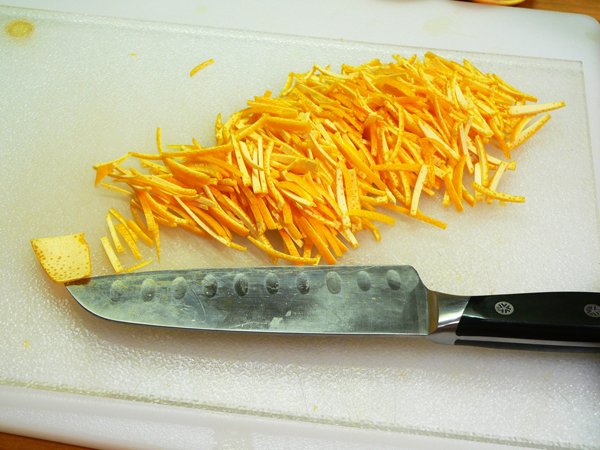
Slice the orange peel into very thin pieces.

The white layer of stuff between the orange pulp and the peel is called “pith.” It’s got a very bitter taste so I’m going to cut as much of this away as possible.
I sliced each quarter in half, then carefully slid a knife under the pith to cut it away from the peel.
This was a bit of extra work, but I decided to go ahead and do it. Just be careful and cut away from yourself when doing this. It’s kind of like filleting a fish. Smile.

Here you can see how I’ve separated the pith from the peel. We’re still going to use it all, but I’ll show you how I used the pith a bit further down in the recipe, so be sure to save it.
This part got a bit tedious, but I just kept working on it until I had it all cut up.
Use a good sharp knife and cut the orange peel into very fine slivers. These pieces are about an inch long, and about the size of a toothpick.

Next, do the same thing with your grapefruit.

I also separated as much of the pith from the pulp of the red grapefruit as I could. Just remember, we’re going to use this later, so don’t throw any of it away.

Place the slivers of peel in a large sauce pot.

Add one and a half quarts of water to the peels. Place this over medium heat and let it come to a low boil.
Simmer this for five minutes, then remove from the stove.

While the peels are simmering, chop up the grapefruit pulp.

Then, chop up the orange pulp.

Slice the lemon into very thin slices.
I’m not sure why the lemon gets sliced and the orange and grapefruit pieces are cut differently. Maybe it’s more for looks than anything else, but it’s the way the recipe says to do it.
I decided to cut each circle into half, but I don’t have a photo of that. I didn’t think I wanted a whole slice of lemon showing up in my marmalade. Be sure to remove all the seeds and save those.

Here’s where we use all the pith and other scraps.
Place all the scraps, pith, and pips (seeds) in a double layer of cheesecloth.
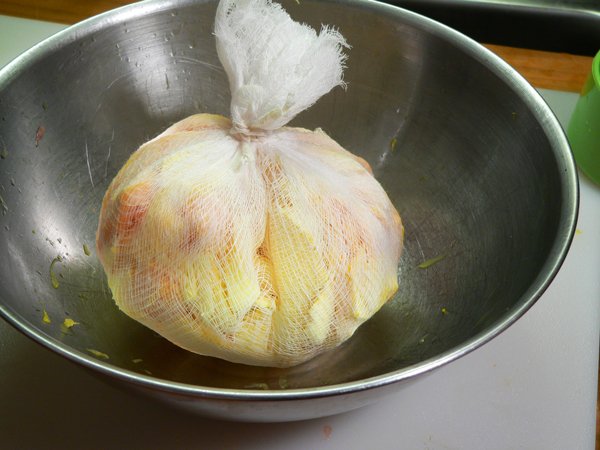
Gather up the ends and tie it all together to make a packet.
The seeds and the pith contain a good amount of pectin, so we want to get as much of this as we can. Pectin will help the marmalade to “gel” as opposed to being thin and runny. By placing it all in the cheesecloth, we’ll get the benefits of the pectin it provides without adding all that bitter pith to our finished product.

After letting the slivers of peel simmer for a good five minutes, remove them from the stove top and drain them in a colander. Discard the water.

Place the drained peels back into your sauce pot.

Add the chopped orange and grapefruit pulp, plus the slices of lemon, into the stock pot.

Add the packet of pith and other scraps. As you can see, it was a pretty large bundle.

Add the remaining quart and a half of water to the sauce pot.
Quickly bring this up to a low boil and simmer for 5 minutes. Stir it often while it cooks.

After five minutes, remove the sauce pot from the heat. Cover the pot with a lid and place this in a cool spot on your counter top.

Let this mixture stand for 12 to 18 hours.
I just placed the pot on the back burner of my stove, covered it, and let it set there overnight. You do not need to refrigerate this.
After all that slicing into slivers, I was more than ready to just let this set for awhile. I’m just not getting any younger you know. These type of canning recipes are becoming a favorite. I can do part one day, then finish up the next day. Nothing wrong with that in my opinion. Smile

When you’re ready to start the canning process:
Wash your jars in hot soapy water. Do the same with the jar bands that you will be using.
As you wash each jar, carefully run your finger around the top rim, inside and out, to be sure the jar is not cracked or chipped anywhere. Rinse the jars well after they are washed.

After I rinse my jars, I like to go ahead and place them in my water bath canning pot. I don’t use the rack at this time, and I just set the jars in the bottom of the canning pot. Then, I fill the pot with water, making sure the jars are fully submerged.
I will go ahead and place this on my stove top and begin warming the water up.
Timing everything out is one of the things you’ll learn through trial and error with your canning process.
I know it’s going to take this big pot of water some time to heat up to boiling, so I’ll start it while I work on the other steps in the recipe.
The jars will need to boil at a slow boil for at least 15 minutes in order to sterilize them.

My stove top set up to water bath can this marmalade.
This is pretty much the way my stove setup goes for all of my canning adventures. I place the item to be jarred up and canned on the front left burner. My jars are heating up in the water bath canning pot thats on the right front burner.
I keep a smaller pot of water in a pot on the back right burner. I heat that up so that it’s almost at the boiling point, and I can use this to add to my canning pot as needed.
Remember, you will need enough water in your canning pot to cover your jars with one inch of water while they are processing. Keeping hot water at the ready just always comes in handy.
In the pot on the back left burner, I place my NEW jar lids and the washed bands in a pot with some water. The water should fully cover both the lids and the bands.
I only use the LOWEST heat setting available under this pot. You do not want to get the jar lids too hot as it might damage the red rubber sealing compound on the lids. Just keep it slightly warm.

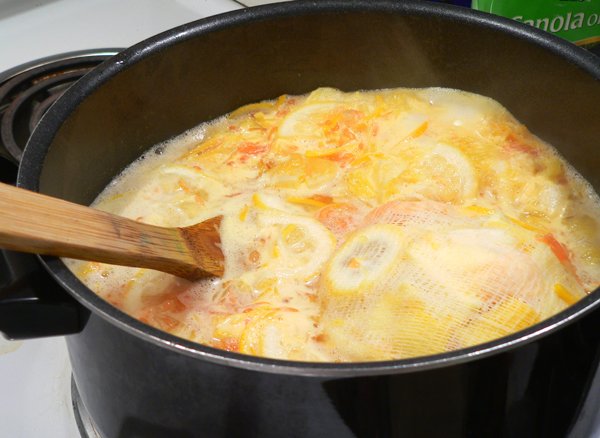
After the fruit mixture has been allowed to set for the 12 to 18 hours, BRING IT BACK TO A BOIL.
Let this mixture cook on a low rolling boil, until the peels are tender. You’ll just need to try one and see if it’s tender to the bite. I cooked mine for about 15 minutes, knowing it would continue to cook even more as we bring it up to the gel point once we add the sugar.

Remove and discard the cheesecloth packet with the scraps.
I did use my wooden spoon to squeeze out as much liquid that was in this packet as I could. I wanted to get all the pectin that I could out of it.

Measure the remaining fruit and juice mixture.
You will need to know how much of this mixture you have in order to know how much sugar you will need to add to make the marmalade.

For each cup of fruit mixture that you have, you will need to add 1 CUP of sugar.

Stir everything together well.

Place the sugar and fruit mixture on your stove top and quickly bring it up to a good rolling boil.
This mixture needs to cook until it’s almost at the gelling point. How long this actually takes will depend on how much product you have in your pot, so I can’t give you an exact time here.
I used a digital thermometer to cook this up to 220F degrees, which is considered the gel point. It took about 30 minutes to do this, and I kept stirring it often throughout the whole time.
If you do not have a candy thermometer or a digital thermometer, here’s some additional information you might find of help: GEL POINT OF JELLY

With the mixture boiling, I setup my counter so I would have everything ready to go once it reaches the gel point.
I’ve got my funnel, my jar lifter, wooden skewer to remove air bubbles, magnetic wand to lift the jar lids and bands from the warm water, and my head space measuring tool. I use the tongs to remove jars from the canning pot before filling them. A plate keeps the work area cleaner and catches spills from filling the jars.

Skim off as much foam as you can if needed. All I had was the little bit around the edge of the pot as you can see in the photo above.
You’ll likely not ever get it all, so don’t fret with it too much. It will not be a problem.

Remove one jar from the sterilizing pot, and place it on your plate. Insert the funnel, then ladle the hot marmalade into the jar.

Use your head space measuring tool to check for proper head space in each jar.
Head space is the amount of space from the top of the product in your jar, to the top of the jar rim itself.
This recipe calls for leaving a 1/4 inch amount of head space. That’s the first notch on the tool.

It’s not likely that you’ll have much of an issue with air bubbles in your marmalade, but this is a step in most canning processes that I just like to keep repeating.
I use a wooden skewer to remove any air bubbles. Just insert the skewer along the inside of the jar and bob it up and down a bit to release any air bubbles that might be in your jars. I also move it to the center of the jar and do the same, trying to remove as many air bubbles as possible.
A few bubbles will not cause you any problems, so again, it’s nothing to fret over too much.

Use a damp towel, or paper towel, to carefully remove any food particles that might be on the very top rim of the jar. Wipe around the “threads” on the jar so the band will tighten as needed also.
The marmalade in the jars will be hot, so use a tea towel or dish towel to hold the jar.

Use the magnetic wand to lift one of the jar lids from the warm water in your pot. Center the lid, rubber side down, on top of the jar. Gently shake away most of the water from the lid, but it’s not going to be a problem if you have water on the lid.
Add a jar band to the jar, then tighten it just “finger tight” onto the jar itself.
Don’t get carried away, just give it a little snug to secure it down.
Continue to fill your jars, repeating these steps, until you have all the jars filled.

Place your canning rack into your canning pot.
The handles of the metal racks are made to hook over the top rim of the canning pot while you add the jars. Hook both handles as pictured above.

Use your jar lifter to carefully lift each jar as it’s filled and place it into the rack.
As you can see, these half pint jars are almost under water at this point, but still not fully submerged.

Lift the jar rack up from the pot, then carefully lower the entire rack with jars into the canner.
The jars must have at least ONE INCH of water covering the tops of the jars for them to properly seal.
If you need extra hot water, here’s where that pot of water on the back burner, already heated, comes in handy. You can thank me later. Smile.

Once the water comes back up to a boil, cover the canning pot and begin the timing process for the particular recipe you’re working with.
The Ball Blue Book Guide to Preserving says the marmalade should be processed for 10 minutes in a water-bath canner.
Please note that some recipes will need to be adjusted based on the size of jars you are using and the altitude of where you live. Always consult a trusted source for your recipes and the proper canning requirements for processing times in your neck of the woods.

After 10 minutes, carefully remove the lid. I always open the back side of the pot first, keeping all that steam and heat away from me. It can get dangerously hot.
I use two tongs to lift the rack by the handles and hook it back over the top rim of the canning pot.
The jars need to rest here for about 5 minutes before you remove them.
You may hear jars “ping”, or “pop” as soon as you pull them out of the water. That’s fine, it’s what they are suppose to do. Sometimes though, you might not hear a jar ping for 30 minutes or more after it comes out of the canning pot. That’s fine too.
You might not ever hear it ping at all. That will probably be fine as well. We’ll check on that later.
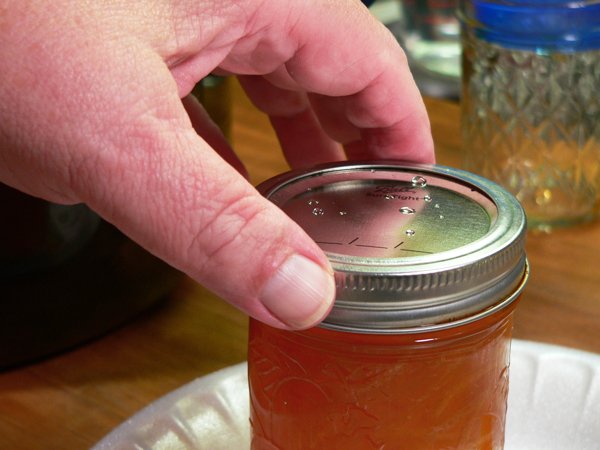
The jar lids have a “dimple” in the center of each lid. When new, this dimple is in the up position. After canning, the dimple should be in the down position. This tells you whether the jar is sealed or not. That ping or a “pop” sound is what you hear when the jar seals once it comes out of the water.
HOWEVER, do NOT press down on the center of the lid for 24 hours. Patience, my friend, you’ll need some patience. Smile.

Place the jars on a folded towel, in a draft free location for 24 hours.
Do Not Disturb the jars during this time. They need to be left alone to assure they have time to properly seal.
After 24 hours, you can press down on the center of the jar lid. If it is down, your jar should be properly sealed. If it gives in and isn’t down, you’ll hear it make a popping sound. That jar didn’t seal. The product inside will still be good, so just place that jar in the refrigerator and use it first.
Should you have numerous jars that didn’t seal, sometimes the product can be reheated and processed again. If you find you must do this, you will ALWAYS have to use new lids. The bands can be reused, but not the lids.
You will also need to seek more information than we’re providing here about how to try and redo the product in your jars.
After the jars have set undisturbed for 24 hours, you will need to remove the bands and store your jars.
We remove the bands before storage in case a jar still didn’t properly seal. If you have a band screwed down tight on a jar, the lid can lose the seal but not come up. You might not know the product had spoiled and that could be trouble.
With the bands removed, any lid that comes lose will be pushed off the jar as gasses form inside the jar. This would be a clear sign that the jar wasn’t to be used. You would need to discard it if that happens.
Likewise, do not sit one jar on top of another, or sit anything else on top of the jars, pretty much for the same reason.
Store your Citrus Marmalade in a dry, cool area and it will last you for well over a year.

Enjoy!
NOTE: Proper canning techniques are essential for any home canning project. It can be safely done if you follow the right information.
All of the canning recipes we’ve placed here on Taste of Southern come from the Ball Blue Book of Preserving, or from the USDA Complete Guide to Home Canning. I strive very hard to follow their guidelines with all of our canning recipes, but I also encourage you to read as much as you can about home food preservation before you start canning and preserving food at home for the first time.
We all had to start somewhere. Canning can be work, but it can also be a lot of fun.
It’s a tradition that seems to be a fading art, but I think if you will try it, you’ll enjoy the process. There’s just something about being able to say “I made this myself.” And, you always know what’s going into each and every jar.
I’ll look forward to hearing about your canning adventures in the Comment section below.
Enjoy!
NOTE: Proper canning techniques are essential for any home canning project. It can be safely done if you follow the right information.
All of the canning recipes we’ve placed here on Taste of Southern come from the Ball Blue Book of Preserving, or from the USDA Complete Guide to Home Canning. I strive very hard to follow their guidelines with all of our canning recipes, but I also encourage you to read as much as you can about home food preservation before you start canning and preserving food at home for the first time.
We all had to start somewhere. Canning can be work, but it can also be a lot of fun.
It’s a tradition that seems to be a fading art, but I think if you will try it, you’ll enjoy the process. There’s just something about being able to say “I made this myself.” And, you always know what’s going into each and every jar.