We’re “Saving Summer In A Jar” with this recipe for Blueberry Jam. Talk about easy to make…how about only 3 ingredients to make this quick and easy jam that is just bursting with flavor. Seriously, home canning and food preservation just doesn’t get much easier than this.

Blueberry Jam Recipe
This is another quick and easy recipe to use for getting started in your home food preservation projects. Seriously, all you really need are just Blueberries and Granulated Sugar. No pectin is needed, nothing else, zip..zap…zadda….just TWO ingredients. Of course, we did manage to complicate the recipe just a little by adding one more ingredient. It’s just our way it seems. I added a Tablespoon of freshly squeezed Lemon Juice to the batch. It’s not needed at all but, its like adding a little Lemon zest to your other recipes….it just knocks it all up a punch.
Blueberries are so good for your health. They come in numerous varieties from tart to sweet and are available from late May until late July or early August here in the South. The only real problem is that it’s just usually so hot when it’s time to pick them. We’ve seen some really hot days this year and have broken several records for the hottest days ever in our area. Ouch.
Growing up as a kid, we often would find Blueberries growing in the wild along the edge of a dirt road or out in the edge of the woods. They were so delicious to just stand there and pick them off the bushes and pop them into your mouth, eating them fresh off the bush. Then, you’d run home to grab a bucket and go pick some more for mama. You just knew that if you could gather enough of them, she would make a Blueberry Pie or Blueberry Cobbler.
It didn’t even matter…at the time…that you were probably going to be scratching little bumps for the next several days. Somehow, we always seemed to forget that little part from one summer to the next. Red-bugs…or chiggers, must love Blueberries as well. In the wild, you almost always got “eat up” with red-bugs when picking fresh Blueberries. They are very irritating and we’d scratch them for days trying to dig them…or whatever it was…out of our skin. It makes me itch just thinking about.
These days however, you can find numerous Blueberry Farms with neat rows of bushes that make picking a lot more easier…and….pretty much red-bug free. Gotta love that. I get mine at a place not too far from home called Blueberry Hill U-Pick. They are open from sun-up to sun-down Monday – Saturday and “after church” on Sundays from 1:00pm to 8:00pm. That way, you can pick them late in the evening when the day begins to cool down.
Blueberry Hill U-Pick has 9 different varieties of berries and, they had their first small crop of Strawberries this year. They also have a small retail center on-site that sells about anything Blueberry. From Jams to Jellies, Salsa to 100% Blueberry Juice…you’ll find it available during the growing season. I picked about 2 pints this past Friday and bought a few more to make this Blueberry Jam. I also picked up my first loaf of Blueberry Bread that is made fresh for the retail store. I couldn’t wait to spread on some of my homemade Blueberry Jam. Talk about something good for breakfast, toast up a slice of bread and then spread it all over with a heavy layer of fresh Blueberry Jam. You’ll start scratching right away……your head that is….wondering why you’ve waited so long to make your own Blueberry Jam. Ready to give it a try? Let’s Get Cooking!!!

Blueberry Jam Recipe: You’ll need these ingredients.
This recipe is adapted from the Ball Blue Book Guide To Preserving.
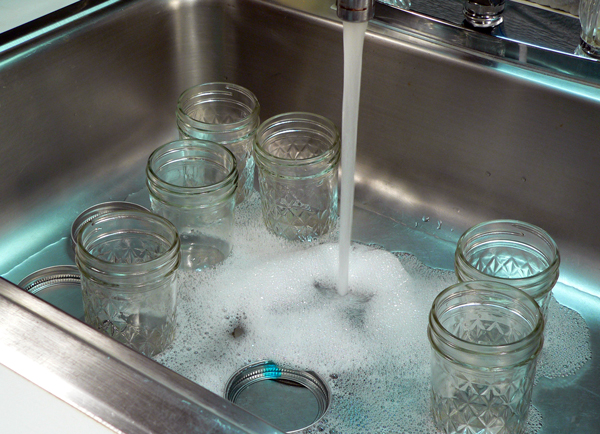
We’ll begin by washing our canning jars and the jar bands in some hot soapy water. You can reuse canning jars and the bands for the tops but, you can NOT reuse the lids. Just place the jars and bands in your sink and give them a good scrubbing to make sure there aren’t any leftover food particles inside. Also, be sure to check each jar…even new ones…for any cracks or chips. Carefully inspect the top of the jars to be sure they haven’t been chipped anywhere. After washing, rinse the jars and set them aside.

Setup your stove for the canning process. We’ll start at the back left burner. It’s hard to tell it from the photo but, that smaller sauce pan on the back left is where I place my bands and lids. The larger sauce pan on the back right burner is where I keep extra water heating to add to the canning pot as needed. The left FRONT burner is the pot where I’ll actually be cooking the blueberries for the jam..and…the large pot on the right FRONT burner is my enameled canning pot. It’s already about 3/4ths of the way filled with water that is heating up to sterilize the jars.

The lids and bands are placed in warm water in a smaller sauce pan. I keep this on my lowest heat setting for the stove top. The lids only need to warm up a bit and should never be placed in very hot or boiling water. I always set this up at the beginning and just leave them in water until I’m ready to place them on the filled jars.

As the water begins to heat up in the canner, carefully add the jars to the water. I just lay the jars on their sides as I place them into the water.

The jars must be totally submerged at all times through the sterilization process. Once the jars are under water, let the pot come on up to a boil and boil the jars for at least 15 minutes to sterilize them. Just leave them in the canner until you’re ready to begin filling them with the jam mixture. Keep a check on them throughout the next steps. Add more of the water you’re keeping heated on the back burner as it’s needed.
Prepare the Blueberries:
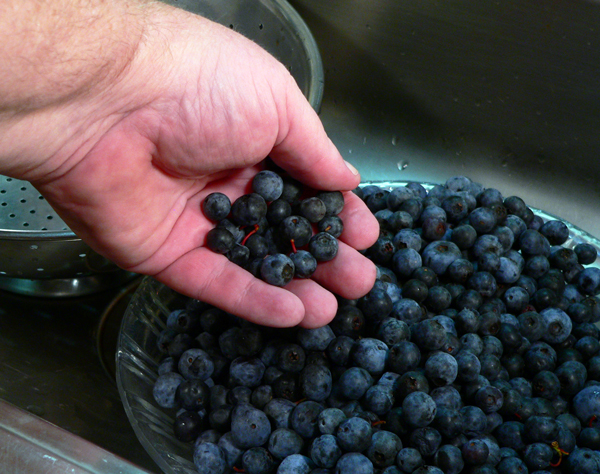
You’ll need to sort through your Blueberries and remove any bad berries, leaves, little stems or other objects. I’d suggest you stop up your sink, place a bowl and a colander inside and just sort through them a handful at a time. Or, you might place them on a cookie sheet that has a lip all around…otherwise….you’ll be playing pickup as berries roll off your counter top. These little things can be amazing once they get in motion. It may be weeks later before you find that one that got away. Trust me on that one.

Now, you’ll need to lightly wash them. I ran some cold water in the sink and just used my hands to swirl them around a bit. Maybe I just like to play in water….I don’t know. Of course, the fun part is collecting them and placing them back in the colander after you’ve washed them. Not only can they roll across the counter top and across the floor…they can swim AWAY…just as easily. Just have fun with them. They like it too I think..

Once I’d “caught” them all and had them in the colander….I rinsed them again under cool running water.

Transfer the drained berries over to the pot you’re planning to cook them in. Then, I used this potato masher to mash them up a bit. You could run them through a food processor for just a second or two if you wanted. It’s entirely up to you. You just want to break up the berries to let the juice out. A food processor will chop them up a little finer but, we want to retain some texture of the berries for our jam…so…don’t over process them.
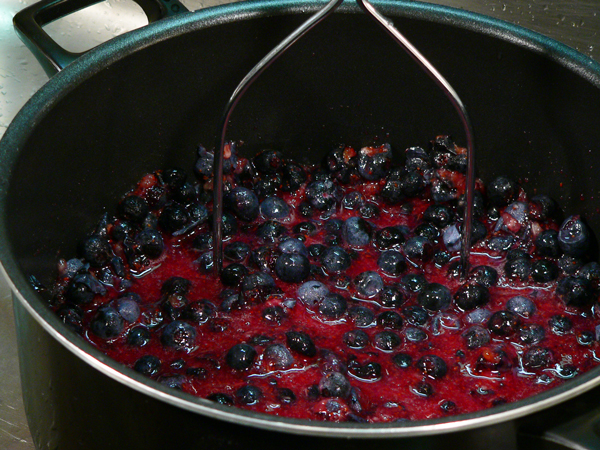
Mash them up to the desired consistency.

Next, you’ll want to measure your crushed berries. I scooped them out of the cooking pot into a 2 cup measuring cup and then poured them into another bowl. My 5 one pint baskets of Blueberries yielded 6 cups of crushed berries.

Pour the berries back into the pot you want to cook them in and place it over medium heat on your stove top.

To the 6 cups of crushed berries, I’m going to add 4 cups of sugar. You may need to adjust this a bit based on the final amount of crushed Blueberries you end up with. Jam needs to be made in small batches for best results.

WOW…that’s a lot of sugar in that pot. 4 cups of sugar completely covered my berries when I added it all in. But, just go ahead and add it all at one time. The berries beneath the sugar are already starting to heat up and the sugar has started to dissolve around the back edge as you can see.

While the sugar is starting to melt, squeeze the lemon. I’m adding 2 Tablespoons of fresh squeezed lemon juice to my recipe. While it’s NOT required, I think it just gives a little “punch” to the flavor of the berries.

Add the lemon juice to the sauce pan. Keep a close watch on the mixture and keep stirring down the sugar as it dissolves.

Prepare the area you’ll be using to fill the jars.
You just need a little space on your table or counter top to set everything up. Once the berries have cooked, you’ll want to move as quickly as possible to fill the jars, add the lids and bands and get them ready for the water bath process. The proper tools will also help make the job go a bit smoother. I’ve got my jar lifter on the left, then my funnel, bubble remover and magnetic lid lifter all ready to go. I also have found that placing my empty jar in a plate next to the cooked jam aides in clean up after I’m finished. After canning a few items, you’ll find your own little way of doing things that will work best for you. If you’re like me however, a little more SPACE in the kitchen would be very nice.

Once the sugar is fully dissolved, RAISE the heat on the sauce pan and cook them as quickly as possible. You’ll need to be able to stay with them pretty much all the time at this point. You’ll want to stir them often as they cook to prevent any sticking to the bottom and scorching. They would also boil over the edge if you let them. That’s one MESS you don’t want so, avoid the possibility of that ever happening and just stay with them from here on out.
We’re going to cook the syrup of the juice and sugar down to a “gel” point. The time needed to do this will vary based on the amount of juice that came out of your berries and the temperature at which you’re cooking. While a thermometer isn’t necessary, I clipped one onto the pot just to watch the process. They only got up to about 205º on the candy thermometer.

Here they are at a pretty good rolling boil, one that can’t be stirred down. You may need to adjust the heat back a bit to keep them from boiling over the top of the pan.
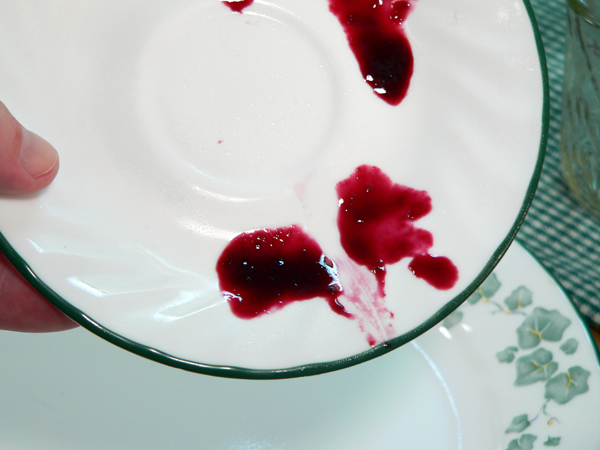
There are several ways to test the jam for proper “gel.” I hope to do a more in-depth article on that one day that you can use for reference. Here, I’m using a saucer that I had placed in the freezer of my refrigerator earlier so it could get cold. I’m constantly lifting juice up with my stirring spoon to watch how it drips off the spoon. As it begins to thicken, you can tell the difference and will learn to SEE that difference the more you make jams and jellies. The purpose of the cold saucer is to drip a few drops of the hot liquid onto the cold surface. Watch how it reacts after a few seconds as the jam begins to quickly cool down on the cold saucer. After about 20 seconds or so, pull your finger through the juice. If it leaves a trail and doesn’t quickly run back together….your jam is ready. If it does run back together, you need to continue to let it cook.
I highly suggest that you search out some more information on this process of the making of any jam and jellies for now so that you’ll have a better understanding of what to watch for.

When the jam has reached the “gel point,” remove the pan from the stove and get ready to fill the jars. I didn’t have any foam on my jam at this point. Any foam should be removed though if you see it. It will just make for a better presentation of the finished product. Just use a spoon to scoop it off and discard it.

Just before I removed the jam from the stove, I removed my jars from the boiling water in the canner. I set them on a clean towel and have them easily accessible for the filling process. Here, I’ve placed one jar on a plate next to the pot of jam and, I’ve inserted my funnel. Let’s fill some jars OK?

Stir the jam in the pot one more time. Then, use a ladle or large spoon and begin filling the jar. Careful….it’s HOT.

HEADSPACE: As we’ve mentioned in our other posts about canning, headspace is the amount of space between the top of the product IN the jar and the TOP of the jar. This neat little tool, that hard to see blue thing up there….has sections measured off to check the headspace. For the Blueberry Jam, the recommended amount of headspace is 1/4 of an inch. The headspace needed will vary from one canning project to the next so always check for the proper amount needed. I was a bit short on this one and just took a Tablespoon and added a bit more until I had the proper amount in the jar.

The other end of that notched tool can be used to remove any air bubbles from your jars. I prefer to use these wooden skewers for that task. You can buy them in packs of about 100 for just about a dollar. They make great testers for cakes and I find them also very well suited for removing bubbles from my jars. Just insert the skewer in the jar, run it around the edges and around through the middle a couple of times. Any bubbles at the bottom of the jar, will follow the skewer up to the top and burst. Work out as many bubbles as you can see. It’s one of the things the judges look for at fairs and competitions so I try a little harder to eliminate them than most folks do I’m sure.

You’ll need a damp cloth for this part. Use the cloth to carefully wipe around the top outside edges of the jars and the very top rim itself. Any jam on the outside could affect the proper seal. Any jam on the top rim could cause the rubber part of the lid to not make good contact and could also prevent a proper seal. Make sure it’s good and clean.

Use your magnetic wand to lift one of the lids out of the warm water. Gently shake off the water but, don’t try to wipe the lid clean. Just place the lid on top of the jar and center it into position on the jar rim.

Use the magnetic wand again to retrieve one of the jar bands. Gently lower it over the lid and make sure that it screws on without resistance. Just use a gentle finger tight pressure to secure the band. Don’t force it down tight. Repeat these steps until all the jars are filled.

When the jars are filled, place them in the rack of your canner. The racks are made so their handles will hang onto the top lip of the canner itself. Place it in this position first and fill the rack with your jars. Use the jar lifter to add them to the hot water and to keep them sitting up straight. Try not to let them fall over as you do this but…don’t fret if it does. It happens to me all the time it seems. I think it’s the quality of the rack I’m using. It only has one wire under the jar and they just don’t want to sit up correctly on that rack. I’ve looked for a new one locally but haven’t found it. Guess I’ll be ordering one off the Internet…about the time I’m finished needing one this season. Wait…wasn’t I going to do that LAST year? Yeah…I think I had intended to do so.
WATER BATH: The process we’re using to make our Blueberry Jam is called the Water Bath Method. It’s fine for most jams and jellies. Another process uses a Pressure Canner to can the jars under pressure. For safety reasons, some produce and meats being canned require the Pressure Canner Method. We could go into a lot more detail about it but, I suggest you seek more info from your local Cooperative Extension Service or your local library…or hey…maybe here on the Internet using some reliable sources.

Carefully lift the handles and the rack and lower the jars into the canner. The jars need to be covered by about 2 inches of water at all times. That’s why I keep another pot of water heating on the back burner. It only takes a few seconds to get back up to a rolling boil after adding more hot water. I just keep filling up the smaller pot as I use up the hot water. It boils away kind of quickly so keep a watch on it.

Once the water is back to a rolling boil, place the lid on the canner and start counting the time needed to process the jam.
This time will vary based on the Altitude of where you live. I need 15 minutes for the water bath process and this jam. You’ll need to adjust accordingly based on your location.

After the correct amount of time, remove the lid. Use some oven mitts or tongs and CAREFULLY lift the rack up and hook the handles back onto the top lip of the canner. It’s recommended that you let the jars REST here for about 5 minutes before removing them. You may even hear one or two of them PING at this point as they seal.

Using the jar lifter again, remove the jars from the canner. Set the jars on a towel spread over your counter top and in a location away from drafts. You certainly wouldn’t want to set one of those hot jars on your bare Granite or Marble counter top. The jar might burst open if you did so, make sure you have a towel handy to set them on.
NOTE: The jars need to remain undisturbed in this location for 24 hours. Do not pick them up or move them if at all possible during this time. And, DO NOT press down on the top of the jar to see if it has sealed until 24 hours have passed. When the time is up, you can press the middle top portion of the jar to make sure it’s properly sealed. The top should already be down and not make any movement or noise when you press the center of the lid. If it springs back up, the jar didn’t seal. The product inside is still good but the jar will need to be refrigerated and used first.
Properly sealed jars may be wiped clean and moved to a dark cool area for storage of up to 12 months or possibly longer.

After I started my adventure into home food preservation, I quickly realized that any time someone shared a jar of their labors…they must really think a good deal about me. It’s fun and rewarding to make your own products like this…not to mention that you know exactly what goes INSIDE each jar. Still, it does take some time and effort to complete the process so, next time someone hands you a jar from their home pantry….give them a BIG HUG and say Thank You Very Much.
You can “Save Summer In A Jar” by making your own homemade Blueberry Jam. These little jars make great gifts for any time of the year. Decorate them with cloth or paper jar toppers, labels, etc. and show someone just how much you appreciate them.
Enjoy!!!