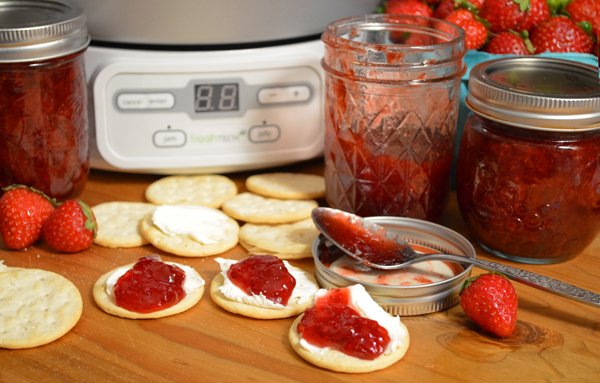
Follow, step-by-step, photo illustrated instructions for making Strawberry Jam with the Ball FreshTECH Automatic Jam & Jelly Maker. We love to save summer in a jar, and Strawberries are one of our favorites. We’ll show you just how easy it is to make fresh Strawberry Jam with the Ball Automatic Jam & Jelly Maker in less than 30 minutes, then show you how to water bath process the jars so you can enjoy homemade jam, all year long. Printable recipe included.
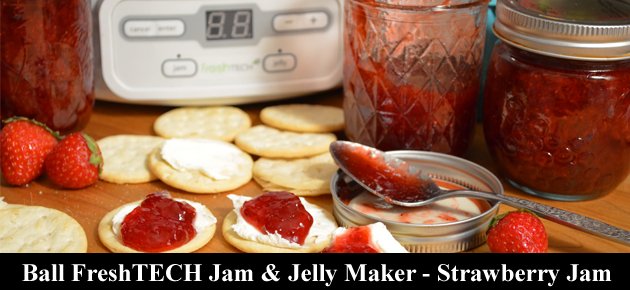
Ball FreshTECH Strawberry Jam Recipe:
Strawberry season is quickly coming to an end here in my neck of the woods. We’ve had a pretty good crop of berries around where I live, and all of the local farms have already ended their season. I did manage to pick up one more quart of berries, grown within the state, on a recent trip down to Kinston, NC this past Friday.
Sadly, those berries just didn’t taste very sweet at all. My older brother and I have purchased berries from several areas across the state during our travels, and we keep coming up with the same thoughts. Strawberries just don’t seem to have the flavor and sweetness that we remember from years past. Of course, it’s not just Strawberries, we’ve experienced it with other produce items and fruits as well. Perhaps our taste buds are just changing.
I’ll miss the berries though. Ever since I got hooked on canning, I’ve eagerly looked forward to Spring and the return of fresh local Strawberries. I’d eagerly await their arrival, and looked forward to getting out the canning pot and supplies and heating up the kitchen.
If you follow Taste of Southern on a regular basis, you’ll already know about the Ball FreshTECH Automatic Jam & Jelly Maker. I was honored to be asked by the Ball Corporation and Jarden Home Brands to test out this neat little machine, and to write a review about it here on Taste of Southern. They also provided an extra unit that we used in a Giveaway along with some of their Heritage Collection jars, and bands and lids.
I wrote a Review about it a few weeks back when I took the unit over to our local North Carolina Cooperative Extension Office. Along with our local Director of Extension Services, we made a couple of batches of Strawberry Jam to try out the Jam & Jelly Maker. I left it at the office and a couple of the other agents tried it out as well.
A few days later, I went to a local farm and picked up about 10 pounds of Strawberries. I wanted to give this unit a good test, and ended up making the equivalent of 19 half pint jars of homemade Strawberry Jam. That’s what today’s recipe is all about.
I’m using the Strawberry Jam recipe that is included in the book that came with the maker. All of their recipes, for use with this unit, are posted on their website at this link: Jam & Jelly Maker Recipes. Take a look around and see what you would like to make with one of these in your own kitchen.
The really nice thing about the Jam & Jelly Maker, is that it stirs the berries for you while it cooks them down to perfection. No more standing over a hot stove, stirring a pot, waiting for your jam to get to the proper consistency. And, from what I’ve experienced thus far, no more OVER cooking your jams and having something so thick and gummy you can hardly eat it. Trust me, I’ve done that a time or two myself. It’s not any fun to find your batch of jam over cooked. I haven’t that happen with the jam’s I’ve made with this little unit.
So, if you’re ready to learn more about the Jam & Jelly Maker, or if you’re just wondering how to make some homemade Strawberry Jam of your own, then let’s get in the kitchen and start washing up those berries.
If you’d like to see our recipe for making Strawberry Jam the “old fashioned way,” just click HERE for that recipe. We do stand over the stove and stir that one, along with steps on how to water bath process the finished jams.
Either way, let’s get in the kitchen, and Let’s Get Cooking!
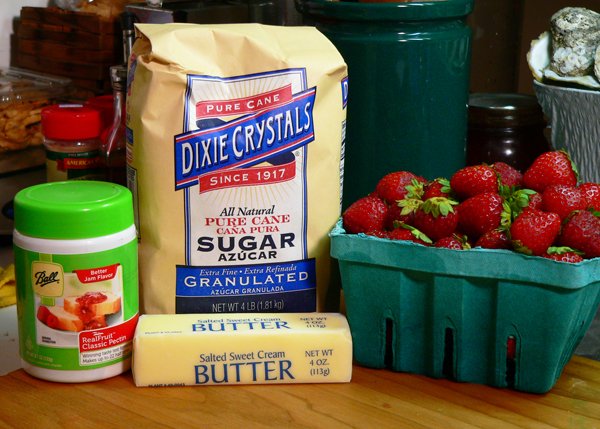
Ball FreshTECH Jam & Jelly Maker Strawberry Jam Recipe, you’ll need these ingredients.
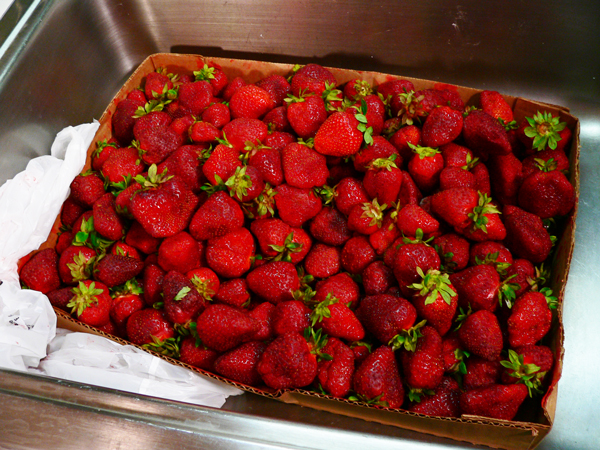
I purchased this flat of “jam berries” from one of our local farms. Their typical bucket of fresh berries were selling for 12.00 per bucket, but I saw a sign saying they had “jam berries” for $7.50 for a 10lb flat. Jam berries are the “seconds” of the berries, as they may not be as pretty as the “selects” they have placed on the counter for sale, or they may just be a bit more ripe and need to be used right away. Always one to seek a bargain, I opted for the flat without thinking about how much jam these berries would actually make.
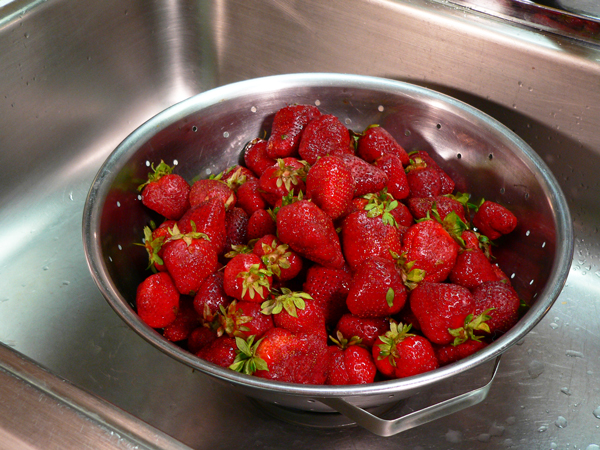
I placed some of the berries in a colander so I could wash them. With so many berries on hand, I had to work with them in batches.
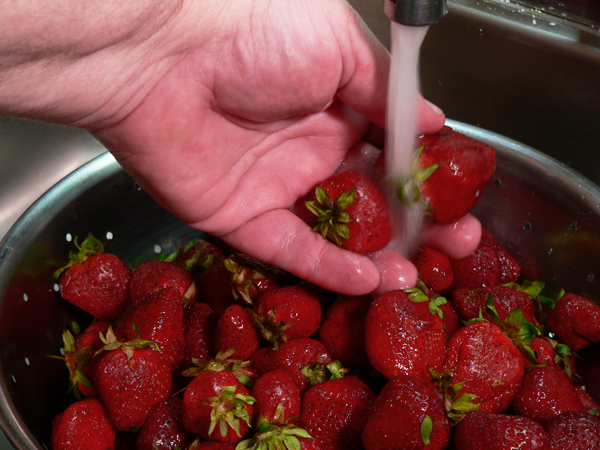
Picking up a couple at a time, I rinsed the berries under cold running water. You need to wash them before you remove the tops. If you take off the tops first, then wash them, the berries will absorb more water. Just give them a quick rinse to remove any dirt or attached debris.
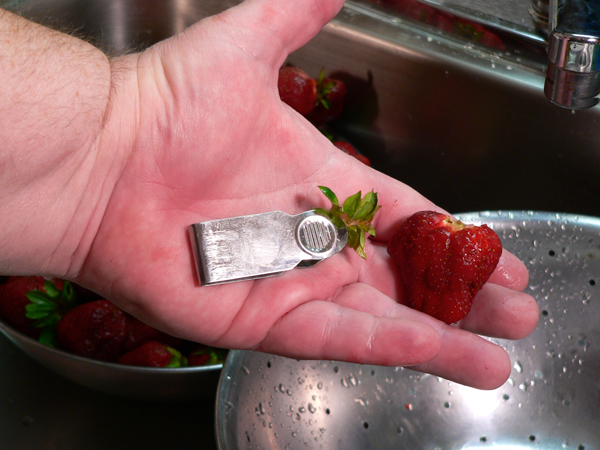
Next, remove the tops. You can do this with a paring knife, or you can use one of the several types of specialty tools made for just this purpose. I’m holding the tool that I used for this batch of strawberries. It’s a neat little older tool that was actually sent to me by one of the readers of Taste of Southern. She had seen another post where I mentioned that I didn’t have anything but a paring knife to remove the tops, and asked me if she could send me one. Thank you Pat, it worked really great and I’ll always treasure it.
This tool sort of pinches the hulls out of the berries, but as mentioned, you can easily cut them out with a paring knife.

I only found a few bad berries in the whole flat that I purchased. Any mushy, or bad berries, along with the tops are discarded.
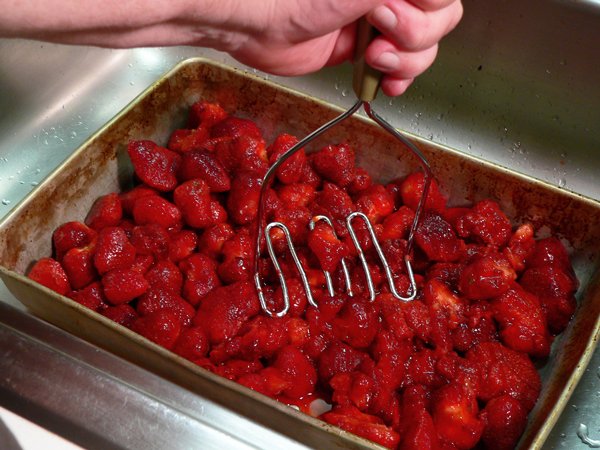
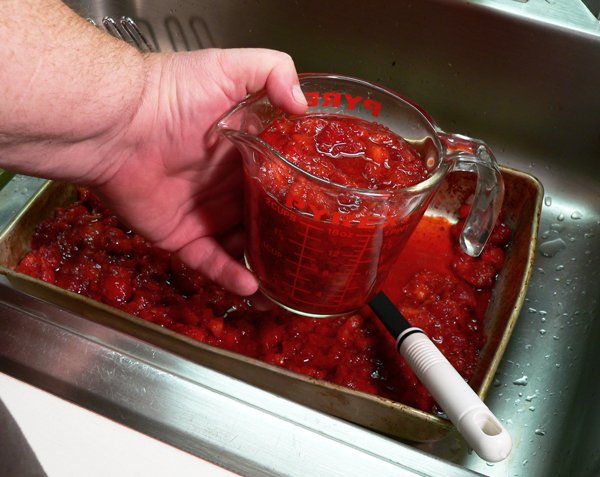
This is just the first batch of berries that I washed and removed the tops from. I placed them in a pan and used a potato masher to mash them up into smaller pieces.

The potato masher helps extract some juice from the berries. Break them up leaving some large chunks. The berries will cook down into smaller pieces once they get hot, so you’ll need to leave some larger chunks in this step. Otherwise, you’ll just have mushy type jam. I like to scoop out a bigger piece of berry sometimes when I’m spreading the jam on my toast.
It will be good to go ahead and measure out everything you’ll need to complete the recipe. Having everything ready once you start the cooking process, just makes the whole adventure go much easier.
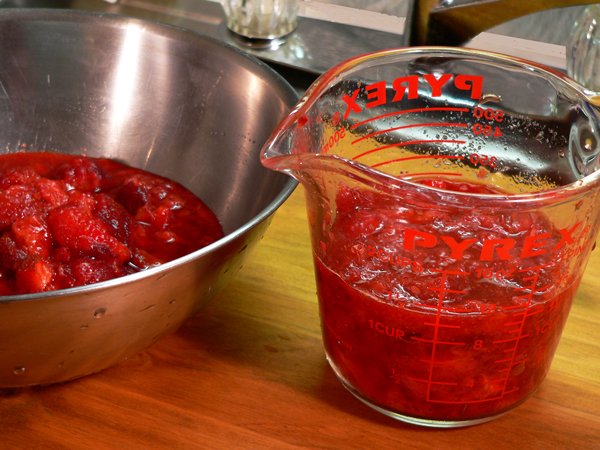
Jams and Jellies need to be made in small batches, and you MUST follow the amounts called for in the particular recipe. Adding more berries than called for can keep the jam or jelly from setting, or gelling properly. Measure carefully.

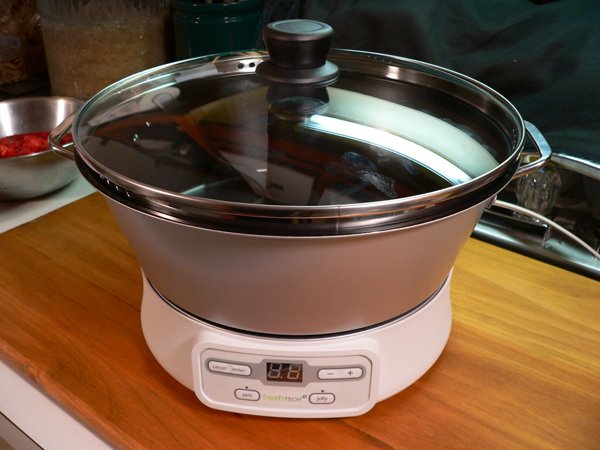
With all the ingredients properly prepared and measured out, lets go ahead and setup the Ball FreshTECH Automatic Jam & Jelly Maker. This is the BASE of the unit which contains the control panel and the heating element.

The POT of the unit sits on top of the BASE, and locks into place with just a slight twist to be sure it’s secured. The handles are on the sides with the control panel in front once everything is aligned properly. I’ve mentioned it before, but the POT looks like a large pound cake pan to me.
Notice the post rising up in the center, that’s where we attach the STIRRER.
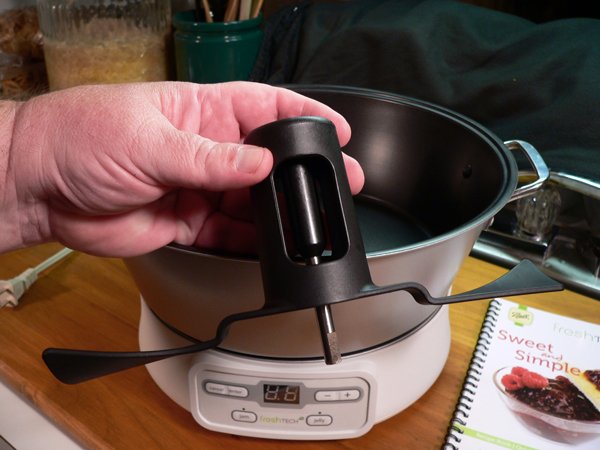
This is the STIRRER unit for the Jam & Jelly Maker. As mentioned above, it just slips down on top of the shaft in the POT. It also locks into place with just a slight twist.
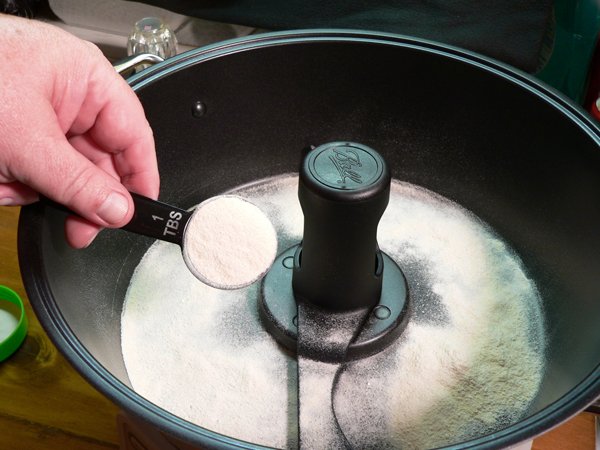
Once the STIRRER is locked into position, we can go ahead and add the proper amount of Pectin. Sprinkle it evenly around the bottom of the POT. This Strawberry Jam recipe calls for Three Tablespoons of Pectin.
Now, spread the 2-2/3 cups of crushed Strawberries evenly over the pectin.

Add the 1/2 teaspoon of Butter. This will help reduce foaming as the berries cook. Please don’t skip this part.
You can see in the REVIEW that I did, when I first tested the Jam & Jelly Maker unit, that leaving out the butter can make a big mess once the POT starts to foam and boil over. I know some folks will say that adding butter isn’t necessary, but with this particular unit and way of making it, I highly suggest you stick to the recipe. You can thank me later. Smile.
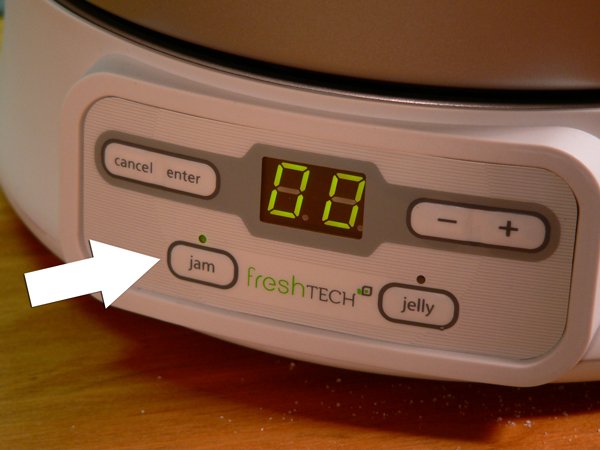
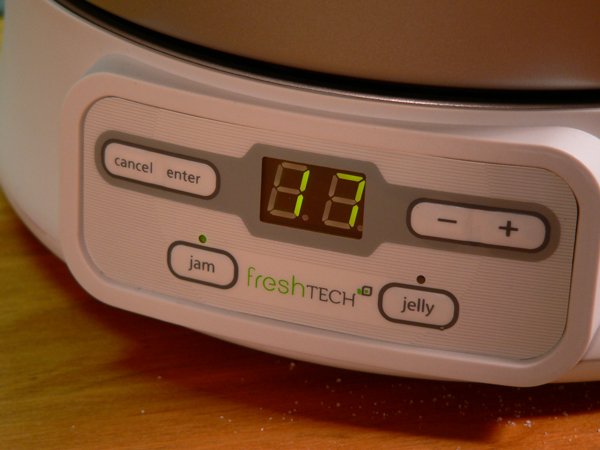
Let’s have some fun. Just press the JAM button on the control panel located on the front of the BASE unit.
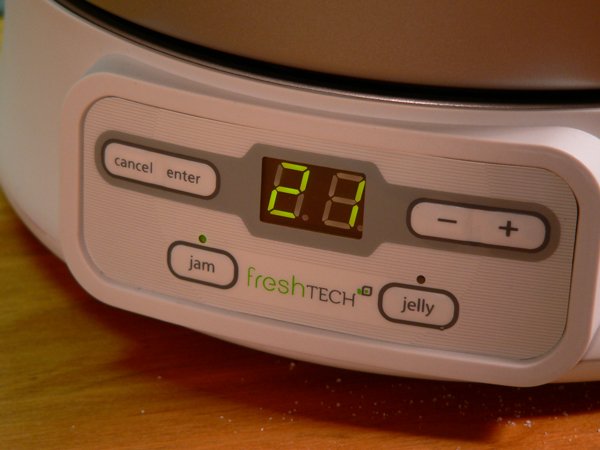
The unit will automatically default to 21 minutes. This is the predetermined amount of time that it will take for this recipe to cook using the Automatic Jam & Jelly Maker.
Although its not used in this recipe, the unit does have the ability to add or remove minutes from the cooking time. That’s what the PLUS and the MINUS buttons are for in the upper right corner.
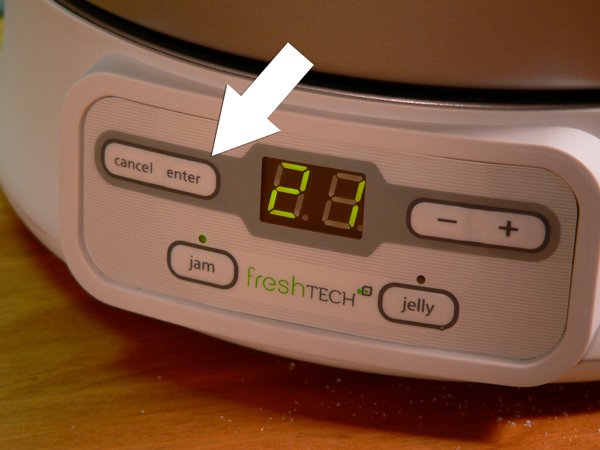
Once you press the JAM button, and the unit defaults to 21 minutes, it’s time to start cooking the berries. Just press ENTER.

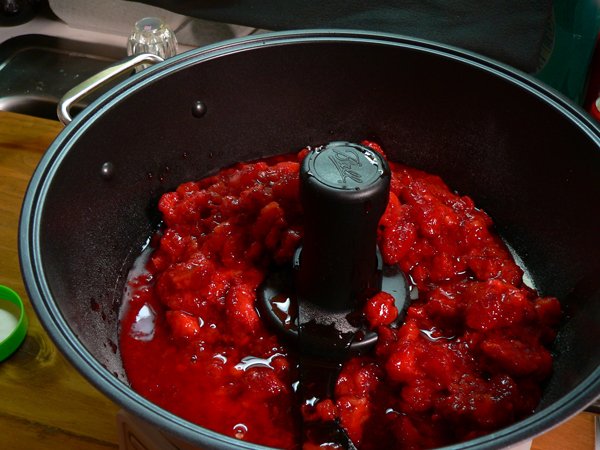
Once you press ENTER, the STIRRER begins to move and the unit starts to heat up. You can see some “motion” in this photo, but it’s not turning as fast as it might appear to be. It just slowly turns, keeping the berries in motion through the entire cooking process. This is the “sweet part,” that saves you from having to stand over a hot stove waiting for your jams or jellies to cook down.
THIS is what the Ball FreshTECH Jam & Jelly Maker is all about.
FOUR MINUTES after you press the ENTER button, the unit will BEEP you that it’s ready for the next step. It will make 4 short beeping sounds to indicate that it’s now time to add the Sugar.
The BEEPS aren’t as loud as I think they should be. Thankfully, I still have pretty good hearing, but I could see where someone with a slight hearing problem could totally miss hearing the beeps. Ball advises you to stay close and listen closely for those beeps.
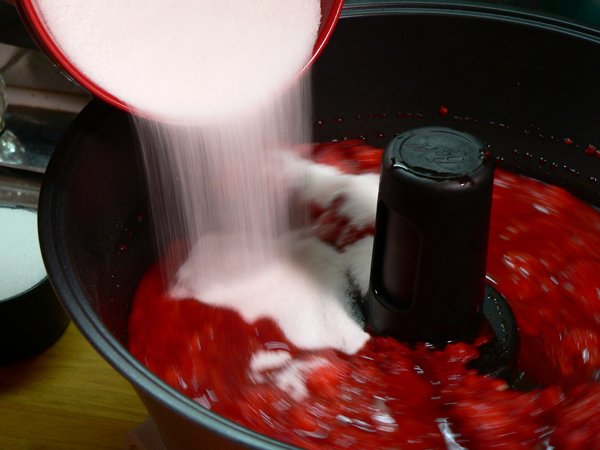
When the unit BEEPS, it’s time to add the Sugar. Gradually add the 3-1/3 cups of sugar into the POT as it continues to stir. The POT is pretty hot at this point, and the heat and juice from the berries will dissolve the sugar pretty quickly. Add all the sugar into the POT.
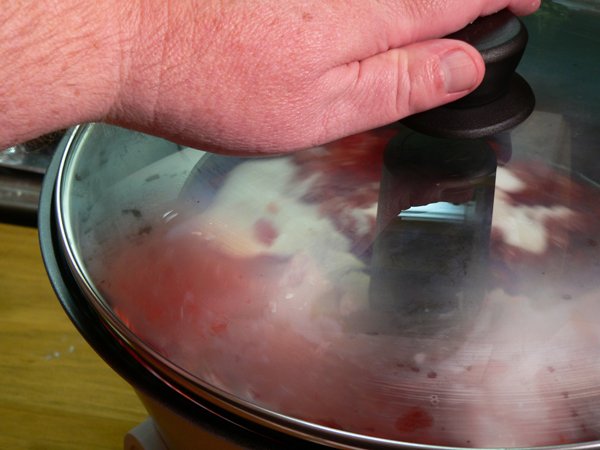
With the sugar all in, place the glass LID on top of the POT. If you’re like me, you’ll probably think the rim of the lid needs to go down inside the POT. It doesn’t though. It sits up a bit on top of the POT. Just make sure you’ve got it centered on the POT and you’ll be good to go.
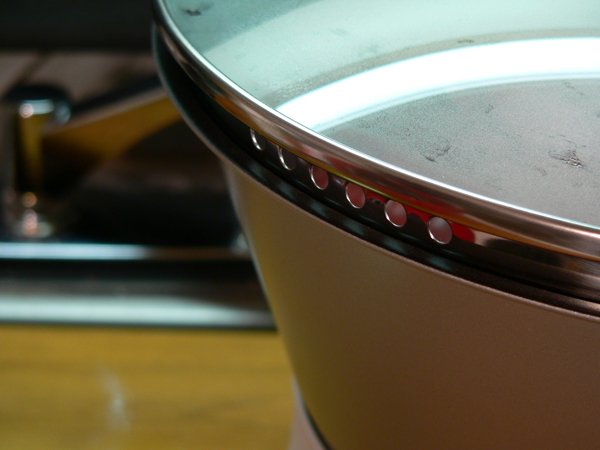
The LID has these vent holes in a couple of places around the side. I kept thinking the LID should fit down in the POT, but it doesn’t, so the vent holes will stay open and allow steam to vent out while the berries are being stirred and cooked to proper temperature.
This is what the fully assembled unit looks like. I failed to snap a photo of it once the berries started cooking, which is why you can’t actually see any Strawberries inside the pot in this photo.
Just make sure the unit is in a fairly clear and open space while you’re using it. Give it room to do it’s thing as it stirs and does the hard work for you.
This is the part where you get to go sit down, instead of standing over that hot stove, and having to constantly stir the pot to keep your jam from burning and sticking. Ball again recommends that you stay close enough that you can hear the BEEPS once the cooking has ended. I must admit though, I pretty much just watched the unit the whole time it was cooking, as it was just fun to do.

BEEP. BEEP. BEEP. BEEP. When the timer reaches the end of the cycle, the unit will sound four more BEEPS. Your jam is now fully cooked to perfection.
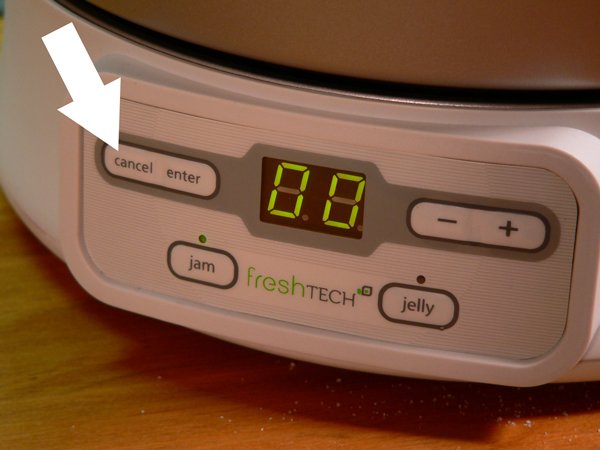
Press the CANCEL button and UNPLUG the unit once you hear those four beeps.
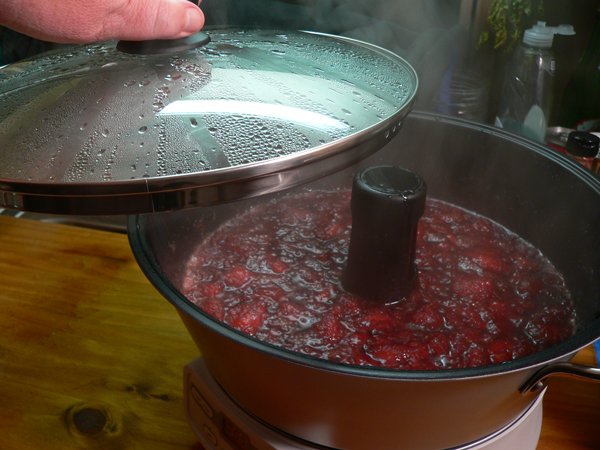
Immediately remove the LID from the POT. Be careful, it has steam inside so tilt the lid away from you as you lift it up. A pot holder comes in real handy for this.
Use that pot holder again to remove the STIRRER from the cooked berries. It too is pretty hot, so handle it carefully and set it aside for the time being.
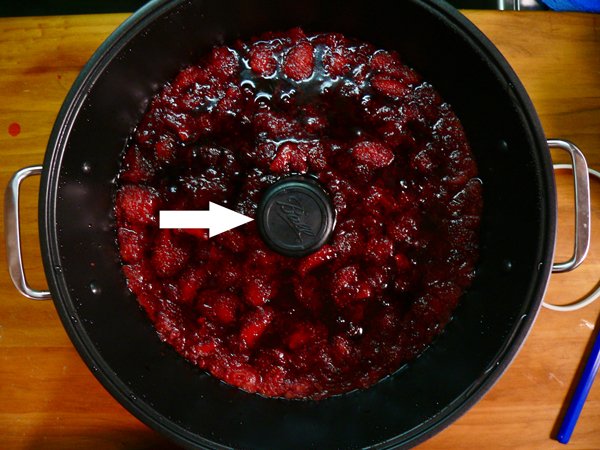
I have YET to do this step before starting to ladle jam into my jars. I forget it each and every time. Try not to be like me.
At this point, you could ladle the jam into containers and let it cool. You could use it right away, or freeze it for use later, depending on your needs and plans for the jam. Once it started to cool, the jam started to gel right away. I planned to jar this up and can it using the water bath canning process. Let’s take a look at how that goes.
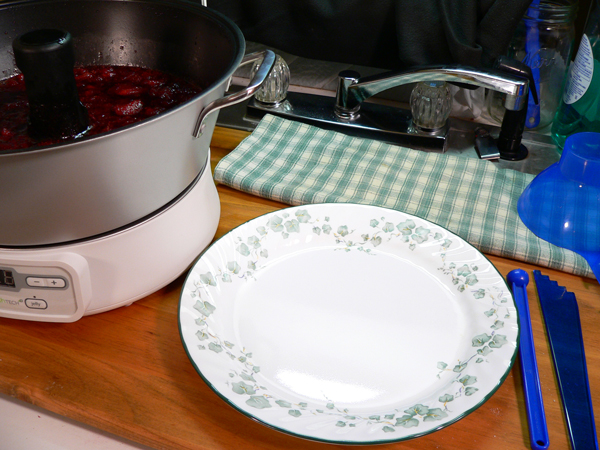
Here, I’ve setup my canning area to fill the jars. I place a plate beside the cooked jam, so I can sit my jars on the plate. It just helps make cleanup a bit easier for me. I’ve got a folded towel for my hot jars, and the needed tools ready to get started.
I’m leaving out just a few photos in the following process. You can also read my other recipe post on making Strawberry Jam and canning it the “old fashioned way,” by clicking HERE. It will give you a little more detail on getting setup for the water bath process, or you can follow THAT recipe to make homemade Strawberry Jam without the Jam & Jelly Maker.
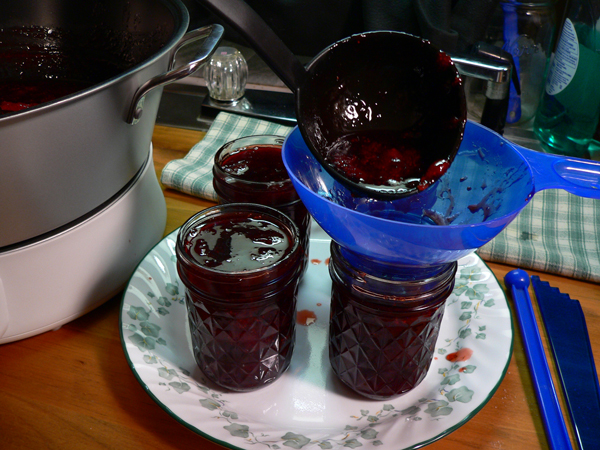
Here, I’m filling the jars with the Jam I’ve just prepared in the Jam & Jelly Maker. This unit only makes small batches of jam or jelly at one time. You will normally get 4 half pints, or 2 pints of jam when using the Ball FreshTECH Jam & Jelly Maker. Some folks find this is just too small of a batch to work with at one time, while others think its just perfect. It really depends on your needs I guess. Either way, it’s a good way to make both jams and jellies, and it’s always great to “Save Summer In A Jar.”
Using a funnel, I ladled the hot jam into my prepared jars.
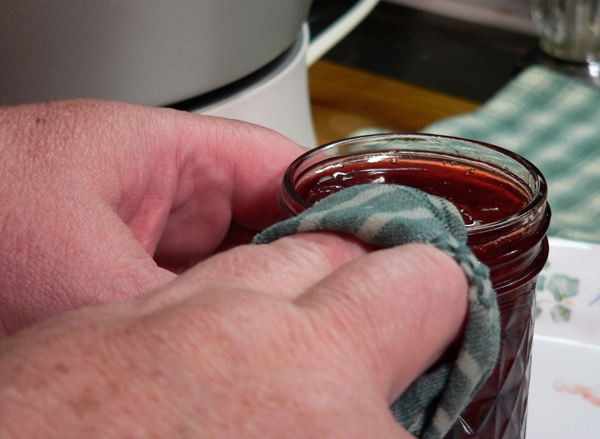
You’ll also need to wipe the top and rims of the jars with a damp cloth. You MUST make sure the top of the jar is clean and free from any food particles so the lid will fit securely on the top and seal properly.
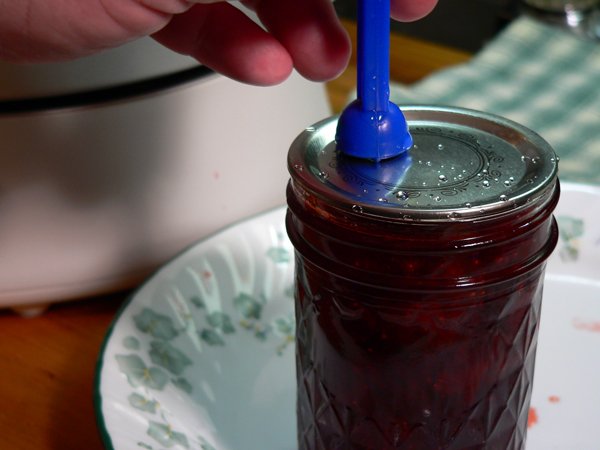
You must ALWAYS use a NEW lid when canning. Center the lid on top of the jar.
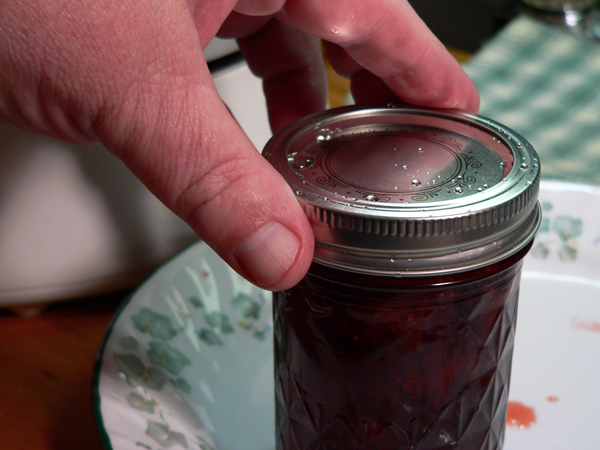
Jar BANDS on the other hand, can be used over and over many times. Place the band over the top of the jar, and snug it down just “finger tight.” Don’t tighten it with all your might, you just need to screw it down snug to the lid.
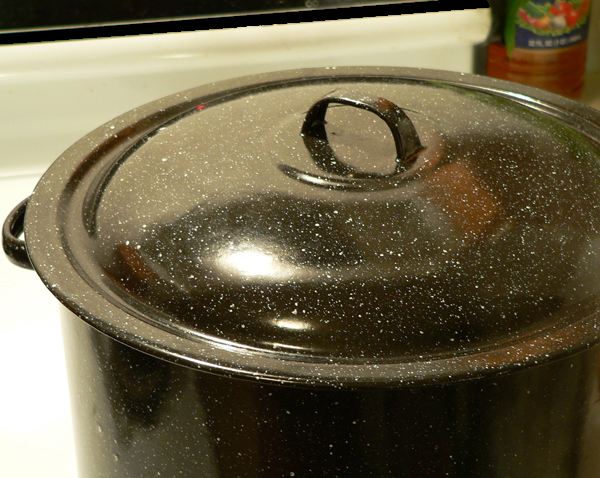
Filled jars are then placed inside a water bath canning pot and processed according to the proper time for your altitude.
We’re just covering some of the basic steps to home canning in this recipe, but you can also check out many of my other recipes under Canning and Freezing here on Taste of Southern for a bit more detailed look at the entire process. We give some pretty detailed photo’s of how it’s done, but you should consult some of the Department of Agriculture or Cooperative Extension Service sites for more information and classes on home food preservation if you’re just beginning. Here’s a good place to start: National Center for Home Food Preservation

Enjoy!
I ended up making four batches of Strawberry Jam on this particular Saturday morning. As I mentioned above, I just wasn’t thinking about how many berries I was purchasing. Still, I ended up with a good number of both pint and half-pint jars of Strawberry Jam. I think I’ve just completed a lot of my Christmas list already.
Homemade Jams and Jellies are always great gifts to share with family and friends. You can take advantage of seasonal fruits as they arrive throughout the year, or you can also use many types of frozen fruits and juices to make jams and jellies.
I’m really enjoying using my Ball FreshTECH Jam & Jelly Maker, and can’t wait to share even more recipes with it in the months ahead.
If you’d like more information, and want to check out more recipes that are exclusive to this unit, visit the Ball Fresh Preserving Store and see what all you can make with this unit.
As a reminder, Ball, and Jarden Home Brands did provide me with one of these units to try out, test, and review here on Taste of Southern. They are the first big company that I’ve had the honor to work with, and that’s been a big step for Taste of Southern. I really appreciate their willingness to provide me with one of the units to keep, and another that we gave away here on our site.
Even though they provided these units, I have not received any monies from them for my reviews, and all the information I’ve given about my work with it has been totally mine. If you decide to try one, I really think you’ll enjoy it and use it often. Tell them Taste of Southern sent you.


